Apparaat – Ventilator
Hardware
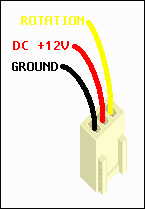
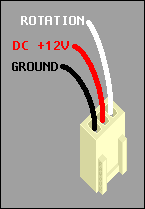
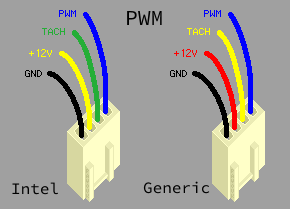
Er zijn verschillende soorten fan aansluitingen 2, 3 en zelfs 4-aderig:
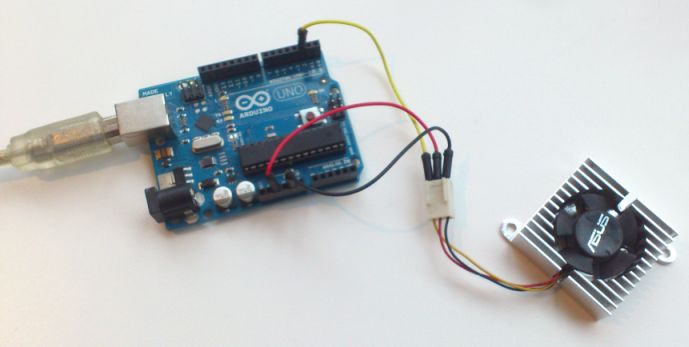
Het volgende voorbeeld laat zien hoe je een het toerental van een ventilator meet dmv de “hall” sensor bij een 3-aderige ventilator.
Sluit de RPM draad (meestal is dit de gele) van je fan aan op je Arduino op Pin 2, open nu de seriele monitor (@9600 baud), bij elke 5 omwentelingen (aanpasbaar in het script) wordt het toerental aangegeven.
Pinout
Pinout 3-aderige ventilator:
Pinout van een standaard 4-aderige ventilator:
DELL ventilator en aansluiting:
| Dell MB Pin Number |
Function | Dell wire colour | Std Fan Pin Number |
Std Fan wire colour | Description |
|---|---|---|---|---|---|
| 1 | Sens (TACH) | White/Yellow | 3 | Green | Sens (TACH) |
| 2 | +12v | Red | 2 | Yellow | +12v |
| 3 | Gnd | Black | 1 | Black | Gnd |
| 4 | PWM | Blue | 4 | Blue | PWM |
| 5 | Key | unused |
Arduino
3-aderige ventilator
Het volgende voorbeeld laat zien hoe je een het toerental van een fan meet dmv de “hall” sensor en kan instellen met PWM bij een 4-aderige ventilator.
Sluit de RPM draad (meestal is dit de gele) van je fan aan op je Arduino op Pin 2, open nu de seriele monitor (@9600 baud), bij elke 5 omwentelingen (aanpasbaar in het script) wordt het toerental aangegeven.
Script om RPM uit te lezen
|
1 2 3 4 5 6 7 8 9 10 11 12 13 14 15 16 17 18 19 20 21 22 23 24 25 26 27 28 29 30 31 32 33 34 35 36 |
volatile byte rpmcount; int ledPin = 13; unsigned int rpm; unsigned long timeold; void setup() { Serial.begin(9600); digitalWrite(2, HIGH); pinMode(ledPin, OUTPUT); attachInterrupt(0, rpm_fun, RISING); rpmcount = 0; rpm = 0; timeold = 0; } void loop() { if (rpmcount >= 5) { //Update RPM every 5 counts, increase this for better RPM resolution, //decrease for faster update rpm = 30*1000/(millis() - timeold)*rpmcount; timeold = millis(); rpmcount = 0; Serial.println(rpm,DEC); } } void rpm_fun() { rpmcount++; //Each rotation, this interrupt function is run twice digitalWrite(ledPin, HIGH); delay(10); digitalWrite(ledPin, LOW); } |
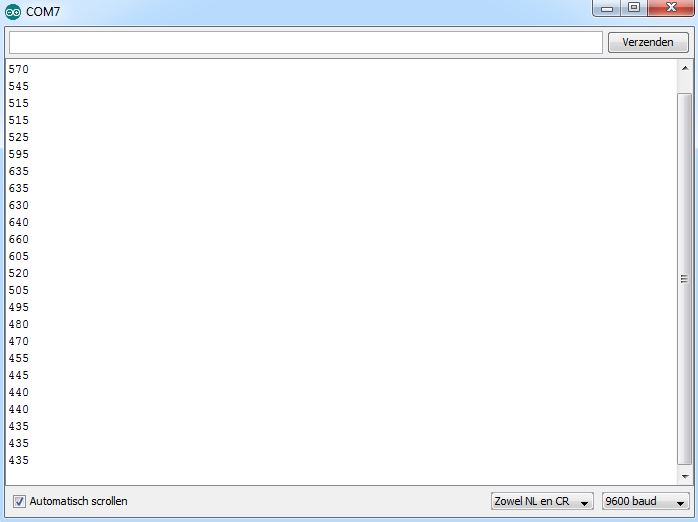
Resultaat:
4-aderige ventilator
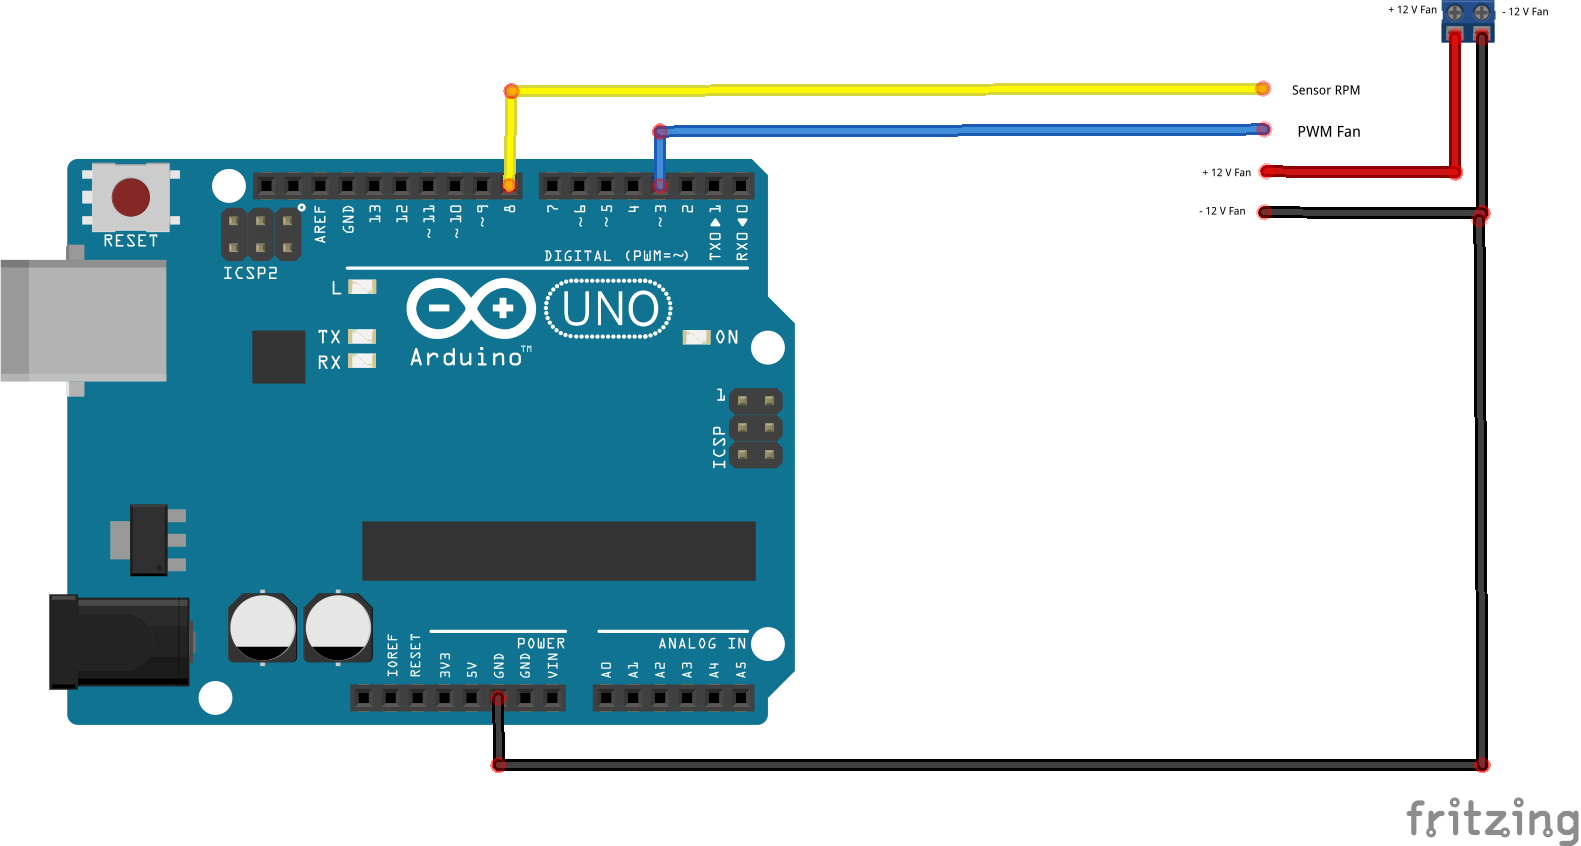
Bij een 4-aderige ventilator wordt de voeding vanuit een externe bron geleverd (niet via de microcontroller) en de massa met de arduino verbonden, sluit het volgende aan volgens schema:
Script met PWM control en uitlezen van PWM/Toerental
Ps. de PWM is in te stellen met speed = 0 t/m 255:
|
1 2 3 4 5 6 7 8 9 10 11 12 13 14 15 16 17 18 19 20 21 22 23 24 25 26 27 28 29 30 31 32 33 |
float fanSpeed = 0; // A0 op de Arduino / Loper van de Potmeter float fanPWM = 3; // Pin D3 op de Arduino. / Instellen van toerental 0/255 int fanSensor = 8; // Pin D8 op de Arduino / Uitlezen van toerental 0/1023 int Puls = 4; // Hier het aantal pulsen per omwenteling van de fan. Te vinden in specs van de fan. int Speed = 50; // Var die nodig is om de snelheid in te stellen van 0 tot 255 unsigned long SensorPulsTijd; void setup() { Serial.begin(9600); pinMode(fanSensor, INPUT); pinMode(fanSpeed, INPUT); digitalWrite(fanSensor, HIGH); } void loop() { analogWrite(3, Speed); // RPM snelheid instellen SensorPulsTijd = pulseIn(fanSensor, LOW); double frequency = 1000000/SensorPulsTijd; // 1000000 microsec / SensorPulsTijd = aantal microsec per puls. Serial.print("Pulsduur in microsec. = "); Serial.println(SensorPulsTijd); Serial.print("Rotatietijd in microsec. = "); Serial.println(SensorPulsTijd*Puls); Serial.print("Frequentie in Herz = "); Serial.println(frequency/Puls, 0); Serial.print("Toerental per Minuut = "); Serial.println(frequency/Puls*60); Serial.println(); Serial.println(); delay(1000); } |
Script met PWM control met potmeter en uitlezen van PWM/Toerental
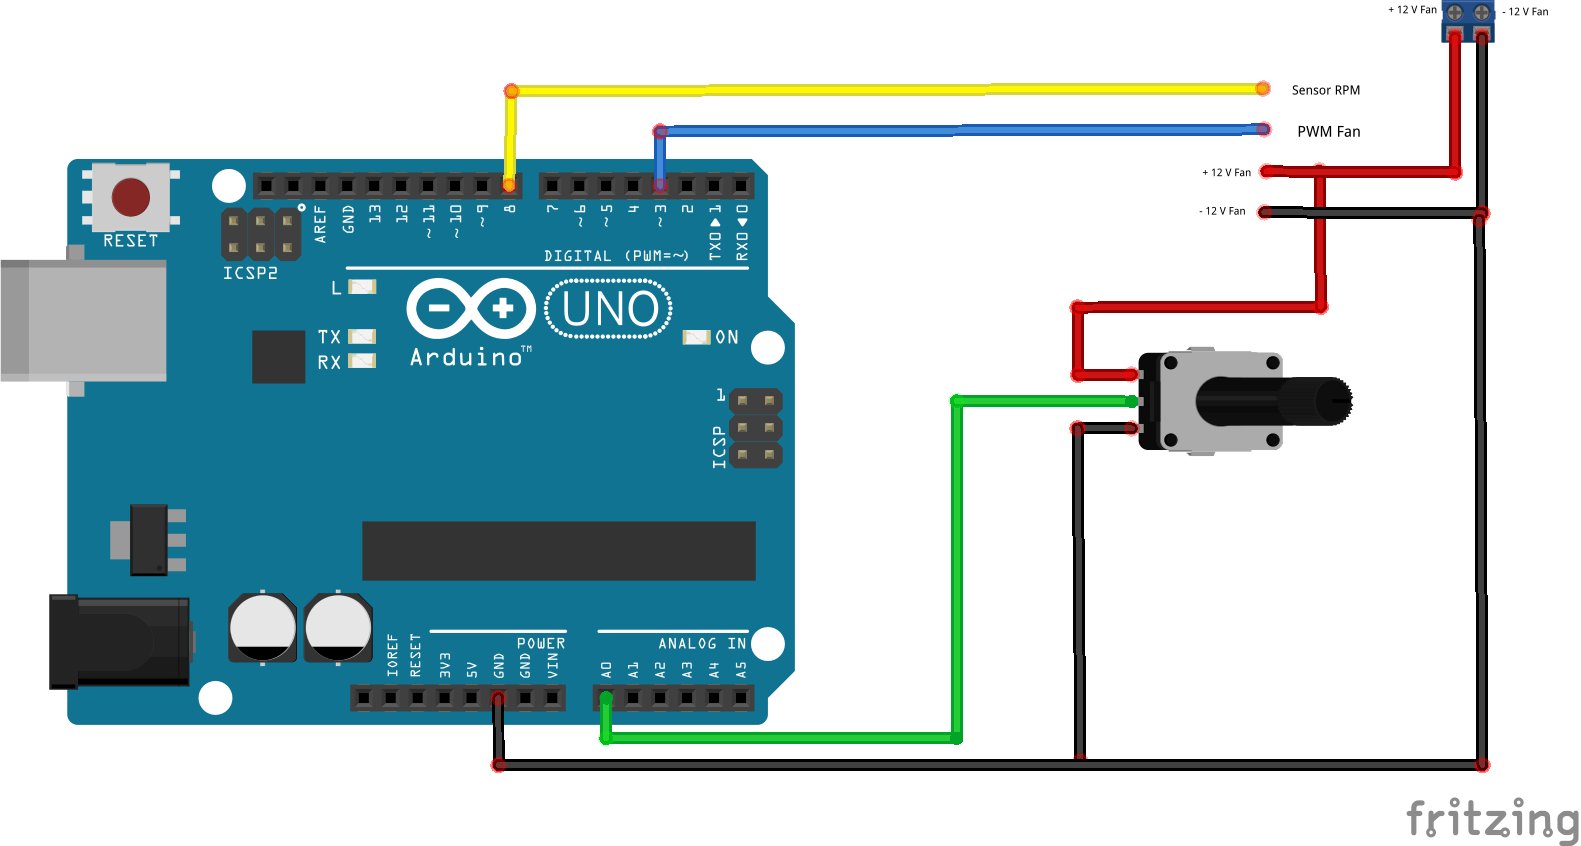
Hier wordt een potmeter gebruikt om het toerental in te stellen, sluit het volgende aan volgens schema:
|
1 2 3 4 5 6 7 8 9 10 11 12 13 14 15 16 17 18 19 20 21 22 23 24 25 26 27 28 29 30 31 32 33 34 35 |
float fanSpeed = 0; // A0 op de Arduino / Loper van de Potmeter float fanPWM = 3; // Pin D3 op de Arduino. / Instellen van toerental 0/255 int fanSensor = 8; // Pin D8 op de Arduino / Uitlezen van toerental 0/1023 int Puls = 4; // Hier het aantal pulsen per omwenteling van de fan. Te vinden in specs van de fan. int Speed = 0; // Var die nodig is om de snelheid in te stellen. unsigned long SensorPulsTijd; void setup() { Serial.begin(9600); pinMode(fanSensor, INPUT); pinMode(fanSpeed, INPUT); digitalWrite(fanSensor,HIGH); } void loop() { Speed = analogRead(fanSpeed)/4; // analogRead waarde = 0-1023 en analogWrite waarde = 0-255 dus moeten we eerst door 4 delen om op de goede waarde te komen. analogWrite(3, Speed); // analogWrite waarde = van 0 tot 255 SensorPulsTijd = pulseIn(fanSensor, LOW); double frequency = 1000000/SensorPulsTijd; // 1000000 microsec / SensorPulsTijd = aantal microsec per puls. Serial.print("Pulsduur in microsec. = "); Serial.println(SensorPulsTijd); Serial.print("Rotatietijd in microsec. = "); Serial.println(SensorPulsTijd*Puls); Serial.print("Frequentie in Herz = "); Serial.println(frequency/Puls, 0); Serial.print("Toerental per Minuut = "); Serial.println(frequency/Puls*60); Serial.println(); Serial.println(); delay(1000); } |
Resultaat:
|
1 2 3 4 5 6 7 8 9 10 11 12 13 14 15 16 17 18 19 20 21 22 |
Pulsduur in microsec. = 7474 Rotatietijd in microsec. = 29896 Frequentie in Herz = 33 Toerental per Minuut = 1995.00 Pulsduur in microsec. = 7389 Rotatietijd in microsec. = 29556 Frequentie in Herz = 34 Toerental per Minuut = 2025.00 Pulsduur in microsec. = 7473 Rotatietijd in microsec. = 29892 Frequentie in Herz = 33 Toerental per Minuut = 1995.00 Pulsduur in microsec. = 7390 Rotatietijd in microsec. = 29560 Frequentie in Herz = 34 Toerental per Minuut = 2025.00 |
Bron:
fritzing.org
Processing
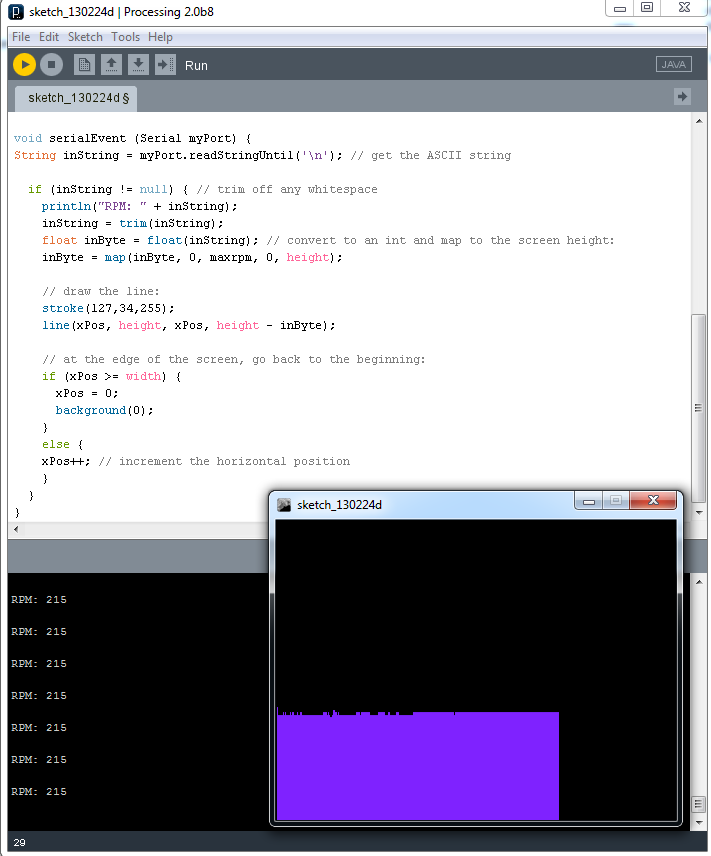
RPM grafiek met processing
Als je processing installeert, gebruik dan dit script om de RPM’s in grafiekvorm weer te geven, pas in onderstaand script de COM poort, venster X,Y en max RPM waarde aan!
|
1 2 3 4 5 6 7 8 9 10 11 12 13 14 15 16 17 18 19 20 21 22 23 24 25 26 27 28 29 30 31 32 33 34 35 36 37 38 39 40 41 42 43 44 45 46 47 |
// Graphing sketch // // This program takes ASCII-encoded strings // from the serial port at 9600 baud and graphs them. It expects values // followed by a newline, or newline and carriage return import processing.serial.*; Serial myPort; // The serial port int xPos = 1; // horizontal position of the graph int maxrpm = 600; void setup () { size(400, 300); // set the window size: myPort = new Serial(this, "COM7", 9600); myPort.bufferUntil('\n'); // don't generate a serialEvent() unless you get a newline character: background(0); // set inital background: } void draw () { // everything happens in the serialEvent() } void serialEvent (Serial myPort) { String inString = myPort.readStringUntil('\n'); // get the ASCII string if (inString != null) { // trim off any whitespace println("RPM: " + inString); inString = trim(inString); float inByte = float(inString); // convert to an int and map to the screen height: inByte = map(inByte, 0, maxrpm, 0, height); // draw the line: stroke(127,34,255); line(xPos, height, xPos, height - inByte); // at the edge of the screen, go back to the beginning: if (xPos >= width) { xPos = 0; background(0); } else { xPos++; // increment the horizontal position } } } |
Resultaat:
Schema
GEEN GEGEVENS
Teardown
GEEN GEGEVENS
Datasheet
Fritzing
GEEN GEGEVENS
Downloads
GEEN GEGEVENS


