Arduino Library – HCMAX7219
![]()
Installatie van Arduino IDE libraries: Arduino info
![]()
Informatie (ENG)
This Arduino library is written to work with the MAX7219 LED driver IC. The library will allow you to control one or more of these IC’s that have been serially connected together. The library provides compatible commands and an alphanumeric character set for these types of modules. Future updates are planned to include other MAX7219 based products.
To use the library just include the HCMAX7219.h header file and create an instance of the library. E.g:
|
1 2 |
#include <HCMAX7219.h> HCMAX7219 HCMAX7219(DIN, CLK, LOAD); |
Where:
DIN is the number for the digital pin connected to the first MAX7219 ‘s DIN pin.
CLK is the number for the digital pin connected to the first MAX7219 ‘s CLK pin.
LOAD is the number for the digital pin connected to the first MAX7219 ‘s LOAD (CS) pin.
The following functions are available with this library:
HCMAX7219.Init();
Initialises the library. This function should be executed once before any other library function.
HCMAX7219.Write(Address, Data, Driver)
Writes to a register within the one of the connected drivers where:
Address is the address of the register to write to and can be one of the following pre-defined values:
MAX7219NOOP
MAX7219DIGIT1
MAX7219DIGIT2
MAX7219DIGIT3
MAX7219DIGIT4
MAX7219DIGIT5
MAX7219DIGIT6
MAX7219DIGIT7
MAX7219DIGIT8
MAX7219DECODE
MAX7219INTESITY
MAX7219SCANLIMIT
MAX7219SHUTDOWN
MAX7219TEST
Data is a value of type Byte to write to the register.
Driver is a value of type Byte which driver in the chain to access. 0 being the first.
HCMAX7219.Shutdown(Mode, Driver)
Puts the driver into low power shutdown mode where:
Mode is of type boolean and can be one of the following pre-defined values:
MAX7219OFF
MAX7219ON
Driver is a value of type Byte which driver in the chain to access. 0 being the first.
HCMAX7219.TestMode(Mode, Driver)
Puts the driver into its test mode and turns all driven LED’s on:
Mode is of type boolean and can be one of the following pre-defined values:
TESTMODEOFF
TESTMODEON
Driver is a value of type Byte which driver in the chain to access. 0 being the first.
HCMAX7219.SevenSegDigits(Digits, Driver)
Sets the number of digits to drive in each driver. Valid values for Digits are:
0 (Digit 0)
1 (Digit 0 & 1)
2 (Digit 0, 1 & 2)
3 (Digit 0, 1, 2, & 3)
4 (Digit 0, 1, 2, 3 & 4)
5 (Digit 0, 1, 2, 3, 4 & 5)
6 (Digit 0, 1, 2, 3, 4, 5, & 6)
7 (Digit 0, 1, 2, 3, 4, 5,, 6 & 7)
Driver is a value of type Byte which driver in the chain to access. 0 being the first.
HCMAX7219.Intensity(Level, Driver)
Sets the intensity of the LED’s. Valid values for Level are 0 (min) to 0x0F (max)
Driver is a value of type Byte which driver in the chain to access. 0 being the first.
HCMAX7219.Clear()
Clears the contents of the output buffer. Executing the refresh library command after a clear command will write the empty buffer to the driver thereby clearing (turning off) all the LED’s.
HCMAX7219.Refresh()
Update all connected drivers with the contents of the output buffer.
HCMAX7219.DisplayBuffer[]
An array of type Byte holding the display buffer which is written to the driver(s) digit registers when the refresh() command is executed. The size of the buffer is 8 x the number of drivers (default 8). The fist 8 bytes (0 to 7) represent the digit registers in the first driver. The second group of 8 bytes (8 to 15) represent the digit registers in the second driver etc.
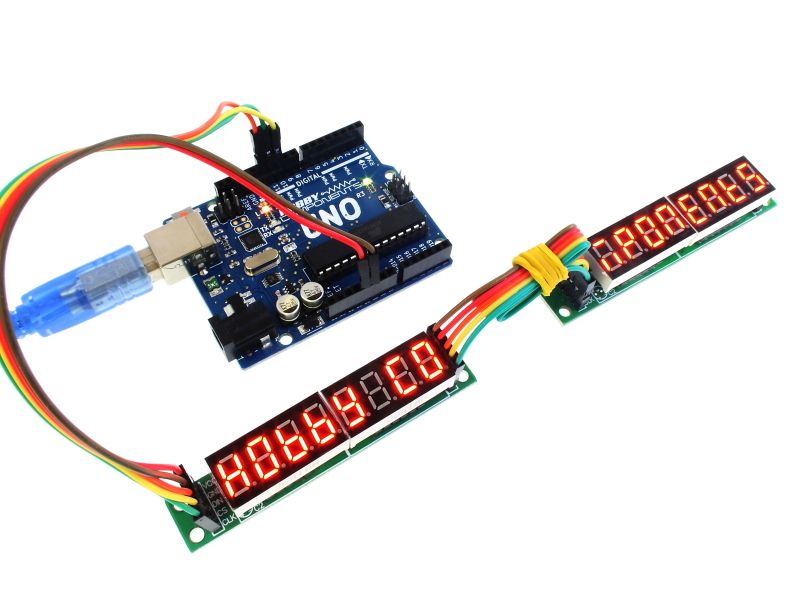
Setting the number off drivers:
By default the library assumes that you only have one driver connected. If you are connecting multiple drivers together you can set the number of drivers you have by changing the following line in the HCMAX7219.h header file:
#define NUMBEROFDRIVERS 1
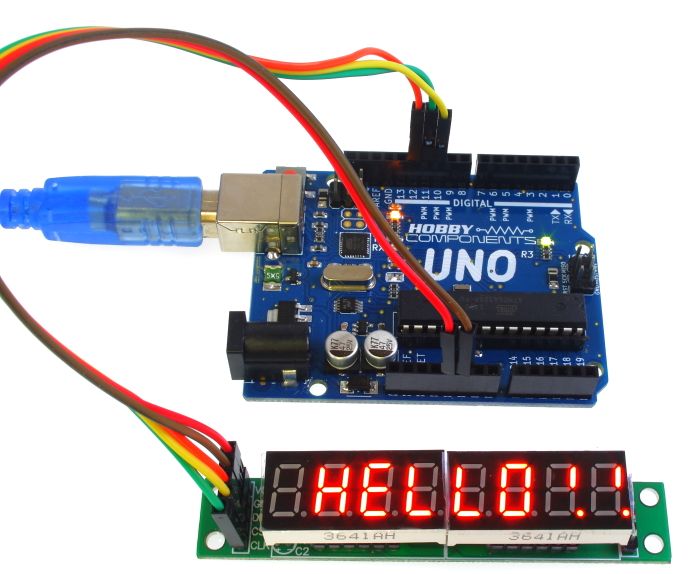
8 digit 7 segment display module specific commands:
HCMAX7219.print7Seg("TEXT STRING", Offset)
Writes a string of text to the output buffer at position starting at Offset. A value of 1 for offset start the text at digit 1 on the display of driver 1, 8 will start the text from digit 8 of driver one, 9 will start the text from digit 1 of driver 2 etc. Offset numbers beyond the maximum digit number can be set to allow for text to be positioned beyond the ends of the display.
HCMAX7219.print7Seg(Value, Offset)
Writes a positive or negative integer to the display. If negative a ‘-‘ sign will be appended to the beginning of the number. See above of description of Offset.
HCMAX7219.print7Seg(Value, Decimal_Position, Offset)
Writes a positive or negative integer to the display. If negative a ‘-‘ sign will be appended to the beginning of the number.
Decimal_Position allows the option to specify the position of a decimal point.
See above of description of Offset.
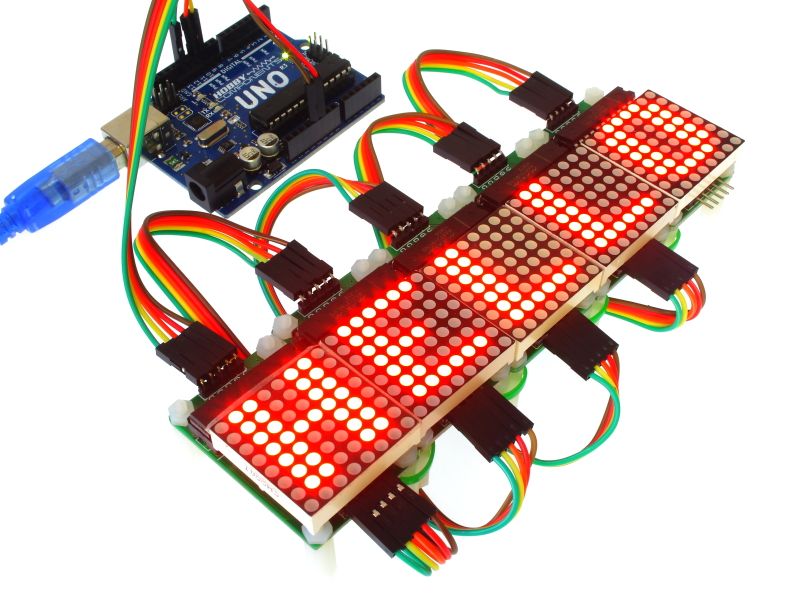
8×8 serial dot matrix module specific commands:
HCMAX7219.printMatrix("TEXT STRING", Offset)
Writes a string of text to the output buffer at position starting at Offset. A value of 1 for offset start the text at column 1 on the display of driver 1, 8 will start the text from column 8 of driver one, 9 will start the text from column 1 of driver 2 etc. Offset numbers beyond the maximum column number can be set to allow for text to be positioned beyond the ends of the display.
HCMAX7219.printMatrix(Value, Offset)
Writes a positive or negative integer to the display. If negative a ‘-‘ sign will be appended to the beginning of the number. See above of description of Offset.
HCMAX7219.printMatrix(Value, Decimal_Position, Offset)
Writes a positive or negative integer to the display. If negative a ‘-‘ sign will be appended to the beginning of the number.
Decimal_Position allows the option to specify the position of a decimal point.
See above of description of Offset.
HCMAX7219.Invert(Mode);
Turns inverted text on or off. Mode is of type boolean and can be one of the following pre-defined values:
INVERTOFF
INVERTON