Arduino Shield – Ethernet W5100 – Algemene informatie
Hardware: Ethernet shield (W5100)
Overzicht
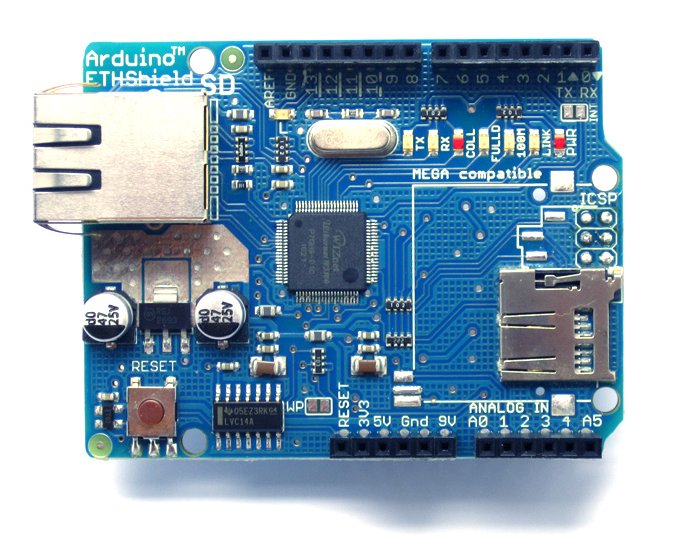
De Arduino Ethernet Shield verbindt uw Arduino met het internet in slechts enkele minuten. Deze shield kan u aansluiten uw Arduino board, aansluiten op het netwerk met een RJ45-kabel, en volg een paar eenvoudige instructies om te beginnen met connectie te maken met het internet.
- Vereist een Arduino board
- Bedrijfsspanning 5V (via Arduino board geleverd)
- Ethernet Controller: W5100 met interne 16K buffer
- Verbinding snelheid: 10 / 100Mb
- Verbinding met Arduino op de SPI-poort
Beschrijving
De Arduino Ethernet Shield kan een Arduino board aan te sluiten op het internet. Het is gebaseerd op de Wiznet W5100 ethernet chip (datasheet). De Wiznet W5100 biedt een netwerk (IP) stapel staat om zowel TCP en UDP. Het ondersteunt maximaal vier gelijktijdige socket verbindingen. Gebruik de Ethernet-bibliotheek voorbeelden om verbinding te maken met het internet. Het schild is zo opgebouwd dat er nog een ander schild bovenop gedrukt kan worden.
De Ethernet Shield heeft een standaard RJ-45 verbinding met een geïntegreerde lijn transformator en Power over Ethernet ingeschakeld.
Er is een onboard micro-SD-kaartsleuf, die kan worden gebruikt om bestanden te dienen via het netwerk. Het is compatibel met de Arduino Uno en Mega (met behulp van de Ethernet-bibliotheek). De onboard microSD-kaartlezer is toegankelijk via de SD-bibliotheek. Bij het werken met deze bibliotheek, SS is op pin 4. De oorspronkelijke herziening van het schild bevatte een full-size SD-kaartslot; Dit wordt niet ondersteund.
Het schild omvat ook een reset controller, zodat de W5100 Ethernet module goed gereset wordt bij aansluiten van de stroomvoorziening. Vorige herzieningen van het schild waren niet compatibel met de Mega en moeten handmatig worden gereset na het opstarten.
De huidige schild heeft een Power over Ethernet (PoE) module ontwikkeld om kracht te halen uit een conventionele twisted pair categorie 5 Ethernet-kabel:
- IEEE802 .3af compliant
- Lage output rimpel en ruis (100mVpp)
- Ingangsspanning 36V tot 57V
- Overbelasting en kortsluiting bescherming
- 9V Output
- Hoog rendement DC / DC-converter: typ 75% @ 50% belasting
- 1500V scheiding (ingang naar uitgang)
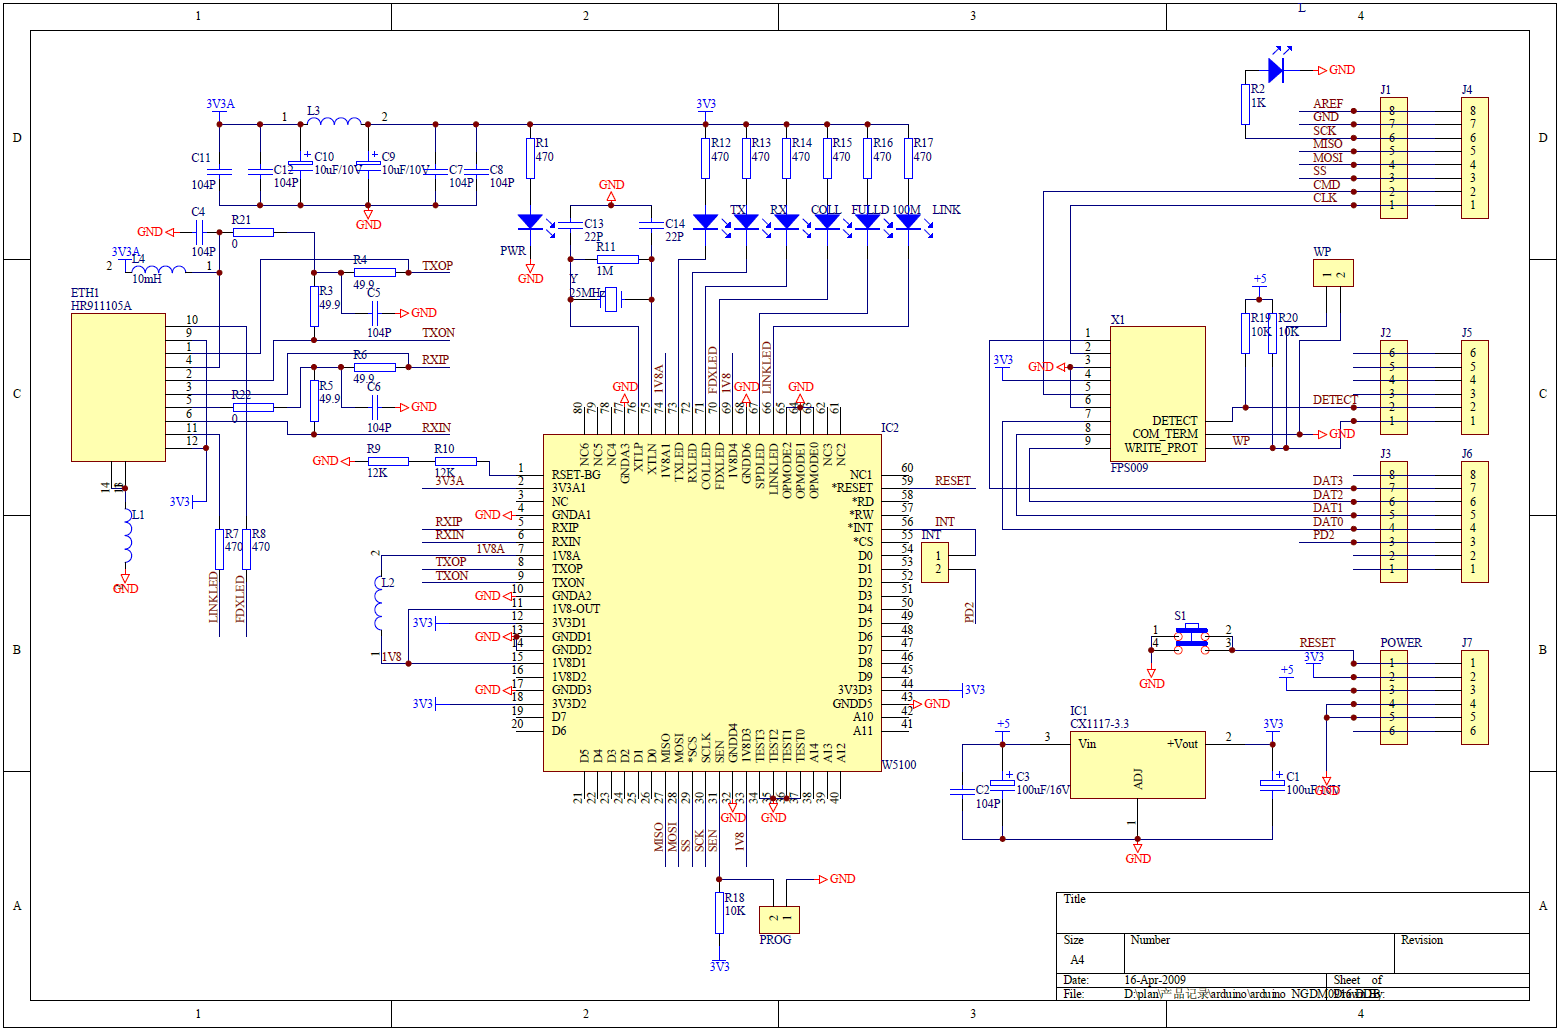
Schema
Problemen
Problemen zoals het vastlopen van een Arduino schets kan optreden bij gebruik van de Arduino Ethernet-schild met een niet-geïnitialiseerde SD-kaart aangesloten op de SD-kaartslot van het schild. Het is altijd het beste om de Ethernet-chip voor het initialiseren van de SD-kaart uit te schakelen of andersom.
De SPI Bus
Op het Arduino Ethernet-schild, delen de WIZnet W5100 Ethernet-chip en micro SD-kaartslot dezelfde SPI-bus (MISO, MOSI en SCK SPI-bus pinnen). De gegevens werden op de SPI bus door alle apparaten op de bus die zijn ingeschakeld worden ontvangen. Slechts één apparaat moet telkens worden ingeschakeld om dit probleem te voorkomen.
Bij het initialiseren van een apparaat (Ethernet chip of SD-kaart) kunnen onbedoeld gegevens worden verzonden naar het andere apparaat als het niet wordt uitgeschakeld. Als bijvoorbeeld het initialiseren van de Ethernet chip gebeurd, en de SD kaart module is niet uitgeschakeld, dan worden de gegevens naar de SD-kaart gestuurd, en deze krijgt corrupte informatie binnen (over de SPI bus).
De oplossing voor het probleem is dat als je een van de apparaten niet gebruikt deze uit te schakelen.
Gebruik de volgende code om de SD kaart uit te schakelen:
|
1 2 3 |
// SD-kaart uitzetten pinMode(4, OUTPUT); digitalWrite(4, HIGH); |
Gebruik de volgende code om de Ethernet chip uit te schakelen:
|
1 2 3 |
// Ethernet uitzetten pinMode(10, OUTPUT); digitalWrite(10, HIGH); |
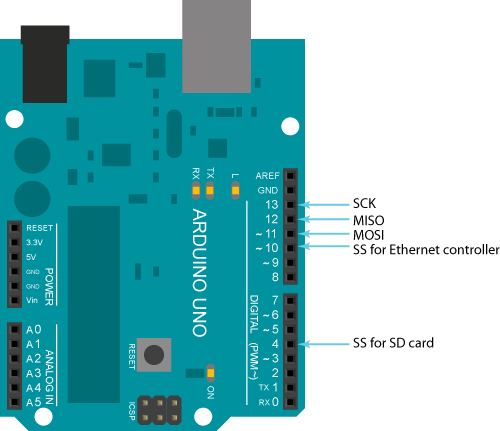
Pinout
De gebruikte pinnen van de ehternet shield.
Arduino Ethernet W5100 – how to fix the wrong board
Bron: https://reedpaper.wordpress.com/2018/09/17/arduino-ethernet-w5100-how-to-fix-the-wrong-board/
I continue to talk about cases of flaws in China-made modules and ways to fix them. This time we are talking about the clone of the Arduino Ethernet Shield W5100.
Many users of such clones (Fig. 1) encountered an annoying problem: when connecting to some routers or using a long network cable, this shield can not establish a connection with the router or the communication is unstable, with large packet losses. Meanwhile, with another router model the same clone can work stably.
I will not torment you with intrigue. The cause of the problem is incorrect resistors set in the Ethernet circuit. If you look at the shield’s schematic (see Fig. 2), you see that the filter circuit uses resistors R3, R4, R5, R6 with a resistance of 49.9 ohms. Traditionally, often use resistors rated at 51 ohms. Yet, this is OK.
Now look at the Chinese clone board (Fig. 3). Chinese manufacturers used a set of four resistors. This would be a good solution – convenient for assembly – if the Chinese installed the part with the correct nominal. The 51 ohm resistance is indicated by the marking 510. 51 is the base denomination, which is multiplied by 10 to the power denoted by the third digit. Ten to zero power is a one: 51 * 1 = 51.
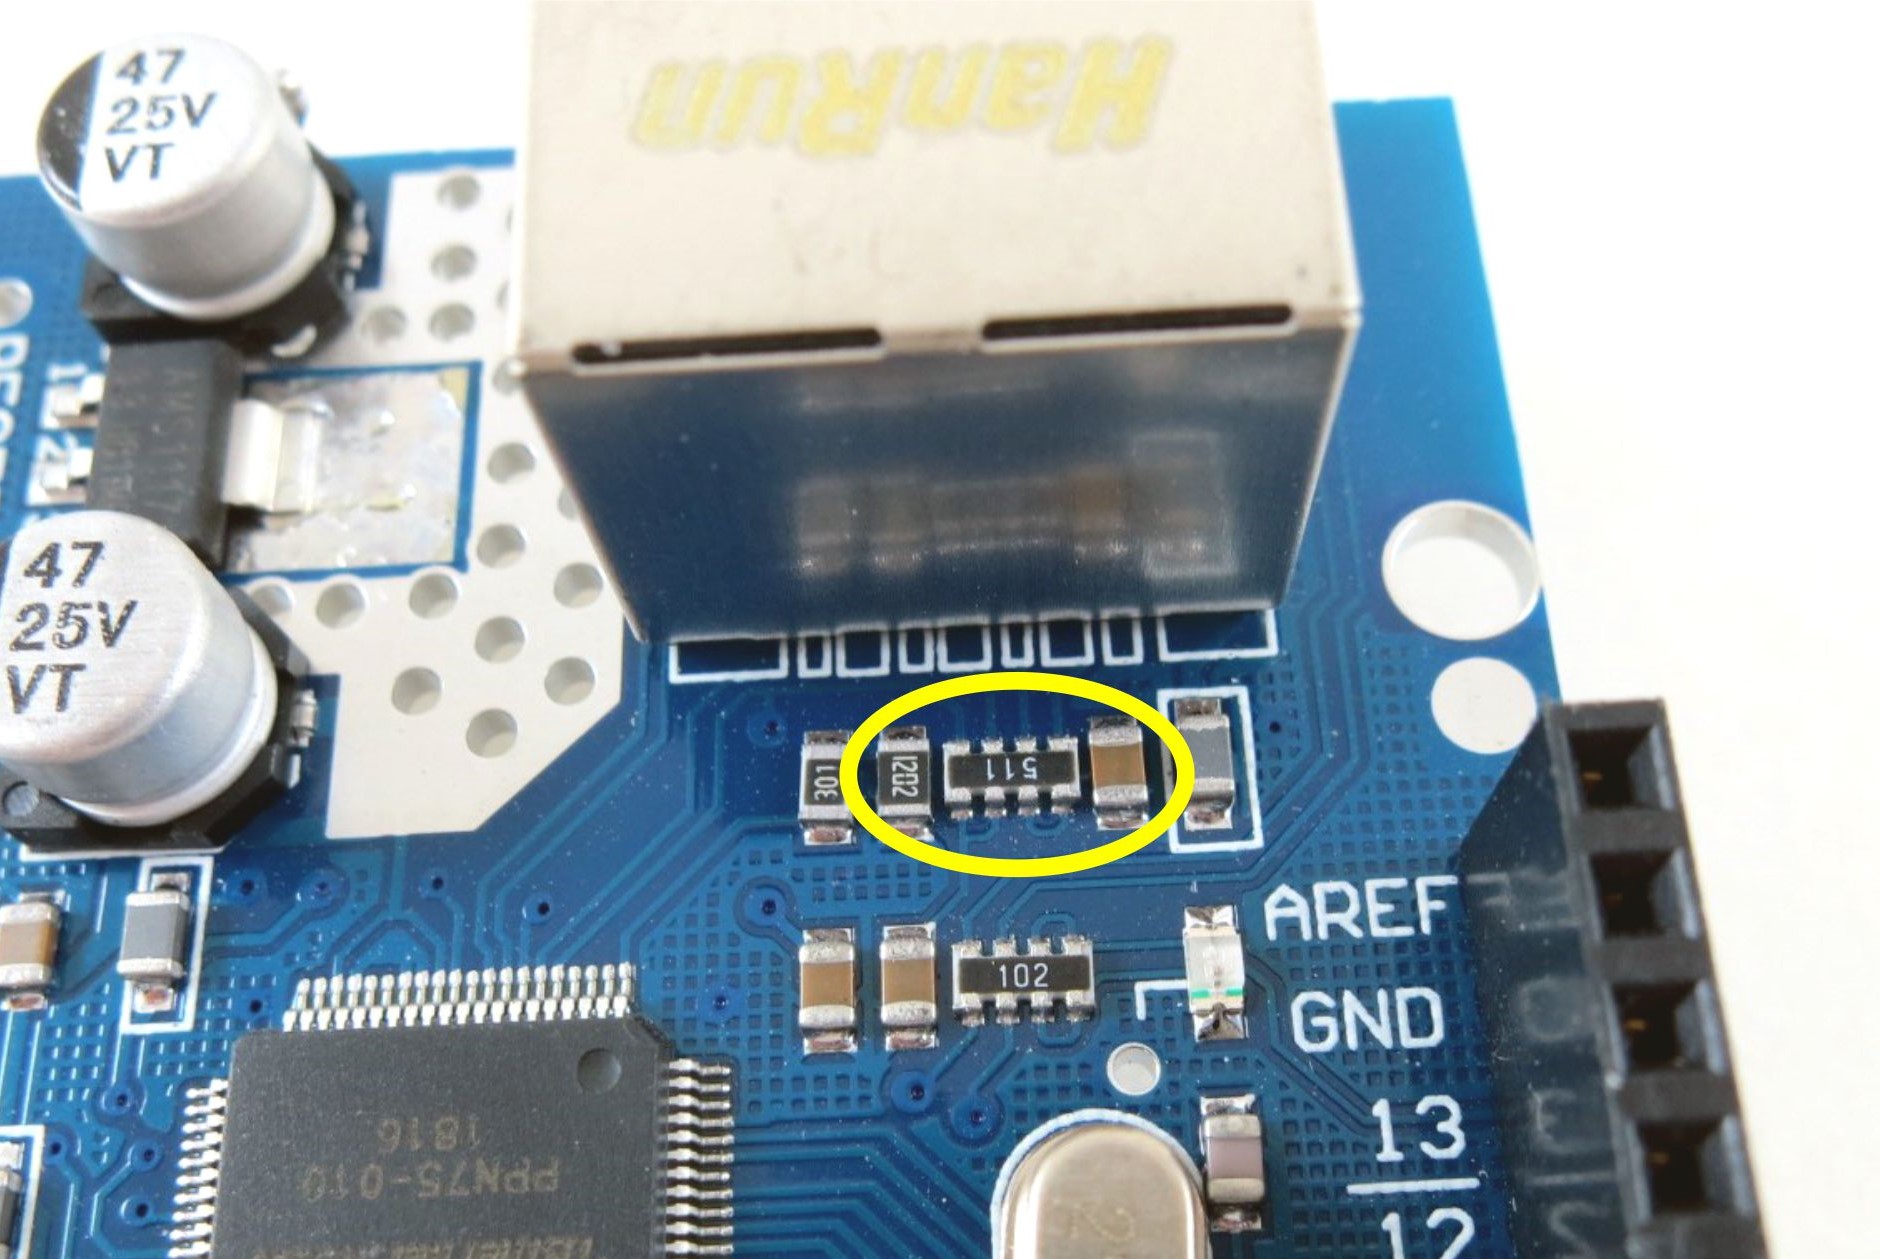
The board is equipped with a resistors set labeled 511, which corresponds to a resistance of 51 * 10 = 510 ohms. In other words, in the matching filter circuit resistors are installed with a resistance ten times greater than the rated value.
Some routers successfully cope with such line mismatch, especially if the network cable is short. But there is nothing worse during debugging a project than a problem that occurs unpredictably. Usually this happens at the most inopportune moment. It is enough to connect to another router or use a bad connection cable, and you will go mad searching for an error in the program code, although the problem is purely hardware.
The simplest method to fix the flaw is to replace the resistor set. You can use the resistors with a resistance 47 or 68 ohms (marking 470 and 680, respectively). In the presence of good eagle eyes and the absence of hand tremors, resistors of size 0402 with a resistance of 51 ohms can be soldered to the board.
If there is nothing to replace the wrong assembly, and the network shield is working fine – do not change anything. Just keep in mind the possible cause of the problem in the future.