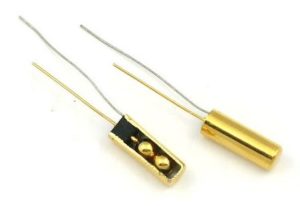
Arduino – Tilt sensor
Hardware
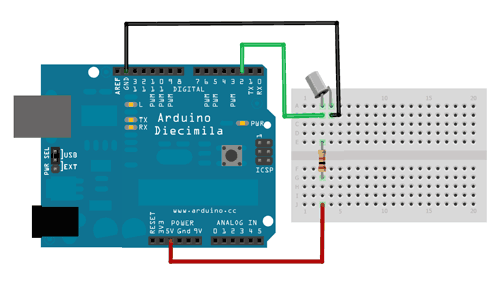
In dit voorbeeld gebruiken we een Tilt sensor om interne led (D13) aan en uit te schakelen, er is echter een handigheidje nodig met een tijdsinterval om de ‘ruis’ van de digitale poort te onderdrukken, dit is omdat de digitale poort wel duizenden keren per seconde wordt uitgelezen, dit geeft voor een drukknop geen goed beeld, vandaar de ’timer’, sluit het volgende aan via onderstaand schema:
|
1 2 3 4 5 6 7 8 9 10 11 12 13 14 15 16 17 18 19 20 21 22 23 24 25 26 27 28 29 30 31 32 33 34 35 36 37 38 39 40 41 42 43 44 45 46 47 48 49 50 51 52 53 54 |
/* Better Debouncer * * This debouncing circuit is more rugged, and will work with tilt switches! * * http://www.ladyada.net/learn/sensor/tilt.html */ int inPin = 2; // the number of the input pin int outPin = 13; // the number of the output pin int LEDstate = HIGH; // the current state of the output pin int reading; // the current reading from the input pin int previous = LOW; // the previous reading from the input pin // the follow variables are long's because the time, measured in miliseconds, // will quickly become a bigger number than can be stored in an int. long time = 0; // the last time the output pin was toggled long debounce = 50; // the debounce time, increase if the output flickers void setup() { pinMode(inPin, INPUT); digitalWrite(inPin, HIGH); // turn on the built in pull-up resistor pinMode(outPin, OUTPUT); } void loop() { int switchstate; reading = digitalRead(inPin); // If the switch changed, due to bounce or pressing... if (reading != previous) { // reset the debouncing timer time = millis(); } if ((millis() - time) > debounce) { // whatever the switch is at, its been there for a long time // so lets settle on it! switchstate = reading; // Now invert the output on the pin13 LED if (switchstate == HIGH) LEDstate = LOW; else LEDstate = HIGH; } digitalWrite(outPin, LEDstate); // Save the last reading so we keep a running tally previous = reading; } |
Bron: learn.adafruit.com


