ATmega328 AU programmeren met Arduino als ISP
![]()

Deze pagina beschrijft hoe je een ATmega328 AU chip kan programmeren met de Aruduino als ISP (In System Programming)
Wat heb je nodig?
1) ATmel328P AU chip
2) Arduino + breadboard & jumpwires (hardware)
3) Arduino IDE (software)
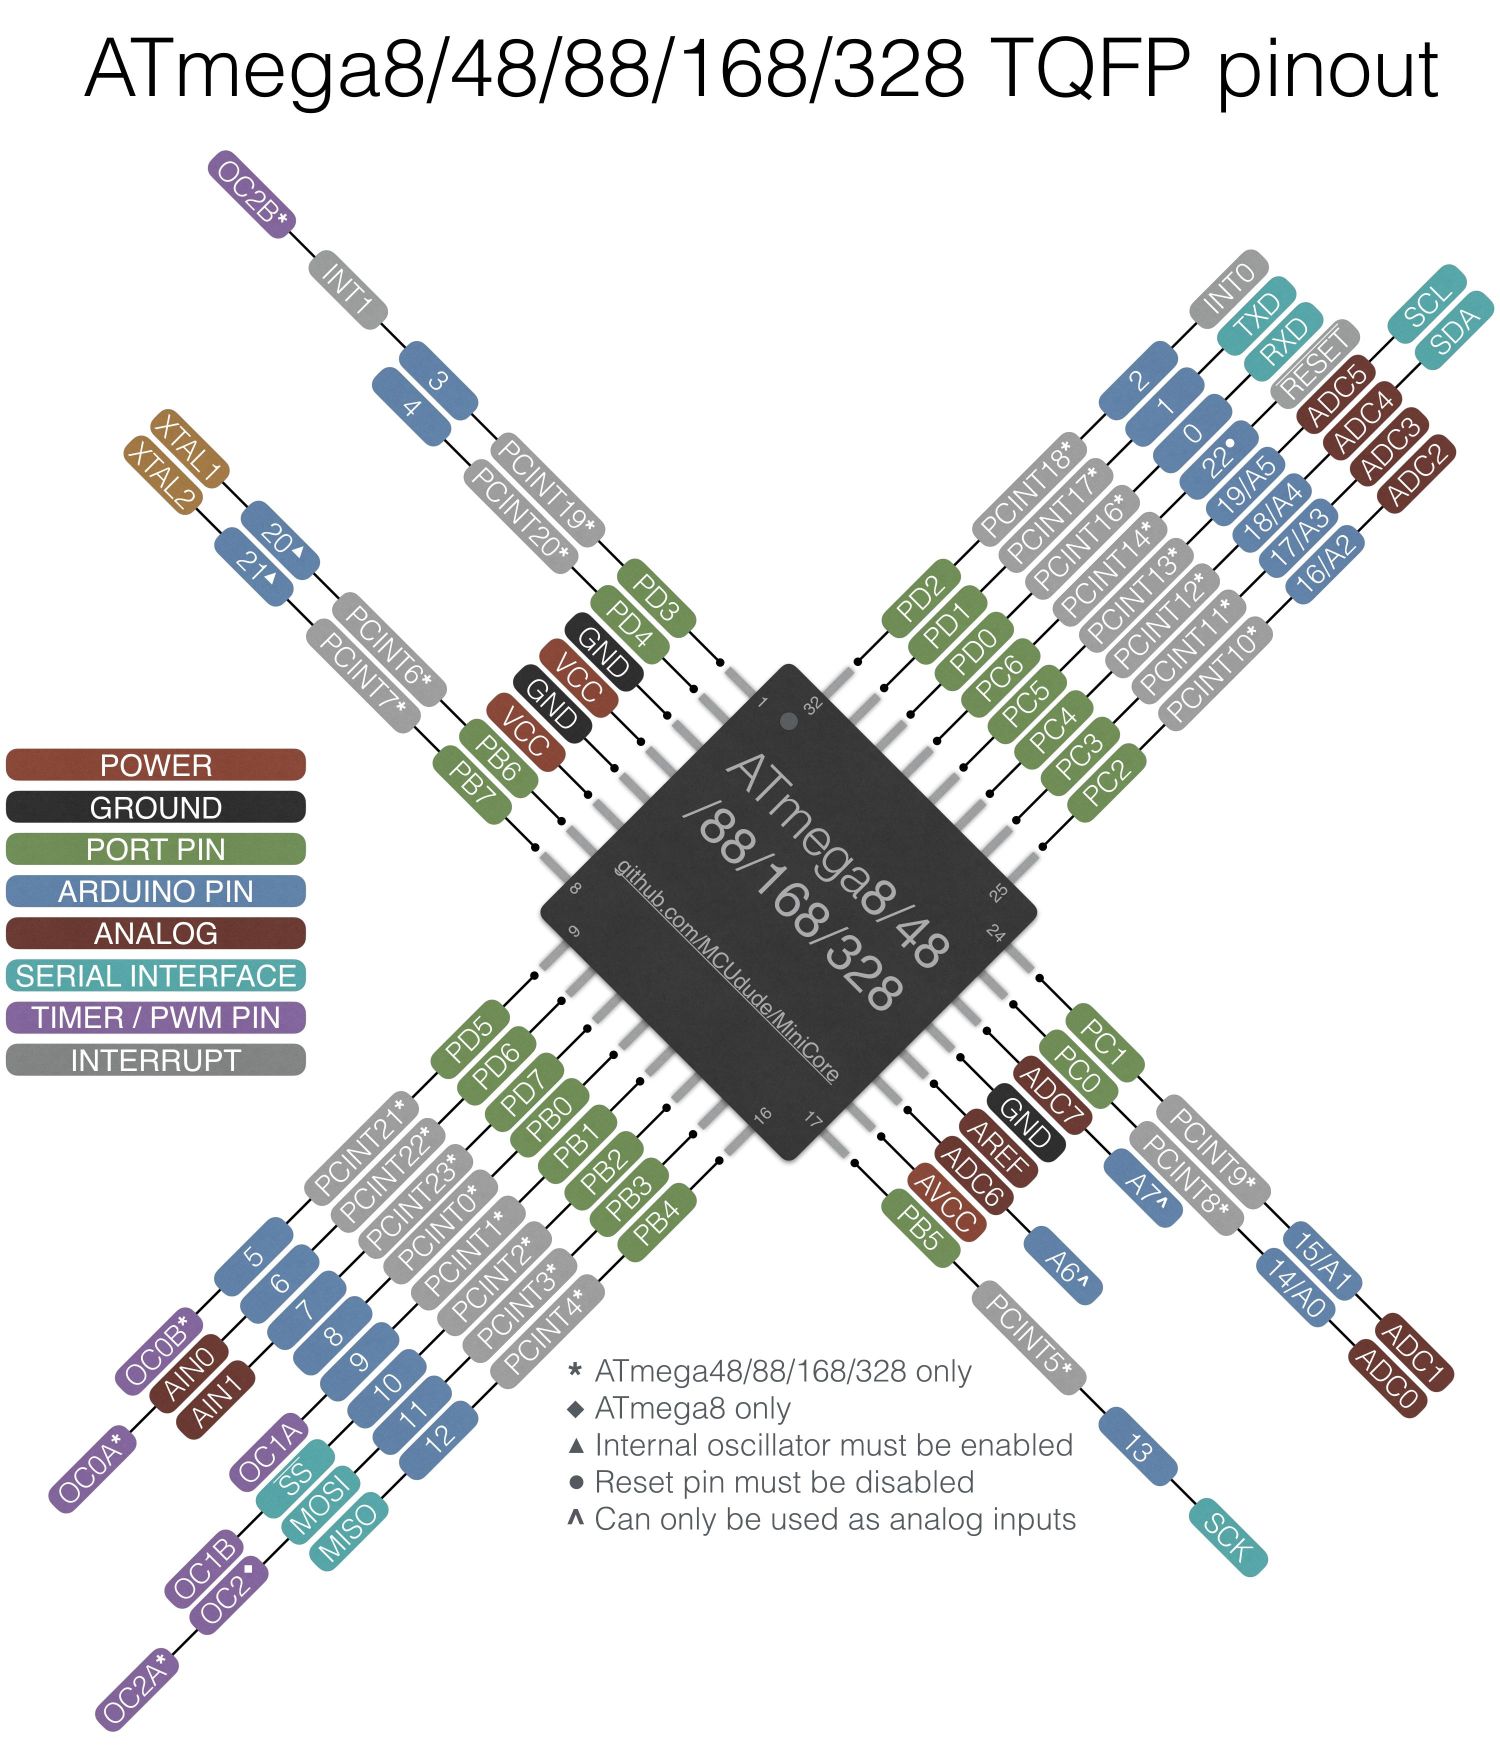
Pinout
Programmeren met Arduino NANO (of UNO) als ISP
Bron: https://www.electronoobs.com/eng_arduino_tut6.php
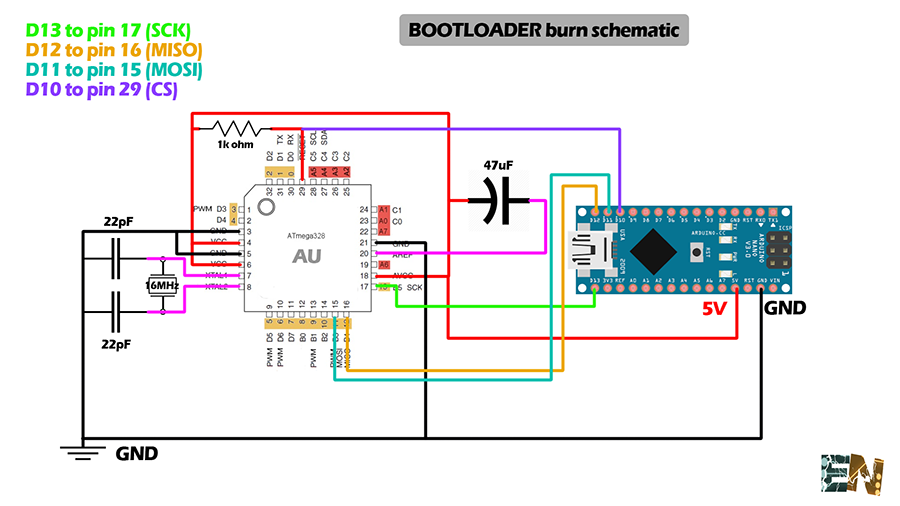
First of all we have to do the basic configuration of the microchip ATMEGA328P AU. The integrated won’t work without that specific configuration. It will need the manufacture recommended circuit with a basic power source, decoupling capacitors, quartz oscilator and the necessary pullups resistors. In the schematic down below I show you the basic components and connections that have to be made for a proper functioning of the microcontroller.

As you can see we have a 16MHz quartz oscilator between pins 7 and 8 of the SMD chip with two 22pF capacitors to ground. We have to connect ground to pins 3, 6 and 21 and a 5V supply to pins4, 6 and 18. Finnaly we add a pullup resitor of 1k ohms between 5V and the reset pin which is pin 29 of this SMD chip.It’s recomanded to connect a 47uF capacitor between Aref pin and 5V.
Once we’ve done the basic circuit we’ll have to make the following connections between the Arduino NANO and the smd chip pins in order to burn the bootloader to it.
Digital pin 13 from the arduino NANO to pin 17 from the SMD chip (SCK)
Digital pin 12 from the arduino NANO to pin 16 from the SMD chip (MISO)
Digital pin 11 from the arduino NANO to pin 15 from the SMD chip (MOSI)
Digital pin 10 from the arduino NANO to pin 29 from the SMD chip (CS)
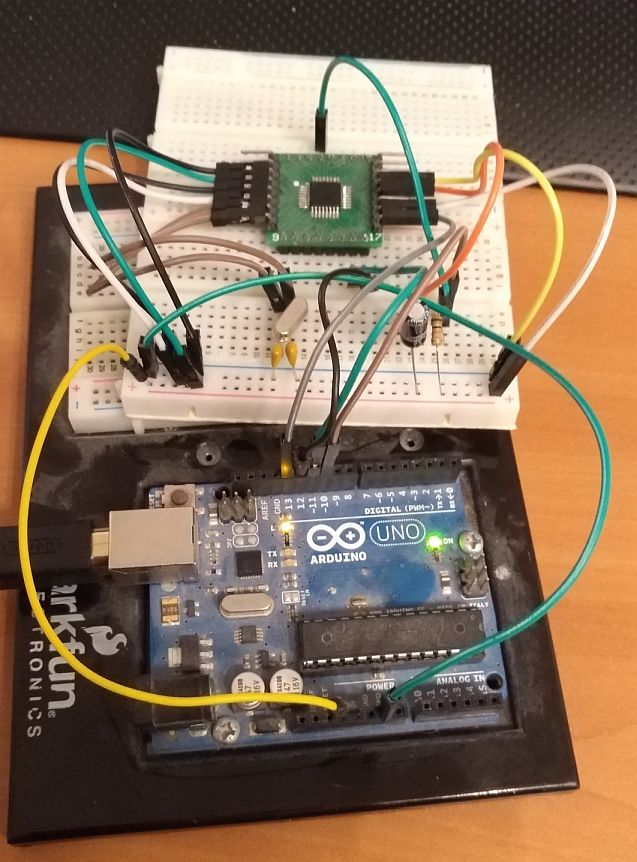
Praktijk:
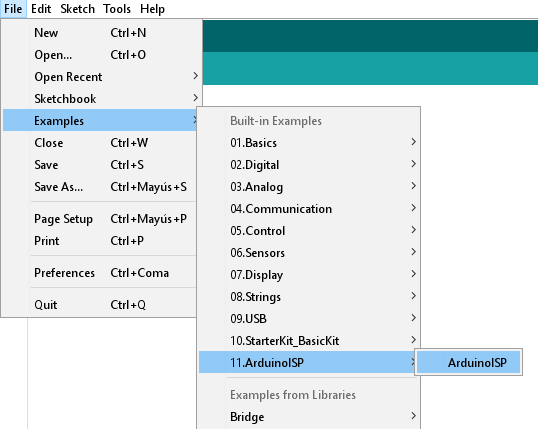
Now we open Arduino IDE. We go to file -> Examples -> Arduino as ISP and we open the ArduinoISP example sketch. In tools we select Arduino NANO as a board, the COM of our USB connected Arduino and we upload the skecth as a normal one like any other to the Arduino NANO.
Once we’ve upload the ArduinoISP code to the Arduino NANO and with the previous connections we can burn the bootloader. For that we go to Tools -> Programmer -> Arduino as ISP as shown below.
Select programmer: “Arduino as ISP”

All is left to do is go to Tools and pres burn bootloader. We will see the Arduino NANO lights are blinking a lot. Once it says bootloader burned we are done. We’ve sucessfully burned a bootloader to an SMD chip.
All we need to do now is test the chip for propper functioning. To do that we will upload a simple blink code using a FTDI conection as shown below. Don’t forget to change the programmer back to normal.
|
1 2 3 4 5 6 7 8 9 10 11 12 13 14 15 16 17 18 19 20 21 22 23 24 25 26 27 28 29 30 31 32 33 34 35 36 37 38 39 40 41 42 43 44 45 46 47 48 49 50 51 52 53 54 55 56 57 58 59 60 61 62 63 64 65 66 67 68 69 70 71 72 73 74 75 76 77 78 79 80 81 82 83 84 85 86 87 88 89 90 91 92 93 94 95 96 97 98 99 100 101 102 103 104 105 |
C:\Arduino\hardware\tools\avr/bin/avrdude -CC:\Arduino\hardware\tools\avr/etc/avrdude.conf -v -patmega328p -cstk500v1 -PCOM20 -b19200 -Uflash:w:C:\Arduino\hardware\arduino\avr/bootloaders/optiboot/optiboot_atmega328.hex:i -Ulock:w:0x0F:m avrdude: Version 6.3-20190619 Copyright (c) 2000-2005 Brian Dean, http://www.bdmicro.com/ Copyright (c) 2007-2014 Joerg Wunsch System wide configuration file is "C:\Arduino\hardware\tools\avr/etc/avrdude.conf" Using Port : COM20 Using Programmer : stk500v1 Overriding Baud Rate : 19200 Writing | ################################################## | 100% 0.03s avrdude: 1 bytes of lfuse written avrdude: verifying lfuse memory against 0xFF: avrdude: load data lfuse data from input file 0xFF: avrdude: input file 0xFF contains 1 bytes avrdude: reading on-chip lfuse data: Reading | ################################################## | 100% 0.01s avrdude: verifying ... avrdude: 1 bytes of lfuse verified avrdude done. Thank you. AVR Part : ATmega328P Chip Erase delay : 9000 us PAGEL : PD7 BS2 : PC2 RESET disposition : dedicated RETRY pulse : SCK serial program mode : yes parallel program mode : yes Timeout : 200 StabDelay : 100 CmdexeDelay : 25 SyncLoops : 32 ByteDelay : 0 PollIndex : 3 PollValue : 0x53 Memory Detail : Block Poll Page Polled Memory Type Mode Delay Size Indx Paged Size Size #Pages MinW MaxW ReadBack ----------- ---- ----- ----- ---- ------ ------ ---- ------ ----- ----- --------- eeprom 65 20 4 0 no 1024 4 0 3600 3600 0xff 0xff flash 65 6 128 0 yes 32768 128 256 4500 4500 0xff 0xff lfuse 0 0 0 0 no 1 0 0 4500 4500 0x00 0x00 hfuse 0 0 0 0 no 1 0 0 4500 4500 0x00 0x00 efuse 0 0 0 0 no 1 0 0 4500 4500 0x00 0x00 lock 0 0 0 0 no 1 0 0 4500 4500 0x00 0x00 calibration 0 0 0 0 no 1 0 0 0 0 0x00 0x00 signature 0 0 0 0 no 3 0 0 0 0 0x00 0x00 Programmer Type : STK500 Description : Atmel STK500 Version 1.x firmware Hardware Version: 2 Firmware Version: 1.18 Topcard : Unknown Vtarget : 0.0 V Varef : 0.0 V Oscillator : Off SCK period : 0.1 us avrdude: AVR device initialized and ready to accept instructions Reading | ################################################## | 100% 0.02s avrdude: Device signature = 0x1e950f (probably m328p) avrdude: NOTE: "flash" memory has been specified, an erase cycle will be performed To disable this feature, specify the -D option. avrdude: erasing chip avrdude: reading input file "C:\Arduino\hardware\arduino\avr/bootloaders/optiboot/optiboot_atmega328.hex" avrdude: writing flash (32768 bytes): Writing | ################################################## | 100% 0.00s avrdude: 32768 bytes of flash written avrdude: verifying flash memory against C:\Arduino\hardware\arduino\avr/bootloaders/optiboot/optiboot_atmega328.hex: avrdude: load data flash data from input file C:\Arduino\hardware\arduino\avr/bootloaders/optiboot/optiboot_atmega328.hex: avrdude: input file C:\Arduino\hardware\arduino\avr/bootloaders/optiboot/optiboot_atmega328.hex contains 32768 bytes avrdude: reading on-chip flash data: Reading | ################################################## | 100% 0.00s avrdude: verifying ... avrdude: 32768 bytes of flash verified avrdude: reading input file "0x0F" avrdude: writing lock (1 bytes): Writing | ################################################## | 100% 0.02s avrdude: 1 bytes of lock written avrdude: verifying lock memory against 0x0F: avrdude: load data lock data from input file 0x0F: avrdude: input file 0x0F contains 1 bytes avrdude: reading on-chip lock data: Reading | ################################################## | 100% 0.01s avrdude: verifying ... avrdude: 1 bytes of lock verified avrdude done. Thank you. |
Sketches uploaden
Nadat je de bootloader op de chip hebt geplaatst kan je ook met deze configuratie sketches uploaden.
Let op: selecteer “uploaden met programmer”, anders wordt de sketch op de arduino UNO geladen!
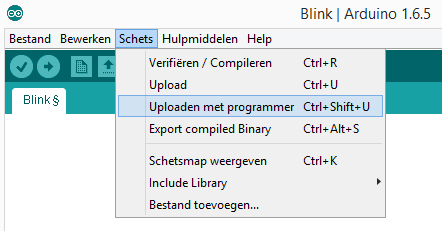
Je code staat nu in de ATmega328 AU en wordt uitgevoerd!