ESP8266 WiFi – Infrarood bewegings-sensor (PIR) (NodeMCU)


Op deze pagina vind je een voorbeeld om via de ESP-01 module een infrarood bewegings-sensor (PIR) sensor te gebruiken via de GPIO pinnen met de NodeMCU firmware.
Hardware
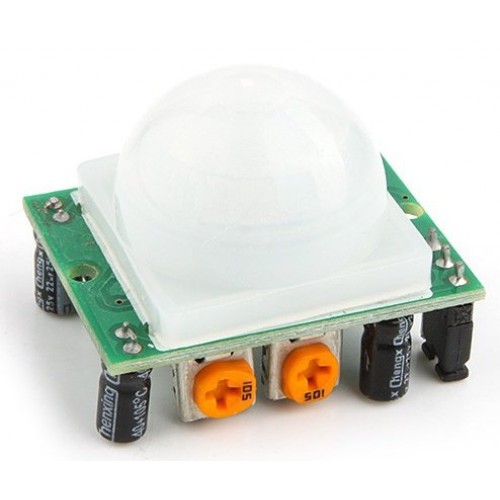
Met deze Infrarood bewegings-sensor (PIR) (Passive InfraRed) sensor kun je beweging detecteren, wordt vaak gebruikt als mensen of dieren binnen het sensorbereik bewegen, ze zijn klein, niet duur, verbruiken weinig vermogen en zijn makkelijk te gebruiken.
Deze PIR heef een bereik tot 7 meter, er zitten 2 stelknoppen op, één voor de detectietijd en één voor vertragings tijd voor de volgende interval.
Specificaties:
- Voltage: DC 4.5 tot 20V
- Verbruik: 50uA
- Blok tijd: 2.5 seconden (standaard)
- Vertragings tijd: 0.3 tot 18 seconden (standaard)
- Detectie hoek: <110 graden
- Detectie bereik :3 meter (standaard) tot max 7 meter
- Lens diameter: 23mm (standaard)
Pinout
| Pin: | Functie: |
|---|---|
| 01 | +4.5v~20v |
| 02 | OUT |
| 03 | GND |
Wat heb je nodig?
1) ESPlorer IDE
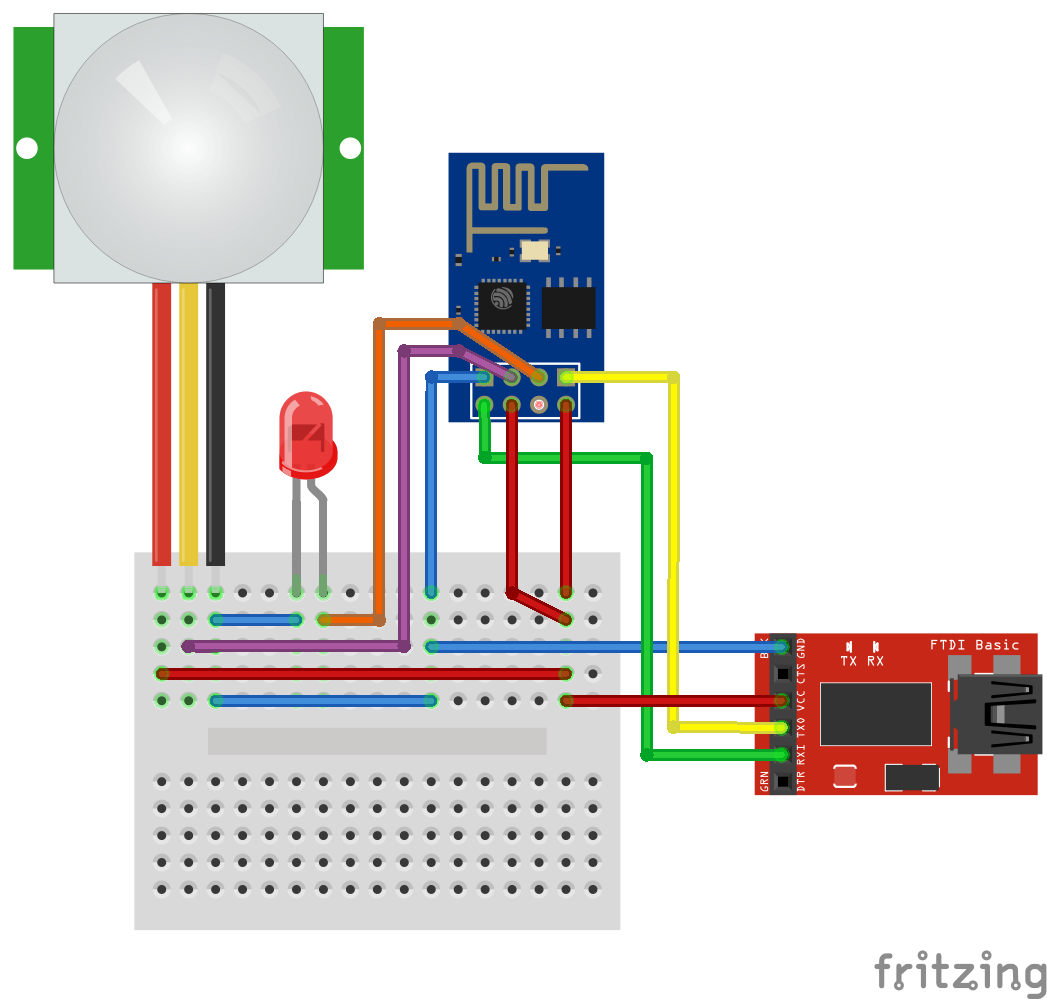
Sluit de PIR module aan op volgens onderstaand schema:
Trigger script voor de PIR sensor
Upload deze “library” code als pir.lua
Tip: Download de code sla het op als bestand, en gebruik de “Upload…” knop in ESPlorer.
|
1 2 3 4 5 6 7 8 9 10 11 12 13 14 15 16 |
LedPin=3 -- GPIO 0 gpio.mode(LedPin,gpio.OUTPUT) PirPin=4 -- GPIO 2 gpio.mode(PirPin,gpio.INT,gpio.PULLUP) -- verbind een interrupt aan de PirPin. function beweging() print("Beweging gedetecteerd!") gpio.write(LedPin,gpio.HIGH) -- Led AAN. tmr.delay(5000000) -- Wacht 5 seconden. print("Beweging beëindigd!") gpio.write(LedPin,gpio.LOW) -- Led UIT end -- Trigger functie "beweging" wanneer PirPin actief gpio.trig(PirPin,"up",beweging) |
Gebruik de volgende regel om het script te starten:
dofile("pir.lua")
Het resultaat via de seriële monitor:
|
1 2 |
Beweging gedetecteerd! Beweging beëindigd! |
Getest met NodeMCU 0.9.6 build 20150704 floating point
Trigger script voor de PIR sensor met webserver
Upload deze “library” code als pir.lua, denk er aan om je SSID en WACHTWOORD in te stellen, de webpagina zal om de 2 seconden automatisch ververst worden!
Tip: Download de code sla het op als bestand, en gebruik de “Upload…” knop in ESPlorer.
|
1 2 3 4 5 6 7 8 9 10 11 12 13 14 15 16 17 18 19 20 21 22 23 24 25 26 27 28 29 30 31 32 33 34 35 36 37 38 39 40 41 42 43 44 45 46 47 48 49 50 51 52 53 54 55 56 57 58 59 60 61 62 63 |
stat="No Movement yet!" LedPin=3 -- GPIO 0 gpio.mode(LedPin,gpio.OUTPUT) PirPin=4 -- GPIO 2 gpio.mode(PirPin,gpio.INT,gpio.PULLUP) -- verbind een interrupt aan de PirPin. function motion() print("Motion Detection : ON!") stat = "ON" gpio.write(LedPin,gpio.HIGH) -- Led ON - Motion detected gpio.trig(PirPin,"down",nomotion) -- trigger on falling edge return stat end function nomotion() print("Motion Detection : OFF!") stat = "OFF" gpio.write(LedPin,gpio.LOW) -- Led OFF gpio.trig(PirPin,"up",motion) -- trigger on rising edge return stat end -- Maak connectie met de Router / DHCP. print("Connectie maken via WiFi...") wifi.sta.config("SSID","WACHTWOORD") wifi.sta.connect() tmr.alarm(1, 1000, 1, function() if wifi.sta.getip()== nil then print("Wachten op IP adres...") else tmr.stop(1) print("Module actief op IP: "..wifi.sta.getip()) end end) -- Trigger functie "beweging" wanneer PirPin actief. gpio.trig(PirPin,"up",motion) -- Start de webserver. srv=net.createServer(net.TCP) srv:listen(80, function(conn) conn:on("receive",function(conn,payload) print(payload) conn:send("HTTP/1.1 200 OK\n\n") conn:send("<META HTTP-EQUIV=\"REFRESH\" CONTENT=\"2\">") conn:send("<html><title>PIR Motion Detector Server - ESP8266</title><body>") conn:send("<h1>PIR Motion Detector Server - ESP8266</h1><BR>") conn:send('Status: ') if (stat == "ON") then conn:send('<B><font color=red>Movement Detected!</font></B>') elseif (stat == "OFF") then conn:send('<B><font color=green>No Movement</font></B>') else conn:send(stat) conn:send('%') end conn:send("<BR><BR><br>Node.HEAP : <b>" .. node.heap() .. "</b><BR><BR>") conn:send("IP ADDR : <b>".. wifi.sta.getip() .. "</b><BR>") conn:send("TMR.NOW : <b>" .. tmr.now() .. "</b><BR<BR><BR>") conn:send("</html></body>") conn:on("sent",function(conn) conn:close() end) end) end) |
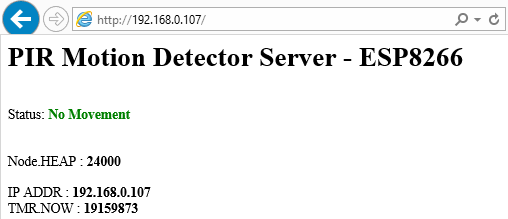
Het resultaat:
Getest met NodeMCU 0.9.6 build 20150704 floating point
bron:
esp8266-projects.com


