ESP8266 WiFi Project – DHT22 naar MYSQL en HighCharts
![]()
Informatie (ENG)
Step 1: Flash ESP8266 with firmware
I will tell you how I did to get an ESP8266-01 to read data from DHT22 and send it to an MYSQL database then view the data with HighCharts
Features that I will add later is HighStocks
You need below items:
- DHT22
- ESP8266 ESP-01
- ESP8266flasher, also called NODEMCU FIRMWARE PROGRAMMER, attached in Step 1
- USB->TTL
- LUA Loader, attached in Step 3
- If you want to use the sleep function you need to solder before start, see step 2
Links:
EDIT 150826: Updated INIT.LUA. added “–” before “end)” line after — node.dsleep(sleep*60*1000*1000)
EDIT 150924: new ESP8266Flasher version, corrected errors in readdht22.lua, renamed to readdht22_test.lua for testing purpose
EDIT 151005: updated readdht22_test.lua(removed timer) and readdht22.lua(change so timer repeats)
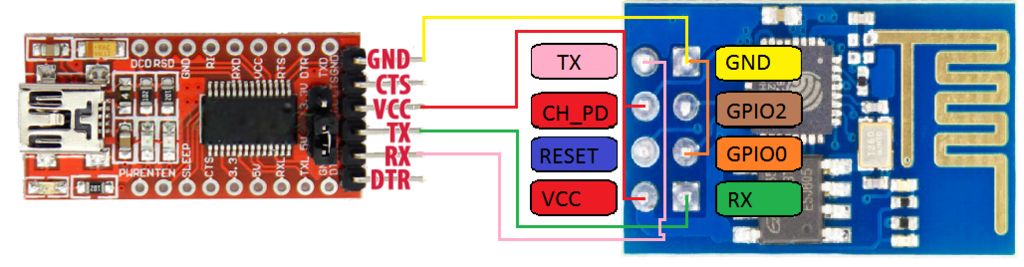
Connect:
ESP8266 -> TTL
VCC -> VCC
CH_PD -> VCC
GND -> GND
GPIO0 -> GND
TX -> RX
RX -> TX
The USB-TTL that I used had the possibility to select power, I used 3.3V
Plug-in USB-TTL to your computer, wait until your PC have installed drivers for USB-TTL
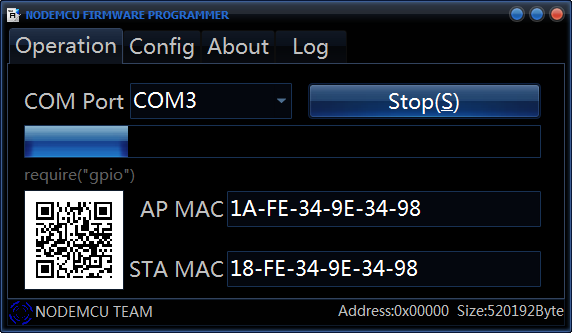
Start ESP8266Flasher.
I used version 1.0.5619.5450 of ESP8266Flasher EDIT 20150924
I used version 0.9.5 20150318 firmware, build-in ESP8266Flasher
Config->INTERNAL://NODEMCU
Advanced->Baudrate 230400, Flash size 4MByte, Flash speed 40MHz, SPI Mode DIO
Select COM-port and press Flash. If the connection is correct you will get a QR-code at bottom left
When it is ready, green check appear in bottom left, close ESP8266Flasher
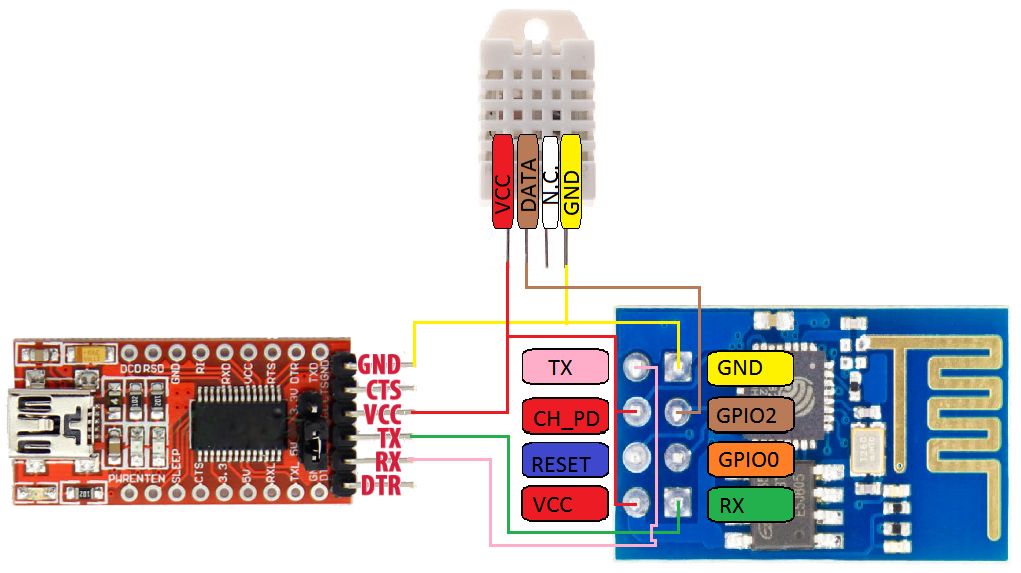
Step 2: Connect ESP8266 to DHT22
Unplug USB-TTL, so the power is disconnected, we dont want to damage anything
Disconnect GPIO0 from GND
Connect:
ESP8266 -> DHT22
VCC -> VCC
GPIO2 -> Data
GND -> GND
If you want to use Sleep function you need to solder RESET to leg 8 on ESP8266 chip:

Step 3: Upload test code to ESP8266
Before we send any data to an MYSQL we must test so that the ESP8266 can read from DHT22
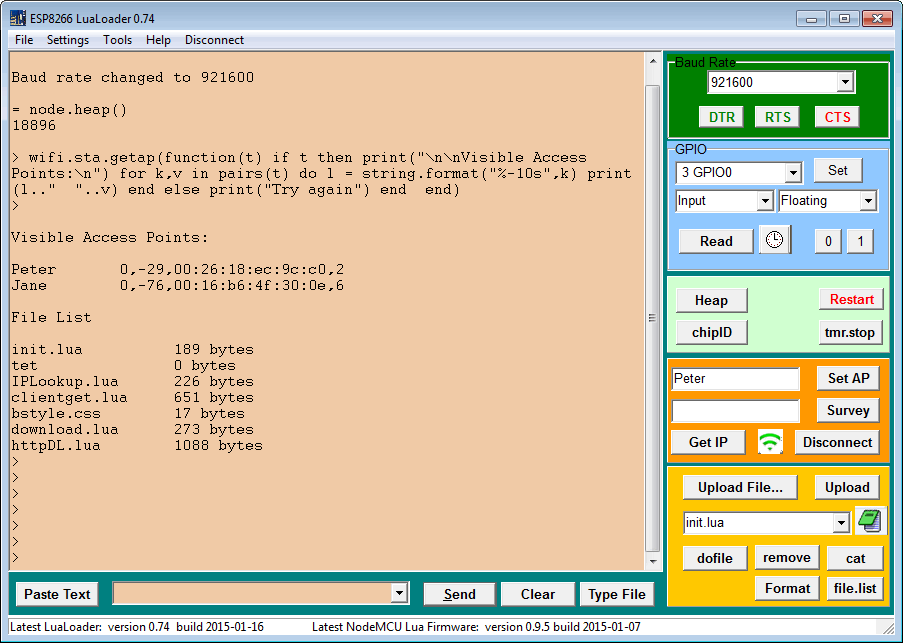
I used LUA Loader version 0.87
Plug-in USB-TTL to your computer
Start LUA Loader
Select COM-port, Settings->Comm Port Settings
Click on Connect, upper right field should be green if you have connection
Click on Restart, middle right side
You should now see some text poping up, if not you have something wrong with the firmware in ESP8266 or the connection is not correct
To upload a file click on Upload file, bottom right
Upload dht22.lua and readdht22_test.lua
dht22.lua: to communication to dht22 sensor
|
1 2 3 4 5 6 7 8 9 10 11 12 13 14 15 16 17 18 19 20 21 22 23 24 25 26 27 28 29 30 31 32 33 34 35 36 37 38 39 40 41 42 43 44 45 46 47 48 49 50 51 52 53 54 55 56 57 58 59 60 61 62 63 64 65 66 67 68 69 70 71 72 73 74 75 76 77 78 79 80 81 82 83 84 85 86 87 88 89 90 91 92 93 94 95 96 97 98 99 100 |
-- *************************************************************************** -- DHT22 module for ESP8266 with nodeMCU -- -- Written by Javier Yanez -- but based on a script of Pigs Fly from ESP8266.com forum -- -- MIT license, http://opensource.org/licenses/MIT -- *************************************************************************** local moduleName = ... local M = {} _G[moduleName] = M local humidity local temperature function M.read(pin) local checksum local checksumTest humidity = 0 temperature = 0 checksum = 0 -- Use Markus Gritsch trick to speed up read/write on GPIO local gpio_read = gpio.read local bitStream = {} for j = 1, 40, 1 do bitStream[j] = 0 end local bitlength = 0 -- Step 1: send out start signal to DHT22 gpio.mode(pin, gpio.OUTPUT) gpio.write(pin, gpio.HIGH) tmr.delay(100) gpio.write(pin, gpio.LOW) tmr.delay(20000) gpio.write(pin, gpio.HIGH) gpio.mode(pin, gpio.INPUT) -- Step 2: DHT22 send response signal -- bus will always let up eventually, don't bother with timeout while (gpio_read(pin) == 0 ) do end local c=0 while (gpio_read(pin) == 1 and c < 500) do c = c + 1 end -- bus will always let up eventually, don't bother with timeout while (gpio_read(pin) == 0 ) do end c=0 while (gpio_read(pin) == 1 and c < 500) do c = c + 1 end -- Step 3: DHT22 send data for j = 1, 40, 1 do while (gpio_read(pin) == 1 and bitlength < 10 ) do bitlength = bitlength + 1 end bitStream[j] = bitlength bitlength = 0 -- bus will always let up eventually, don't bother with timeout while (gpio_read(pin) == 0) do end end --DHT data acquired, process. for i = 1, 16, 1 do if (bitStream[i] > 4) then humidity = humidity + 2 ^ (16 - i) end end for i = 1, 16, 1 do if (bitStream[i + 16] > 4) then temperature = temperature + 2 ^ (16 - i) end end for i = 1, 8, 1 do if (bitStream[i + 32] > 4) then checksum = checksum + 2 ^ (8 - i) end end checksumTest=((humidity / 256) + (humidity % 256) + (temperature / 256) + (temperature % 256)) % 256 if temperature > 0x8000 then -- convert to negative format temperature = -(temperature - 0x8000) end if checksum ~= checksumTest then humidity = -1 end end function M.getTemperature() return temperature end function M.getHumidity() return humidity end return M |
readdht22_test.lua: read data from sensor and print it to the screen in LUA
|
1 2 3 4 5 6 7 8 9 10 11 12 13 14 15 16 17 18 |
humi="XX" temp="XX" PIN = 4 -- data pin, GPIO2 --load DHT22 module and read sensor function ReadDHT22() dht22 = require("dht22") dht22.read(PIN) t = dht22.getTemperature() h = dht22.getHumidity() humi=(h/10).."."..(h%10) temp=(t/10)..","..(t%10) print("Humidity: "..humi.." %") print("Temperature: "..temp.." deg C") -- release module dht22 = nil package.loaded["dht22"]=nil end |
When you have uploaded those two files select readdht22_test.lua from the yellow section and click dofile
Now you should see two lines
Humidity: xx.x %
Temperature: xx.x deg C
For every press on dofile you should see values from sensor
Step 4: Prepare MYSQL database
I am using a WAMPServer 2.5 with Apache 2.4.9, PHP 5.5.12 and MYSQL 5.6.17
I don’t know so much about PHP and MYSQL so please comment if some information is missing or wrong
Create a user named “user” and the password must be “password”, these can be changed later on if wanted
Attached is an export from the database that I am using
Database name is dht22 and datatable name is temphumi
column 1 is date
column 2 is temp
column 3 is humidity
|
1 2 3 4 5 6 7 8 9 10 11 12 13 14 15 16 17 18 19 20 21 22 23 |
SET SQL_MODE = "NO_AUTO_VALUE_ON_ZERO"; SET time_zone = "+00:00"; /*!40101 SET @OLD_CHARACTER_SET_CLIENT=@@CHARACTER_SET_CLIENT */; /*!40101 SET @OLD_CHARACTER_SET_RESULTS=@@CHARACTER_SET_RESULTS */; /*!40101 SET @OLD_COLLATION_CONNECTION=@@COLLATION_CONNECTION */; /*!40101 SET NAMES utf8 */; CREATE TABLE IF NOT EXISTS `temphumi` ( `date` timestamp NOT NULL DEFAULT CURRENT_TIMESTAMP, `Temp` varchar(255) NOT NULL, `Humi` varchar(255) NOT NULL, UNIQUE KEY `datum_2` (`date`), KEY `datum` (`date`) ) ENGINE=InnoDB DEFAULT CHARSET=latin1; INSERT INTO `temphumi` (`date`, `Temp`, `Humi`) VALUES ('2015-04-28 22:57:57', '25', '35'); /*!40101 SET CHARACTER_SET_CLIENT=@OLD_CHARACTER_SET_CLIENT */; /*!40101 SET CHARACTER_SET_RESULTS=@OLD_CHARACTER_SET_RESULTS */; /*!40101 SET COLLATION_CONNECTION=@OLD_COLLATION_CONNECTION */; |
Step 5: Test PHP file
This is my dht22.php, save it in the root of www on your webserver.
|
1 2 3 4 5 6 7 |
<?php $result = mysql_connect("123.123.123.123", "user", "password"); $temp = $_GET["temp"]; $humi = $_GET["humi"]; $sqlt = "insert into dht22.temphumi (temp,humi) values ($temp,$humi)"; mysql_query($sqlt); ?> |
change IP adress inside file, now it is 123.123.123.123, change to IP where your webserver is installed
test it in your webserver by typing, e.g. “123.123.123.123/dht22.php?temp=20&humi=30” [ENTER]
open your MYSQL database and now you must see a date, temp and humi values
Step 6: Upload final code to ESP8266
change WiFi settings in top of file, SSID, Password and IP
readdht22.lua: read data from sensor and write to MYSQL
if you want to use Sleep function you have to remove — from init.lua file
–tmr.alarm(1, gsleep*1000, 0, function()
— print(“timer1 trigger dsleep”)
— node.dsleep(sleep*60*1000*1000)
|
1 2 3 4 5 6 7 8 9 10 11 12 13 14 15 16 17 18 19 |
sleep = 5 --minutes to sleep wait = 3 --seconds before executing file gsleep = 20 --seconds until it goes to sleep, don't go below 20 FileToExecute="readdht22.lua" --file to execute l = file.list() for k,v in pairs(l) do if k == FileToExecute then print("*** You've got "..wait.." sec to stop timer 0 ***") tmr.alarm(0, (wait*1000), 0, function() print("Executing ".. FileToExecute) dofile(FileToExecute) end) --tmr.alarm(1, gsleep*1000, 0, function() -- print("timer1 trigger dsleep") -- node.dsleep(sleep*60*1000*1000) -- end) end end |
|
1 2 3 4 5 6 7 8 9 10 11 12 13 14 15 16 17 18 19 20 21 22 23 24 25 26 27 28 29 30 31 32 33 34 |
SSID="SSID" Password="Password" IP='123.123.123.123' wifi.setmode(wifi.STATION) wifi.sta.config(SSID,Password) humi="XX" temp="XX" PIN = 4 function sendData() dht22 = require("dht22") dht22.read(PIN) t = dht22.getTemperature() h = dht22.getHumidity() humi=(h/10).."."..(h%10) temp=(t/10).."."..(t%10) dht22 = nil package.loaded["dht22"]=nil conn=net.createConnection(net.TCP, 0) conn:on("receive", function(conn, payload) print(payload) end) conn:connect(80,IP) conn:send("GET /dht22.php?temp="..temp.."&humi="..humi.." HTTP/1.1\r\n") conn:send("Host: IP\r\n") conn:send("Accept: */*\r\n") conn:send("User-Agent: Mozilla/4.0 (compatible; esp8266 Lua; Windows NT 5.1)\r\n") conn:send("\r\n") conn:on("sent",function(conn) conn:close() end) conn:on("disconnection", function(conn) end) end tmr.alarm(2, 12000, 1, function() sendData() end ) |
Step 7: View data with HighCharts
Download files. Save .js files to a sub folder named JS and php files in the folder above JS
Access temphumi.php with a web browser, if everything is OK you should see data that ES8266 has sent
|
1 2 3 4 5 6 7 8 9 10 11 12 13 14 15 16 17 18 19 20 21 22 23 24 25 26 27 28 29 30 31 32 33 34 35 36 37 38 |
<?php $conn = mysqli_connect("123.123.123.123","user", "password", "dht22"); if (!$conn) { die('Could not connect: ' . mysql_error()); } $sth = $conn->query("SELECT temp FROM temphumi"); $rows = array(); $rows['name'] = 'temp'; while($r = mysqli_fetch_array($sth)) { $rows['data'][] = $r['temp']; } $sth = $conn->query("SELECT humi FROM temphumi"); $rows2 = array(); $rows2['name'] = 'humi'; while($rrrr = mysqli_fetch_array($sth)) { $rows2['data'][] = $rrrr['humi']; } $sth = $conn->query("SELECT date FROM temphumi"); $rows1 = array(); $rows1['name'] = 'Date'; while($rr = mysqli_fetch_array($sth)) { $rows1['data'][] = $rr['date']; } $result = array(); array_push($result,$rows); array_push($result,$rows1); array_push($result,$rows2); print json_encode($result, JSON_NUMERIC_CHECK); mysqli_close($conn); ?> |
|
1 2 3 4 5 6 7 8 9 10 11 12 13 14 15 16 17 18 19 20 21 22 23 24 25 26 27 28 29 30 31 32 33 34 35 36 37 38 39 40 41 42 43 44 45 46 47 48 49 50 51 52 53 54 55 56 57 58 59 60 61 62 63 64 65 66 67 68 69 70 71 72 73 74 75 76 77 78 79 80 81 82 83 84 85 86 87 88 89 90 91 92 93 94 95 96 |
<!DOCTYPE HTML> <html> <head> <meta http-equiv="Content-Type" content="text/html;charset=utf-8" / > <meta http-equiv="refresh" content="150"> <title>Fukt/Temp/Tryck</title> <script type="text/javascript" src="js/jquery.min.js"></script> <script type="text/javascript"> $(document).ready(function() { var options = { chart: { zoomType: 'xy', alignTicks: false, renderTo: 'container', type: 'line', marginRight: 80, marginBottom: 55 }, title: { text: 'Temp och Fukt', x: -20 //center }, xAxis: { crosshair: true, type: 'datetime', tickInterval: 80, labels: { // format: '{value: %H:%M}', dateTimeLabelFormats: { day: '%H:%M' } // align: 'right', // rotation: -90, } }, yAxis: [{ title: { tickInterval: 0.1, text: '°C/%', rotation: 0, }, labels: { overflow: 'justify' } }, { title: { tickInterval: 0.1, text: '°C/%', rotation: 0, }, linkedTo:0, opposite:true }], tooltip: { shared: true }, legend: { enabled: true, layout: 'horizontal', align: 'center', verticalAlign: 'bottom', // x: 0, y: 20, borderWidth: 0 }, series: [] } $.getJSON("datatemphumi.php", function(json) { options.xAxis.categories = json[1]['data']; options.series[0] = json[0]; options.series[1] = json[2]; chart = new Highcharts.Chart(options); }); }); </script> <script src="http://code.highcharts.com/highcharts.js"></script> <script src="http://code.highcharts.com/modules/exporting.js"></script> </head> <body> <div id="container" style="min-width: 400px; height: 400px; margin: 0 auto"></div> </body> </html> |
will be updated soon…