ESP8266 WiFi – Temperatuur en luchtvochtigheid sensor DHT 11 (NodeMCU)


Op deze pagina vind je een voorbeeld om via de ESP-01 module een DHT11/22 sensor te gebruiken via de GPIO pinnen met de firmware NodeMCU.
Hardware
Met deze module kun je de temperatuur en luchtvochtigheid meten, hij is door de fabrikant al behoorlijk geijkt, eventuele aanpassingen (bijvoorbeeld ijken) kunnen softwarematig gedaan worden.
- Werkt op: 5V.
- Temperatuur bereik: 0 – +50 ºC.
- Temperatuur nauwkeurigheid: ±2,0 ºC.
- Vochtigheid bereik: 20-95% RH.
- Vochtigheid nauwkeurigheid: ±5,0% RH.
- Response tijd: < 5 sec.
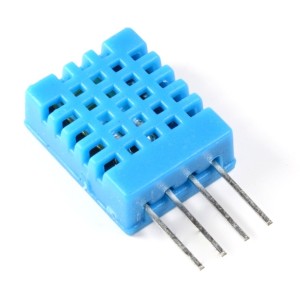
Pinout
| Pin: | Functie: |
|---|---|
| 01 | +5V |
| 02 | Data |
| 03 | NC (niet aangesloten) |
| 04 | GND |
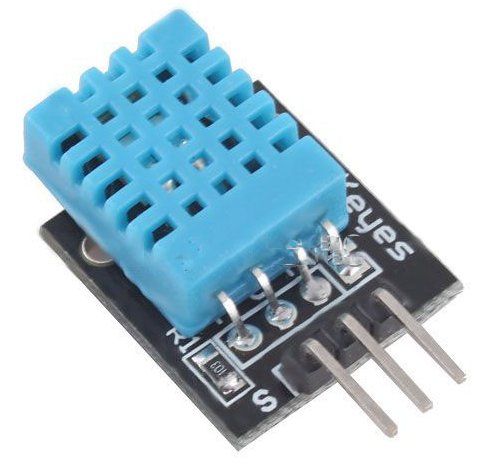
De Keyes versie (met weerstand):
[table “6” not found /]LET OP: Er zijn ook andere versie in omloop, controleer altijd de pinout of raadpleeg de handleiding!
Wat heb je nodig?
1) ESPlorer IDE
2) firmware:
Je zal zelf een firmware moeten proberen (20150107 wordt aanbevolen), ook wordt de float versie aanbevolen, dit is wat ik getest heb:
WERKT – nodemcu_20150107.bin
WERKT – nodemcu_float_0.9.5_20150318.bin
WERKT NIET – nodemcu_float_0.9.6-dev_20150704.bin
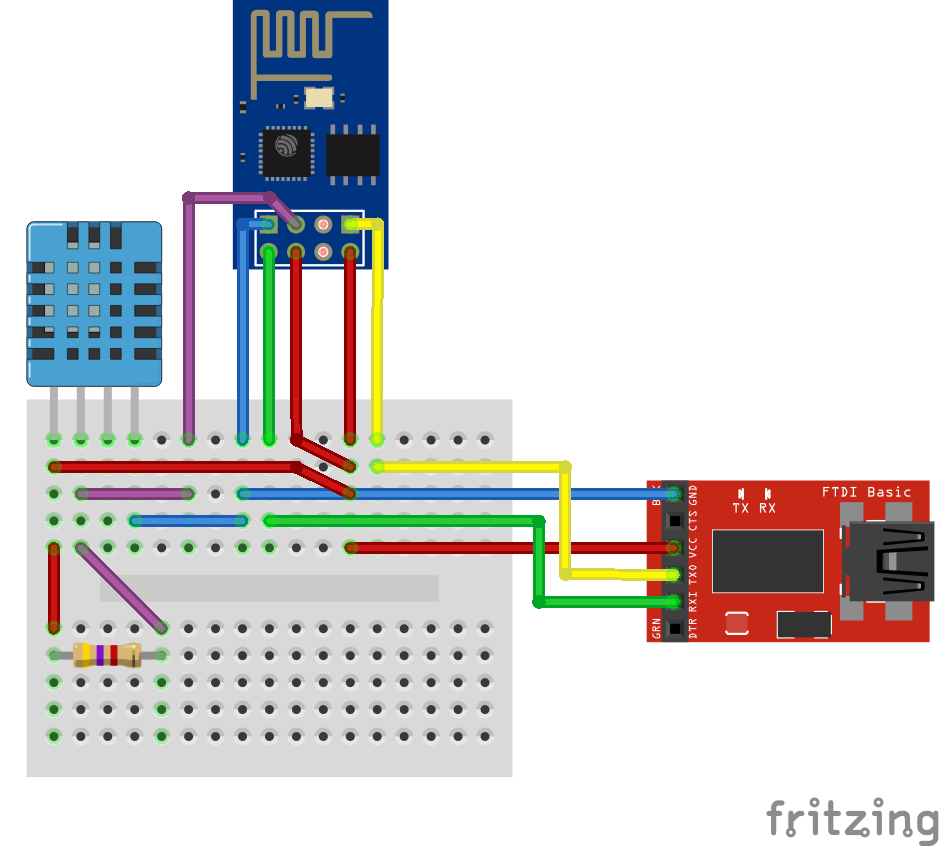
Sluit de DHT11/22 module aan op volgens onderstaand schema:

Upload deze “library” code als dht_lib.lua
Tip: Download de code en sla het op als bestand, gebruik de “Upload…” knop in ESPlorer.
|
1 2 3 4 5 6 7 8 9 10 11 12 13 14 15 16 17 18 19 20 21 22 23 24 25 26 27 28 29 30 31 32 33 34 35 36 37 38 39 40 41 42 43 44 45 46 47 48 49 50 51 52 53 54 55 56 57 58 59 60 61 62 63 64 65 66 67 68 69 70 71 72 73 74 75 76 77 78 79 80 81 82 83 84 85 86 87 88 89 90 91 92 93 94 95 96 97 98 99 100 101 102 103 104 105 106 107 108 |
-- *************************************************************************** -- for communication of DHT sensor only -- DHT module for ESP8266 with nodeMCU floating point -- Written by Javier Yanez -- but based on a script of Pigs Fly from ESP8266.com forum -- MIT license, http://opensource.org/licenses/MIT -- *************************************************************************** local moduleName = ... local M = {} _G[moduleName] = M local humidity local temperature function M.read(pin) local checksum local checksumTest humidity = 0 temperature = 0 checksum = 0 -- Use Markus Gritsch trick to speed up read/write on GPIO local gpio_read = gpio.read local bitStream = {} for j = 1, 40, 1 do bitStream[j] = 0 end local bitlength = 0 -- Step 1: send out start signal to DHT22 gpio.mode(pin, gpio.OUTPUT) gpio.write(pin, gpio.HIGH) tmr.delay(100) gpio.write(pin, gpio.LOW) tmr.delay(20000) gpio.write(pin, gpio.HIGH) gpio.mode(pin, gpio.INPUT) -- Step 2: DHT22 send response signal -- bus will always let up eventually, don't bother with timeout while (gpio_read(pin) == 0 ) do end local c=0 while (gpio_read(pin) == 1 and c < 500) do c = c + 1 end -- bus will always let up eventually, don't bother with timeout while (gpio_read(pin) == 0 ) do end c=0 while (gpio_read(pin) == 1 and c < 500) do c = c + 1 end -- Step 3: DHT22 send data for j = 1, 40, 1 do while (gpio_read(pin) == 1 and bitlength < 10 ) do bitlength = bitlength + 1 end bitStream[j] = bitlength bitlength = 0 -- bus will always let up eventually, don't bother with timeout while (gpio_read(pin) == 0) do end end hum=" " tem=" " chk=" " --DHT data acquired, process. for i = 1, 16, 1 do hum=hum.." "..tostring(bitStream[i]) tem=tem.." "..tostring(bitStream[i+16]) if (bitStream[i] > 3) then humidity = humidity + 2 ^ (16 - i) end if (bitStream[i + 16] > 3) then temperature = temperature + 2 ^ (16 - i) end end for i = 1, 8, 1 do chk=chk.." "..tostring(bitStream[i+32]) if (bitStream[i + 32] > 3) then checksum = checksum + 2 ^ (8 - i) end end checksumTest = (bit.band(humidity, 0xFF) + bit.rshift(humidity, 8) + bit.band(temperature, 0xFF) + bit.rshift(temperature, 8)) checksumTest = bit.band(checksumTest, 0xFF) if temperature > 0x8000 then -- convert to negative format temperature = -(temperature - 0x8000) end -- conditions compatible con float point and integer if (checksumTest - checksum >= 1) or (checksum - checksumTest >= 1) then humidity = nil end --print("checksum ", checksum) --print("checksumTest ", checksumTest) --print("humidity - timing of bits ",hum) --print("temperat - timing of bits ",tem) --print("checksum - timing of bits ",chk) end function M.getTemperature() return temperature end function M.getHumidity() return humidity end return M |
Gebruik de volgende code om de temperatuur en luchtvochtigheid weer te geven, sla het op als dhtread.lua:
Let op!: Geef hierin ook aan of het een DHT11 of DHT22 sensor betreft.
|
1 2 3 4 5 6 7 8 9 10 11 12 13 14 15 16 17 18 19 20 21 22 23 24 25 26 27 28 |
sensorType="dht11" -- set sensor type dht11 or dht22 PIN = 4 -- data pin, GPIO2 humi=0 temp=0 --load DHT module for read sensor function ReadDHT() dht=require("dht_lib") dht.read(PIN) chck=1 h=dht.getHumidity() t=dht.getTemperature() if h==nil then h=0 chck=0 end if sensorType=="dht11"then humi=h/256 temp=t/256 else humi=h/10 temp=t/10 end fare=(temp*9/5+32) print("Humidity: "..humi.."%") print("Temperature: "..temp.." deg C") -- release module dht=nil package.loaded["dht_lib"]=nil end ReadDHT() |
Om de sensor uit te lezen start het bestand dhtread.lua
dofile("dhtread.lua")
resultaat:
|
1 2 |
Humidity: 39% Temperature: 21 deg C |
bron:
scottsnowden.co.uk


