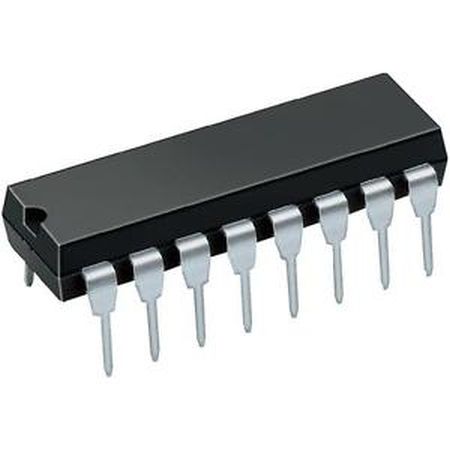
IC – 74HC165 – Shift register input 8-bit
Hardware
Informatie (eng)
General Description
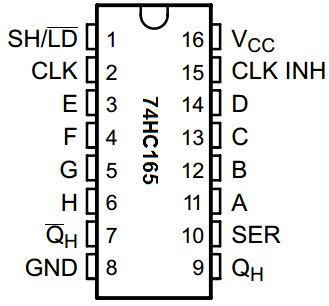
The 74HC165 is an 8-bit serial-in shift register. It uses only 4 Arduino pins, while itself can read in from 8 digital pins. If the parallel load pin (PL) is LOW, the data is read from the A to H pins in parallel. When PL is HIGH, the Q pin is set to the value of the first bit. Each time you change the value from your clock pin from LOW to HIGH, the next bit is send to the Q pin. Therefore you can read in all 8 bits sequentially. Furthermore you can daisy-chain several shift registers, while still using only 4 Arduino pins!
Pinout
Arduino
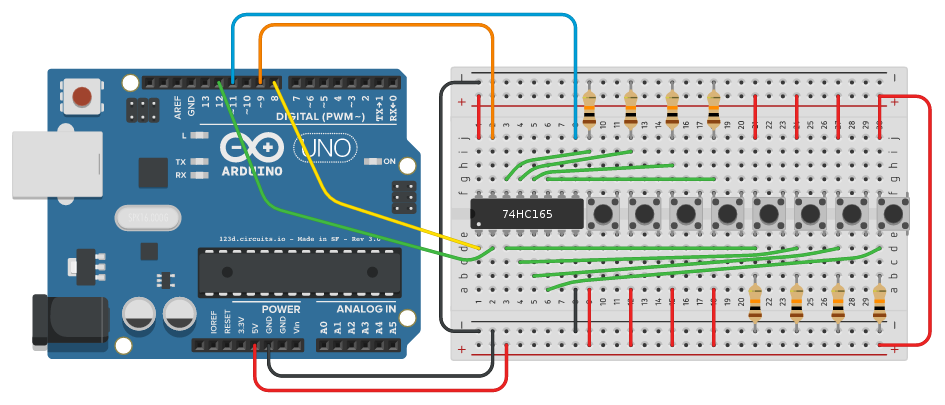
Sluit de IC aan volgens onderstaand overzicht:
Met onderstaand arduino script kun je de chip uitlezen:
|
1 2 3 4 5 6 7 8 9 10 11 12 13 14 15 16 17 18 19 20 21 22 23 |
#include <ShiftIn.h> // Init ShiftIn instance with one chip. // The number in brackets defines the number of daisy-chained 74HC165 chips // So if you are using two chips, you would write: ShiftIn<2> shift; ShiftIn<1> shift; void setup() { Serial.begin(9600); // declare pins: pLoadPin, clockEnablePin, dataPin, clockPin shift.begin(8, 9, 11, 12); } void displayValues() { for(int i = 0; i < shift.getDataWidth(); i++) Serial.print( shift.state(i) ); // get state of button i Serial.println(); } void loop() { if(shift.update()) // read in all values. returns true if any button has changed displayValues(); delay(1); } |
Bron(nen):
infectedbytes.com
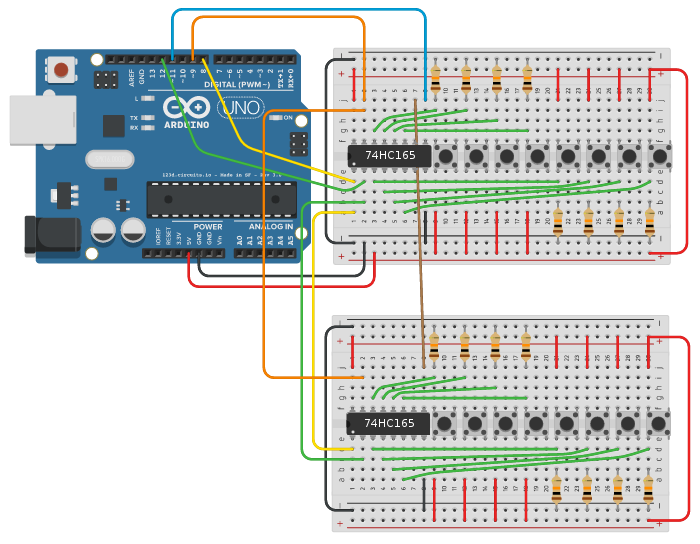
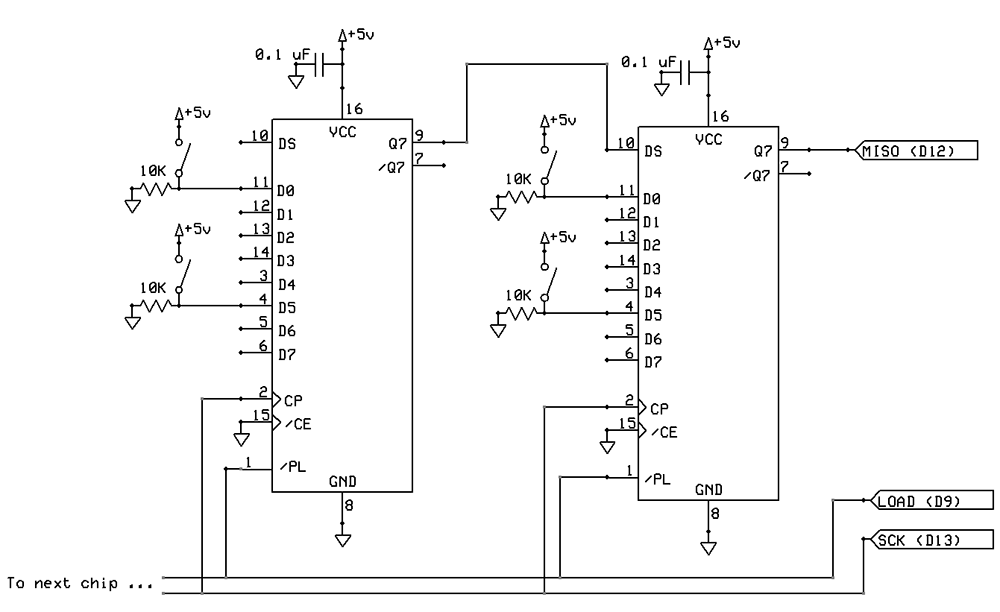
Aansluiten van meerdere IC’s (pin 10 aansluiten op volgende IC pin 9):
Voorbeeld schemavorm:
Arduino Library
ArduinoShiftIn
This is a small library for reading in values from a 74HC165 8 bit shift register.
The Arduino has only a limited amount of pins, therefore it might happen that you run out of pins. For this case, the 74HC165 comes to the rescue. It is an 8 bit shift register. It allows you to read in 8 values by only using 4 pins on your Arduino. Furthermore you can daisy-chain several shift registers by still only using 4 Arduino Pins.
Usage
If you have installed this library, you can include it by navigating to Sketch > Include Library > ShiftIn. This will add the line #include <ShiftIn.h> to your sketch (of course you could also write this line manually).
Now you can actually use this library:
|
1 2 3 4 5 6 7 8 9 10 11 12 13 14 15 16 17 18 19 20 21 22 23 |
#include <ShiftIn.h> // Init ShiftIn instance with one chip. // The number in brackets defines the number of daisy-chained 74HC165 chips // So if you are using two chips, you would write: ShiftIn<2> shift; ShiftIn<1> shift; void setup() { Serial.begin(9600); // declare pins: pLoadPin, clockEnablePin, dataPin, clockPin shift.begin(8, 9, 11, 12); } void displayValues() { for(int i = 0; i < shift.getDataWidth(); i++) Serial.print( shift.state(i) ); // get state of button i Serial.println(); } void loop() { if(shift.update()) // read in all values. returns true if any button has changed displayValues(); delay(1); } |
API
Depending on the number of chips, this library will use different data types. If you are only using one chip, the type ShiftType will be an unsigned byte (uint8_t). For two chips it will be an unsigned int (uint16_t). For three and four chips it will be an unsigned long (uint32_t) and for 5 to 8 chips it will be an unsigned long long (uint64_t). More than eight chips are not supported yet.
This function must be called in the setup function. It is used to tell the library the pins it should use.
|
1 |
<span class="pl-k">void</span> <span class="pl-en">begin</span>(<span class="pl-k">int</span> ploadPin, <span class="pl-k">int</span> clockEnablePin, <span class="pl-k">int</span> dataPin, <span class="pl-k">int</span> clockPin) |
Gets/sets the delay time for the clock pin (in microseconds). This value defaults to 5 and in most cases there’s no need to change it.
|
1 2 |
<span class="pl-c1">uint8_t</span> <span class="pl-en">getPulseWidth</span>() void setPulseWidth(<span class="pl-c1">uint8_t</span> value) |
Returns the number of buttons (bits in the state)
|
1 |
<span class="pl-c1">uint16_t</span> <span class="pl-en">getDataWidth</span>() |
Returns true if any button has changed its state during the last frame.
|
1 2 |
boolean <span class="pl-en">hasChanged</span>() boolean hasChanged(<span class="pl-k">int</span> i) <span class="pl-c">// same as above, but only for button i</span> |
Returns the complete state for this frame / last frame
|
1 2 |
ShiftType <span class="pl-en">getCurrent</span>() ShiftType getLast() |
Returns the state of a single button for this frame / last frame
|
1 2 |
boolean <span class="pl-en">state</span>(<span class="pl-k">int</span> i) boolean last(<span class="pl-k">int</span> i) |
Whether button i is just pressed/released
|
1 2 |
boolean <span class="pl-en">pressed</span>(<span class="pl-k">int</span> id) <span class="pl-c">// wasn't pressed lasst frame, but is pressed now</span> boolean released(<span class="pl-k">int</span> id) <span class="pl-c">// was pressed last frame, but is released now</span> |
This function (or the update function) should be called each frame exactly once. It will read in all values from the shift registers and it will return the new state.
|
1 |
ShiftType <span class="pl-en">read</span>() |
This function is basically the same as the read function, but it will return true if some button has changed its state and false otherwise
|
1 |
boolean <span class="pl-en">update</span>() |
Download @ github.com/InfectedBytes/ArduinoShiftIn
- ShiftIn-1.0.0.7z 232,67 kb
Afmetingen
GEEN GEGEVENS
Schema
GEEN GEGEVENS
Teardown
GEEN GEGEVENS
Datasheet
Fritzing
GEEN GEGEVENS
Downloads
GEEN GEGEVENS


