Mechanica Software – GRBL Controller
![]()
GRBL CONTROLLER
Informatie (ENG):
Grbl Controller is software that is designed to send GCode to CNC machines, such as 3D milling machines. It isn’t super smart, it just needs to give the user a nice way to get commands down to whatever controller they are using.
Version 3.0 is has been optimized for the Arduino to control Grbl shields. I am using it to control my Shapeoko milling machine. It is the only program I use with my Shapeoko in order to maximize the amount of real-world testing.
Grbl Controller is written using the Qt cross-platform libraries. It also gets some help from the QextSerialPort library to simplify choosing the correct USB serial port.
Qt is pretty cool because you can create a nice GUI application for Windows, Mac and Linux. Qt was originally developed by Nokia (ok, Trolltech to be exact, bought by Nokia). To develop in Qt you must be proficient in C++.
Why am I writing about this? I wanted a controller that would run on an old Pentium III laptop running Debian 6 – the only option was Universal G-Code-Sender written in Java, which unfortunately ran really slow on 256 MB of RAM due to the Java requirements. There is a pretty nice Windows-only project called GCodeSender that has been in use for the Shapeoko project since the early days.
I found a project on github called GrblHoming aka Grbl Controller, which was originally developed by Kosme, which showed promise for running native C++ on Linux, however it needed some attention.
I forked the project and started tweaking it to compile and run under Linux. I got it working and posted a version. Although it mostly worked, the bugs started to, well, bug me. I also knew people were interested in a native Mac version, so lots of hours later (mostly spent learning the ins and outs of Qt) I’ve produced version 3.0, which provides some neat enhancements like a status bar and time elapsed. It is also a near full rewrite to take into account how Qt protects memory objects across multiple threads using “signals and slots”.
For information on how to build it on all three platforms, check out this multi-page “manual”.
Give it a try and let me know if it works for you.
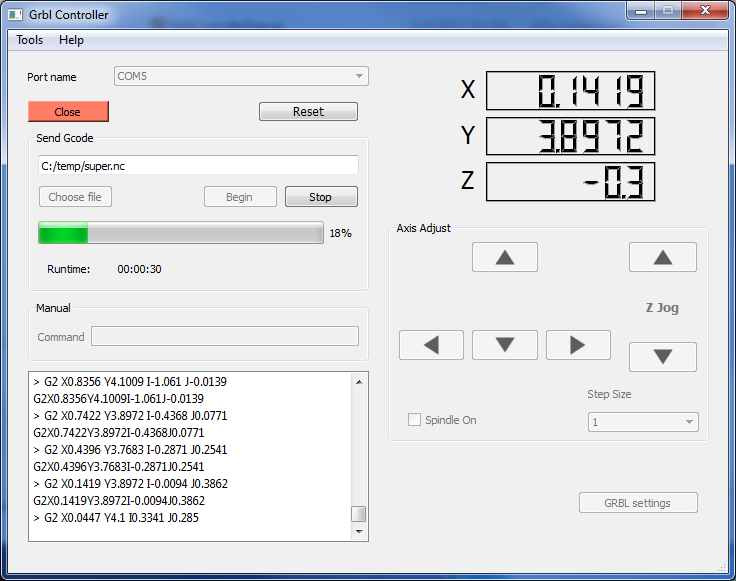
Here is an interface of the Grbl Controller V3.0. In this shot it is connected to my test Arduino running an older version of the Grbl code. The latest code doesn’t echo commands.
Using Grbl Controller 3.0
Preparing
- Power up Arduino and shield
- With motor off, manually position milling bit over origin (0,0) on the work piece. The origin is the intersection of X and Y on your CAD drawing.
- Start Grbl Controller
- Select COM port and open
Adjusting
- Choose appropriate step size (start with 1)
- Press the Z down button, the milling bit should move down towards the work piece 1 mm. The Z jog speed can be adjusted in menu Tools -> Options
- Repeat until the the bit is almost touching
- Turn on motor
- Press Grbl Controller’s Reset button to zero the Arduino Grbl code
Sending G-code
- Choose Send GCode radio button
- Open desired file, usually .nc
- Press Begin. If for some reason there is a long, slow traverse, the controller may time out. Increase timeout value in Tools -> Options
Finish
- Turn off motor when milling is complete
Emergency
- Press the Reset, Stop or Close button on Grbl Controller – the steppers should stop within a second or two. If not, power off your shield
|
1 2 3 4 5 6 7 8 9 10 11 12 13 14 15 16 17 18 19 20 21 22 23 24 25 26 27 28 29 30 31 32 33 34 35 36 37 38 39 40 41 42 43 44 45 46 47 48 49 50 51 52 53 54 55 56 57 58 59 60 61 62 63 64 65 66 67 68 69 70 71 72 73 74 75 76 77 78 79 80 81 82 83 84 85 86 87 88 89 90 91 92 93 94 95 96 97 98 99 100 101 102 103 104 105 106 107 108 109 110 111 112 113 114 115 116 117 118 119 120 121 122 123 124 125 126 127 128 129 130 131 132 133 134 135 136 137 138 139 140 141 142 143 144 145 146 147 148 149 150 151 152 153 154 155 156 157 158 159 160 161 162 163 164 165 166 167 168 169 170 171 172 173 174 175 176 177 178 179 180 181 182 183 184 185 186 187 188 189 190 191 192 193 194 195 196 197 198 199 200 201 202 203 204 205 206 207 208 209 210 211 212 213 214 215 216 217 218 219 220 221 222 223 224 225 226 227 228 229 230 231 232 233 234 235 236 237 238 239 240 241 242 243 244 245 246 247 248 249 250 251 252 253 254 255 256 257 258 259 260 261 262 263 264 265 266 267 268 269 270 271 272 273 274 275 276 277 278 279 280 281 282 283 284 285 286 287 288 289 290 291 292 293 294 295 296 297 298 299 300 301 302 303 304 305 306 307 308 309 310 311 312 313 314 315 316 317 318 319 320 321 322 323 324 325 326 327 328 329 330 331 332 333 334 335 336 337 338 339 340 341 342 343 344 345 346 347 348 349 350 351 352 353 354 355 356 357 358 359 360 361 362 363 364 365 366 367 368 369 370 371 372 373 374 375 376 377 378 379 380 381 382 383 384 385 386 387 388 389 390 391 392 393 394 395 396 397 398 399 400 401 402 403 404 405 406 407 408 409 410 411 412 413 414 415 416 417 418 419 420 421 422 423 424 425 426 427 428 429 430 431 432 433 434 435 436 437 438 439 440 441 442 443 444 445 |
V3.6.1 Executable release rollup IMPORTANT: Manual/Jog control defaults to new mode which doesn't update the position. This was done to ensure that jog motions are as fast as possible. However, if you want to have the original 3.5.1 and earlier behavior, go to Tools | Options | Display and change radio button to "Always Request but without Idle Check". Sending files still updates position, it is only manual/jog that does not. V3.6 Enhancements - Options dialog is now tabbed to better fit widgets - Ability to handle 4th axis as either A, B, or C (requires correct grbl version for axis), please see https://github.com/zapmaker/GrblHoming/issues/56 and https://github.com/LETARTARE/Grbl_with_Arduino/tree/master/Grbl845Mega2560 which is the A,B,C,U,V,W axes grbl variant. - LETARTARE: Added UVW axes - #45: Added ability to completely or partially turn off querying position from grbl to help improve responsiveness. The new default is to disable waiting for idle before a jog or manual command, which speeds up those operations. Additional, you can completely turn it off position reporting during jog or manual control which will result in light-greyed LCD numbers. A button to query the position has been added, which will provided up-to-date position at the time the button is pushed. Look in Options | Display tab for new button options. You can also set the rate at which the query takes place from 0.5-10 seconds, if it is enabled. Setting a time that is too long may result in the system waiting too long to retrieve the final position before control is handed back. Also, the current position dot on the Visualizer turns from red to green when the position is not accurately known to match the color of the path. Bug fix - Fixed fourth axis adjust buttons and coordinate display greyed out when they shouldn't be (under specific operating circumstances). V3.5.1 Enhancements - Made subtle modifications to the command preload when sending a file so that the command queue on grbl is as full as possible. Previously we were depleting the queue and then filling it again. This has possible negative performance implications, although testing shows them to be negligible, probably because we immediately send a command after the last ok is received. - The status list view now supports only a maximum of 200 items when active. This was done for the slower processors like the raspberry pi to prevent excessive CPU usage when many commands lines exist in a file. When the user grabs the scrollbar, all items are restored back into the view. - A new progress bar has been added showing the current items in the grbl queue during a file send. If the number of items for some reason drops to 0 the label text will flash red. For this 0 count to occur is a very rare event. - Added the ability to set the delay between sending of characters to grbl. The theory is that grbl can drop characters if the sending computer is very fast. There is still some debate on whether this is happening, so I provided the ability to set this value in the options from 0 to 20 ms. Note: The default of 0 ms delay is back, like in 3.4.6 and unlike in 3.5 which has a hardcoded 10 ms delay. Bug fix - Modified the status window redraw to always ensure items show on the bottom when the redraw timer expires. V3.5 Bug fix - For very fast computers, they send characters with virtually no delay between which requires grbl to process the serial port as fast as it can. The problem is that grbl has an interrupt service routine that can slow down the processing it does of incoming characters on its serial port. This causes lost characters in its input buffer, which results in hung gcode file processing or errors. To fix, I have added a slight delay (10ms) after sending every character. This has been confirmed to solve the lost character problem on grbl. V3.4.6 Bug fix - Scrolling of content now completes each time. Previously there were conditions where auto-scrolling would fail and you would have to manually scroll to see some lines - Fixes to support 4-axis Mega2560 (tested with actual Mega2560 running 0.81 c-axis). Includes fix to command filter to support A/B/C axis commands - Fixed minor issue where connecting with wrong baud rate can cause long delay before you can again control the Open/Close button - Incorporated more translations from LETARTARE V3.4.5 Bug fix - When modifying the ui files for auto widget rescaling, broke a number of programmatically greyed out widgets, mainly, you couldn't reopen the port after closing it. Now those are fixed. Enhancement - Incorporated LETARTARE's localization file for French so that it is possible to see locale-specific text in the installed version of Grbl Controller (see trlocale subdir) V3.4.4 Bug fix - Incorporated LETARTARE's 4-axis (C-axis) implementation - thanks! (Issues #29 and #34) (added option to enable/disable 4-axis mode) - potential issue that needs investigating: Can this be enabled on the fly or if it requires restart of Grbl Controller? - Incorporated LETARTARE's translation support (French) - Incorporated LETARTARE's fix for command history (#26) - Incorporated Kosme's fix to issue #17 (#33). Z axis slider now moves in 0.1 inch increments when in inches mode. - Incorporated Kosme's fix to issue #27. If work units are inches, now displays inches, not mm. Enhancements - Ability to resize entire screen and widgets. Scales down to close to 600x400 pixels for tiny displays; also remembers last size and position of screen. (#37) - Incorporated Kosme's fix to issue #10 (#33). Popup appears to remind you to zero position if starting a new job. V3.4.3 Bug fix - Unsupported G43/G44 commands include following Z command which causes problems when left standalone. The entire line must be removed. - Now treat M2 and M30 as unsupported as they cause grbl lockup when using aggressive preloading. - Moved program version define into its own header file so fewer files need recompiling with a version change. V3.4.2 Bug fix - If a gcode command line is an arc with X,Y,Z and z-rate limiting enabled, fixed to properly split the z rate to not use the G2 command and use G1 instead as grbl was generating an error with the G2. V3.4.1 Code sync - Fixes to code now allows code to compile under Qt5 without error and also resolves some localization issues. Continues to properly compile under Qt4 also. No normally noticable functional differences. V3.4 Enhancements - Z-axis slider now allows rapid control of Z-axis positioning. This feature is still being evaluated for proper behavior due to some user-interface issues. If you run into trouble, please report a bug. - All axis control buttons have been permanently enabled regardless of whether or not an axis command is in progress - this allows more rapid updating. Note - there is no error checking for the case of entering too many commands for the Grbl buffer. This is unlikely but possible. - Now supports setting of baud rates from 9600 to 115200 - Aggressive preload enabled is now the default. If the user upgraded from an older Grbl Controller and had it disabled, a popup will warn them that it is being enabled. They still have the option to disable, if desired - Logging is turned on by default (only for new installs) - All detected errors are collected and displayed after a file is run in the status view - If filtering unsupported commands, all commands filtered out are listed after the file is run. - Logging now gives the line number of each command sent from the file and the corresponding ok or error also contains the line number. - An option has been provided to reduce the precision of lines that exceed Grbl's line buffer, which by default is 50 characters. The code removes the arguments with the greatest precision first and ending with at least one decimal place of precision. Errors are generated if it cannot remove sufficient precision for the available buffer space. The buffer size on Grbl is configurable in the options, as older Grbls have 50 characters and newer have 70. Bug Fixes - If Grbl stops responding (waiting for an ok), Soft Reset Grbl now functions correctly (so you can soft reset without having to restart Grbl Controller). This affects aggressive preload mode only. - Commands to start/stop coolant coupled with dwell commands and aggressive preload cause Grbl's modal logic to stop sending OK responses (on purpose). This was solved by waiting for the OK of the coolant off before sending additional commands. It is not clear whether this fixes all possible such modal problems, so use carefully and report any anomalies. V3.3.9 Enhancement - We now are able to remember and restore ports that are not visible to QextSerialEnumerator so that user doesn't have to retype the ghost port every time they start Grbl Controller. V3.3.8 Enhancement/Fix - Modified code that detects presence of Grbl upon serial port opening, the original assumption was that we would get the version string upon serial port open, but some Arduino-compatible boards like the AlaMode did not behave this way. Fixed the code so that if there is no response upon serial port open, we send a soft reset (Ctrl-X) and wait for the version string. Tested to work with AlaMode and with traditional Ardiuno Uno. V3.3.7 Enhancement - Made COM port field editable V3.3.6 Bug Fixes - Fixed decimal on the LCD display to always show three decimal points so that it is easier to read the display (it doesn't jump around anymore). Tested to hold up to 9999.999 and -9999.999, which should handle 20 x 20 meter Shapeokos. V3.3.5 Bug Fixes - Changed how we detect Grbl upon opening on COM port. ** NOTE ** This change will probably break older V0.51 capability Previously we sent out a linefeed to trigger a response, however, this caused problems on some arduino variants and would not result in correct sync with the controller. Fixed by no longer sending the linefeed and instead just watch the port for Grbl response. - Changed the default "short" wait timeout to 2 seconds from 1 second in case of slow responses. V3.3.4 Enhancements - Added option checkbox to choose to filter gcode or send it as-is to the controller. The filtering removes gcode that is not supported in v0.8 of Grbl, which reduces the error reports from Grbl. Some files generate unexpected codes like G91.1 which can actually affect the motion in unexpected ways- filtering helps prevent this from happening. IMPORTANT: The default is to not filter, which is different than previous versions! This may result in unexpected command processing. If using advanced gcodes, perform an air run first. Bug Fixes - Mach3 files have no whitespace in the gcode. Fixed code to handle such files. Affects the Visualizer only. - The filtering logic was fixed to properly filter gcode when sending a file - previous versions would filter out gcode that Grbl supported. - Changed validator for double (i.e. float) values so that code compiles under older Qt versions. - Changed Visualizer display to say Width-X and Height-Y instead of Width and Depth to make it less confusing. V3.3.3 Bug Fix - Modal G arc (where G2 or G3 is specified once followed by X/Y/I/J) was failing for certain arc combinations in the visualizer due to resetting the cw to false with each line. Fixed to not reset the cw variable and retain from previous lines. V3.3.2 Bug Fix - G-command can now be set once and multiple X/Y commands then issued on lines following (Allows "ShapeOko_Calibration_Pattern_01b.ngc to be rendered) V3.3.1 Bug Fixes - Hardened the visualizer's file parser so that it supports spaces between positional arguments and values - No longer skips last line in file if that line contains a valid command - No longer crashes if line contains one or more stray whilespace characters - Also accepts semi-colon as a comment line (in addition to existing open paren and percent) V3.3 Enhancemetns - Added "Visualizer" feature. It is now possible to see top-down view of the file to be milled. * Shows actual file units (inches or millimeters) independent of coordinate display * Auto-scaling * Supports limited subset of commands (G0/G1/G2/G3) * Visualizer on tab panel shared with Axis control * Actual last spindle cutter position is shown; auto-scales to include both cutter and file * When file is being run, overlay of all commands sent to Grbl is shown in green * Displays dimensions of design, along with design's width and depth in file's units V3.2 Enhancements - Support for "Aggressive Preload" of commands when sending file to Grbl * File's lines are sent to Grbl as fast as Grbl can take it, allowing Grbl to optimize acceleration. Some files have been observed to take 1/3 the time to complete! * Modeled after Grbl's own python script (computes/predicts how much space is available in Grbl's input buffer) * Due to the additional processing, CPU usage is greater than normal mode and it has been optimized to run fine on a Raspberry Pi * Normal (non-preload) mode is the default * Response processing code now waits until a line has been received rather than collect a long stream to behave like the python script * LCD updates have been set to be roughly once every second independent of rate of line sends/preloads - Z-rate limit feature now includes default xy rate setting * Z rate limiting only occurs during file sends. If z is included with x&y then they are split into two commands automatically and the xy rate setting is used for the xy portion * Since feed rate is modal, code will fix any subsequent xy items that are missing feed rate specifiers (cambam correctly adds them, but others may not) - Replaced basic logging with Log4Qt logging capabilities. * Support for error, warning, info, debug message types. All messages are timestamped. * More diagnostic messages added, mainly around sending and receiving from com ports * Only error and warning are displayed in release build, all are displayed in debug. * If the user enables file logging, all messages are stored regardless of build type * File is output to user's home folder * If you enable or disable logging to file, you must restart Grbl Controller * You can split out diagnostic from status messages by grepping for (DIAG) or (STATUS) - Changed menus so that the first menu is File > Exit. Menus now use accelerators Bug Fixes - Fixed problems with z-rate limit feature, previous version was not implemented correctly. - Fixed subtle issues with sending bytes to COM port * On really fast Windows PCs, the default timeout values would occasionally result in a line not being sent. This was fixed by changing the write timeout from 10 to 500 ms by hardcoding it into the QextSerialPort library. This was only observed in aggressive preload mode, never in normal mode. Known issues - New reponse line detect mode requires more processing because mainly of the faster stream of status messages. To get around this, certain features have been disabled in the status view so that CPU usage is manageable on the Raspberry Pi, specifically the horizontal scroll bar is not available. Turn on file logging if you wish to see the entire line. - When using aggressive preload, any error messages returned by Grbl are not synced to sent messages (they come back randomly). This can be confusing. - If running preload, it can take longer for steppers to stop after a Stop command due to the number of items in Grbl's queue. The only way to stop sooner is to press Close / Reset button - Under exteme CPU loads (unlikely to occur with recent optimizations), the "runtime" display does not display accurate times, oddly, it displays the same time that would occur if not under load Tested on cardboard using file provided by user: - Windows 7 64bit, 0.8c, aggressive mode (~4 minute run) - Windows 7 64bit, 0.8c, normal mode (~10 minute run) - Windows 7 64bit, 0.8a, aggressive mode(~4 minute run) - Raspberry Pi, 0.8c, aggressive mode (~4 minute run) - Raspberry Pi, 0.8c, aggressive mode and z-limit (~6 minute run) V3.1.2 (unofficial release, optimizations for Raspberry Pi) Enhancements - Optimized multiline write to status window to use faster list-based approach - Removed unnecessary main window repaint after every line added to status window - Fixed options window text positioning so that it appears proper on the pi V3.1.1 (unofficial release, adjustments for Raspberry Pi) Enhancements - Changed measurement units in LCD from "inches" to "in" (cosmetic) - Shortened text and adjusted main window layout for the text size on the pi V3.1 Enhancements - Supports Grbl 0.8c. Still supports 0.8a. 0.51 is supported but without LCDs. - Grbl settings dialog is now a table of dynamic length depending on # of params. - LCD position data is now obtained from Grbl and is *not* computed - Added LCD displays for both machine and work coordinates - Cycling of Grbl via COM port toggling has been completely removed, except that Close button has now been renamed Close / Reset. - Position data on Grbl is persisted as long as possible to allow for repositioning, etc. - Zero work coordinates has been added (G92) - Go-to-home feature added (lifts tool 5 mm and traverses to x=0, y=0) - Option to put manual command (back) into absolute mode after jog button command - Grbl Soft reset (Ctrl-X) button added - Z-axis rate limiting capability added. Only affects file, not jog or manual commands. - User is required to specify which measurement mode they are using, mm or inches: * Default is millimeters * Grbl is configured to operate in either mm or inches * If a file is sent in inches and user is in mm, it will auto-restore to mm after the file has been sent (and vice-versa, mm->inches) - 0.8c enhancements: * Displays current Grbl state (i.e. Run, Idle, etc.) * LCDs display whether values are in inches or millimeters * Unlock Grbl button added ($X) * Determines and sets parser state for current mm/inch command mode ($G) * Determines and sets coordinate units via $13 - Removed annoying "No movement expected for command" message - Flags that cross threads have been changed to use QAtomicInt - Version is now shown in title bar - A basic log file feature has been added - Runs on the Raspberry Pi! Known Issues - The registry key product name has been changed from GCodeSender to GrblController *** WARNING: Old settings are not migrated **** - Switching between millimeters and inches works, but has not been fully tested - Go to home has not been fully tested with inches mode - Manually issuing $13 or G20/G21 can confuse the program V3.0 Enhancements - Nearly a full code rewrite to ensure ease-of-use and robustness - Percentage complete progress bar for files; also shows time elapsed sending file. - Reset button now cycles COM port which causes Arduino to stop steppers and reinitialize position to 0,0,0 (No more manual Auduino resets!) - Settings configurations are now stored using QSettings class for platform independence. - Only available COM ports are now shown. Uses third-party QextSerialPort library. - App remembers last COM port used, last folder, last file extension used after restart - Ability to configure wait-for-response time - Status list window now shows both sent and received data - Error responses are ignored during file send (nearly 100% of the time they are not important) - Z-jog speed using buttons is configurable - Radio buttons to select mode have been removed in favor of enabling/disabling widgets based on current context. This simplifies usage. - Popups have been removed in favor of writing errors to status list window Bug fixes - Overall code hardening - Properly implementing Qt signals and slots across the board Build verification - Windows 7 64 bit using MinGW - Inno Setup for Windows, installs successfully on Windows 7 - Mac OSX Mountain Lion, target 64 bit and 32 bit executables - Qt Mac installer successfully installs and runs on Mountain Lion and 10.5 32 bit Intel - Linux: Builds successfully on Debian 6, Ubuntu 12.10 V2.1x1 NOTE: Changes were only focused on Arduino GRBL capabilities with the Shapeoko, so things like Tool Change were not tested. Enhancements - Improved handling of response code - this is the most significant change as it ensures reliable send/response handling when sending a file to the Grbl processor. - Manual command now allows hitting return and command is sent. No need to press Go. - Default job step size changed from 0.01 to 1 mm - Compiles and runs under Linux now (tested with Debian and latest Qt) - Works with old 168 Arduino processor (except that old code is buggy and not recommended) - Disabled "go to home at end of job". The arduino code doesn't handle it correctly and mills straight back into and through your work. Checkbox in settings has no effect. Bug fixes - Fixed crash when options file is not present the first time run - Fixed crash when trying to get GRBL settings from device - Settings work with 168 (8 settings) and 328 processors (10 settings) - Fixed Stop to call proper routine stopsig - now Stop button works correctly ------------------------------------------------------------- Fork by Zapmaker at this rev ------------------------------------------------------------- v2.1a Bug fixes - Corrected an issue that caused the program to crash if the g-code had blank lines. V2.1 New Features - Gcode that is valid but is not recognized by GRBL gets filtered and it is not sent. Bug fixes - Corrected an issue that prevented manually sent Gcode for being displayed correctly. - Corrected an issue with the images not displaying. V2.0 Major release - Improved the port handling reducing opening and closing frecuency. - Added the ability to type and send commands directly. - Support for tool change instructions. If enabled it pauses execution, raises the spindle, goes to a fixed location for toolchange, waits for tool change, and continues excecution. - Added About window. V1.0c Minor Bug fixes - Corrected a problem when adjusting axis that caused all axis to move at the same time. Caused by grbl starting in incremental programming. V1.0b Minor Bug fixes - Corrected a bug in the adjusting script. V1.0a Minor Bug fixes - Fixed a bug reading some file formats that avoided the dials from updating. |
Download GRBL controller @ zapmaker.grblcontroller.s3-website-us-west-2.amazonaws.com