MendelMax 1 – Informatie en onderdelen
3D Printer
MendelMax 1
Informatie (ENG):
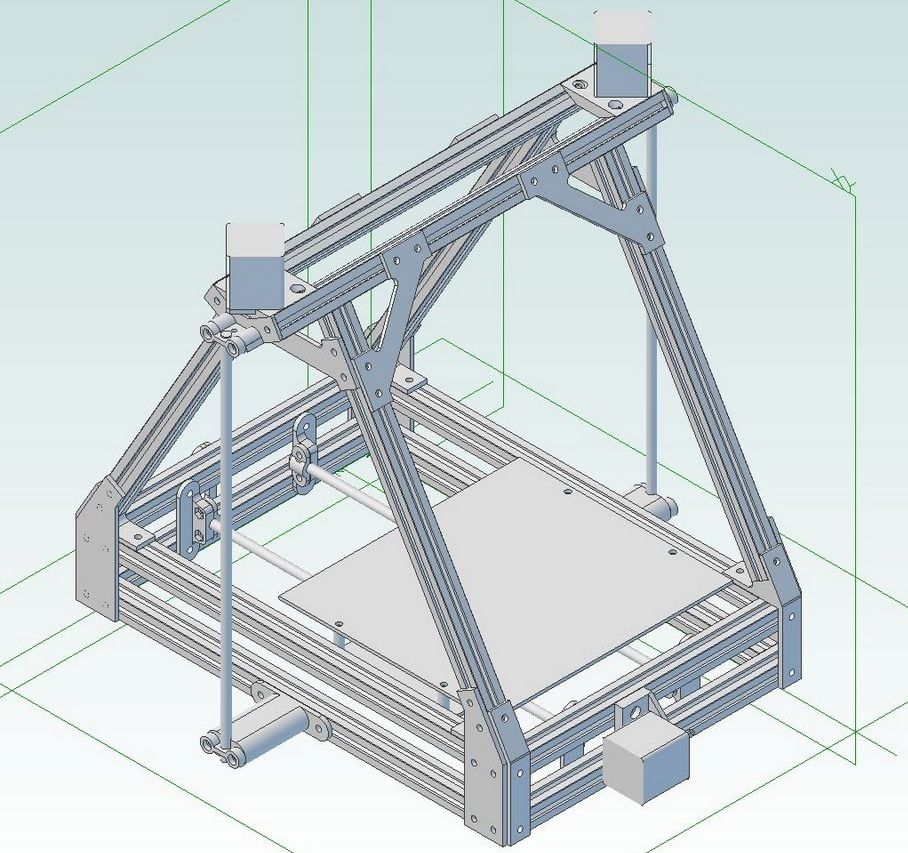
MendelMax (MM) is an Open Source RepRap 3D printer designed by Maxbots in December 2011. It is a true reprap, using printed brackets, but instead of using threaded rod for the structural elements it uses inexpensive aluminum extrusions. This gives a huge increase in rigidity for a minimal extra cost (Self sourcing will cost about $80 more than a standard Prusa when purchased from the recommended suppliers). The required extrusions are available world wide from a variety of suppliers.
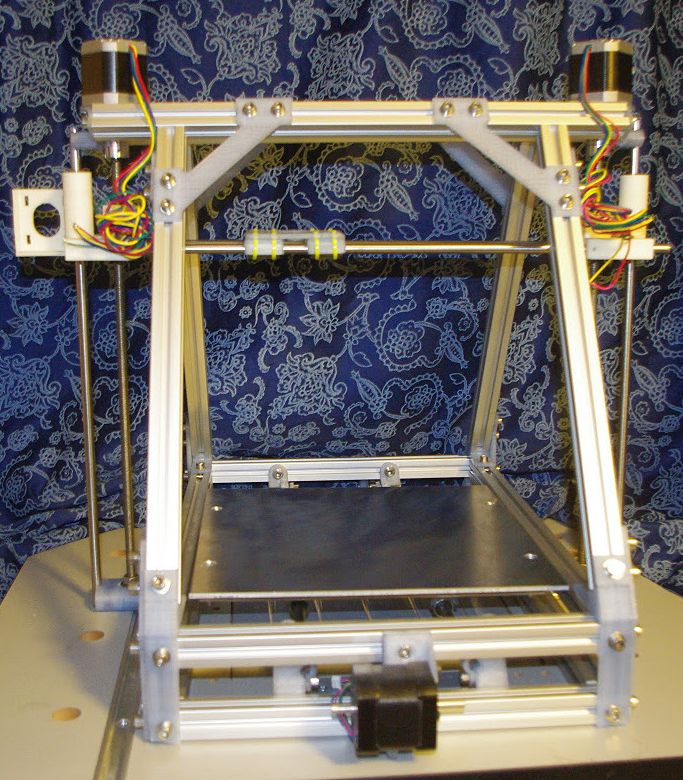
A prototype of the MendelMax RepRap 3d Printer
MendelMax is based on the Prusa Mendel, and keeps its best parts. The Prusa Mendel kept the frame of the Sells Mendel, but fixed the problems in the X,Y and Z axes. MendelMax 1.0 builds on that by largely keeping the current XYZ axes, but completely redesigning the frame.
In addition to the increased rigidity, the printer is much easier to assemble than a standard Prusa. Even an inexperienced builder should have no trouble building the whole frame in an evening, two at most. And along with the easy assembly comes easy hackability. Almost any part on the bot can be removed with just a few screws, so swapping out literally any part on the bot is now a trivial operation.
The X axis is taken stock from the Prusa Mendel, in fact we don’t even specify a specific X axis design, there are several good ones available, including the various vertically-oriented X axis designs that many people are exploring lately. As long as it sticks to the defined standard spacing between the Z rod and the Z leadscrew, it will work fine with MendelMax. We also use the standard Prusa Y design (For version 1.0), though we simplify it just a bit by making it easier to get everything aligned right. Z adds optional thrust bearings to support the weight of the axis (greatly reducing the problems with printed couplers), but this is a purely optional upgrade, and you can easily use the old design if you prefer.
Because MendelMax is primarily defining a new frame design, it is linear-bearing agnostic. I have used both LM8UU’s and PTFE bushings and both work just fine. Brass or even printed bushings could be used, though I recommend avoiding the latter for highest reliability.
The current revision as of July 17 2012 shipping as kits from the official MM store is considered the MM 1.5+. It uses a linear slide for a Y axis rather than polished rods to give the heaviest axis a smoother motion and seems to have cleaned things up greatly. Also different from earlier models the steppers controlling the Z axis have been moved from the top of the printer to the base.
Thingiverse comment:
MendelMax is a new RepRap 3d printer designed by Maxbots. It is a true reprap, using printed brackets, but instead of using threaded rod for the structural elements it uses inexpensive aluminum extrusions. This gives a huge increase in rigidity for a minimal extra cost (Self sourcing will cost about $50 more than a standard Prusa when purchased from the recommended suppliers). The required extrusions are available world wide from a variety of suppliers.
In addition to greatly increased rigidity, this design is faster to assemble (probably 4 hours for most users), easier to print, has a larger build volume (~215x235x190 if built at the standard dimensions), and is easier to hack on.
The X & Y axes are standard Prusa parts, so any design can be used.
Update: The SCAD conversion is mostly complete and available at https://github.com/maxbots/MendelMax To learn how to execute scripts in FreeCAD, read the tutorial at: http://mendelmax.com/tikiwiki/tiki-index.php?page=Getting+Started+with+FreeCAD+scripting Note there may be minor incompatibilities between SCAD generated parts and the parts here on Thingiverse. It should not be an issue intermixing to some extent, but parts that directly connect to another (for example the Y & Z rod mounts & clasps) should always come from the same source. Also note that the SCAD parts are untested at this point so I recommend only using them if you already have a working printer to reprint any parts that may need tweaking.
Update 1/15/2012: Y motor mount & Y Idler mount replaced with much more robust designs. These should fix any flexing issues you might have. The part “Lower Vertex Cupcake” is a replacement for the standard Lower Vertex, but is reduced in height slightly to allow printing on the Cupcake and other small-format printers. Either part will work, but you only need to print one or the other, don’t print both.
Update 2/7/2012: New, improved Lower Vertex pieces uploaded. These parts should be easier to print, easier to assemble, and better looking, though that comes at the expense of being somewhat slower to print. The new parts need to be printed in mirrored pairs, so the the included STLs include one of each part. Print two copies of each of the parts (lower vertex lower and lower vertex upper). You will end up with 8 parts total. If you prefer, you can get the individual STLs for each of the four different parts in the individual lower vertex zip file. One important not about these new parts: WHile they are just as rigid as the old parts, they are not as storng as the old ones. They are amply strong to use the MendelMax as a printer, but DO NOT STAND ON IT! The original parts are still here if you prefer them.
MendelMax 1 list of materials:
| Item | Category | Qty Required for build | Needed for | Notes |
| 10mm M5-.80 screws, bag of 100 | Hardware | 100 | MendelMax | You need exactly 100 of these screws for a standard build, so I recommend you buy a spare bag. If you only get one bag, you can probably source individual replacement screws at Fastenal or another local source, but they are at a substantial premium. You will almost certainly need spares to add accessories. I prefer stainless steel for purely aesthetic reasons, but you can save a couple dollars by using Zinc or Black Oxide. I recommend Socket Head screws, but phillips or other M5-.8 machine screws will also work, but they are more fiddly to assemble. |
| 608ZZ Bearings | bearings | 7 | MendelMax | 2 each are used for the X & Y idlers, 3 for the Wade’s extruder. You will also need four if you use the suggested filament spool. Part number is for a 10 pack for $5, you may want to buy a larger package, these bearings are used in many reprap related projects. |
| 8mm Thrust Bearing | bearings | 2 | MendelMax | These are optional, and are used to support the weight of the Z axis from the base of the printer, instead of from the motor shafts. This should improve reliability and extend motor life. You can safely leave these off if you prefer, and there is little benefit if you are using high quality Z couplers. |
| 8mm Drill Rod 36″ or 1M | hardware | 3 | MendelMax | You can use 8mm or 5/16″, and any formula of drill rod (Called “Silver Steel” in some parts of the world). Type O1 or W1 is usually cheapest and are perfectly suited to what we need. Stainless is also fine, but is considerably more expensive. Plain steel rods from a hardware store are not recommended, and zinc coated rods are not suitable. |
| M3 or SAE #6 washers | hardware | 20 | MendelMax | McMaster part is for a box of 100. Single parts are likely at least $.05 each, so it is most cost effective to just buy 100. |
| Wade’s Idler Stud | hardware | 1 | Wade’s | Not required if you have a cutoff of M8 from your threaded rod, but for $.32 saves the effort of an extra cut. |
| M5 nuts, box of 100 (Thin nuts preferred) | hardware | 1 | MendelMax | You only need a few for the assembly, but it is best to buy 100. Zinc coated is fine. Thin nuts are preferable to normal nuts since they can be used in place of t-slot nuts in a pinch, and even used as post-install nuts (they can be inserted through the top of the slot after the bot is assembled). |
| M3-.50, 10mm long | hardware | 20 | MendelMax | McMaster part is for a box of 100. Single parts are likely at least $.25 each, so it is most cost effective to just buy 100. |
| 20-25mm M5 screws | hardware | 8 | MendelMax | You need 8, but I recommend just getting a box, they will be handy for future projects. Again, Stainless and the screw head type are specified only for looks, any similar screw will work. |
| M5 or #10 Washers, box of 100 | Hardware | 84 | MendelMax | Either M5 or SAE #10 washers will work. I use SAE #10 because they are slightly cheaper in the US. I use stainless for purely aesthetic reasons. |
| 8mm or 5/16″ threaded rod, 36″ or 1M | hardware | 1 | MendelMax | Plain steel or stainless will work, but stainless is recommended. Do not use zinc coated rod, as the zinc can lead to binding. |
| GT2 Belt | Belts | 2 | MendelMax | Suitable pulleys & belts are also available from Misumi, but are considerably more expensive. |
| GT2 Pulleys | Belts | 2 | MendelMax | |
| Linear Bushings | bearings | 12 | MendelMax | After much debate, I have switched the recommended bushings from the previous Igus bushings, to a much easier to use Self Aligning bushing from SDP. Thease are a bit more expensive, but they are basicalaly foolproof, whereas the Igus bushings required a fairly high-precision mounting block that was difficult to reproduce accurately on a RepRap. MANY other choices are available, including LM8UU’s, printed bushings, etc, but this is a good, inexpensive bushing that is very well suited to our application. Please note, SDP offers similar Bronze bushings that are a great choice with precision linear shafting, but are not recommended with drill rod. |
| 300mm extrusions | Extrusions | 4 | MendelMax | |
| 340mm Extrusions | Extrusions | 4 | MendelMax | |
| 420mm extrusions | Extrusions | 6 | MendelMax | |
| T-Slot nuts, bag of 100 | Extrusions | 1 | MendelMax | |
| Blind Joint Screws | Extrusions | 4 | MendelMax | |
| Pololu A4988 Stepper driver | electronics | 4 | RAMPS | Also available from Pololu.com or Ultimachine.com. You need four, but having a spare on hand is not a bad idea. |
| NEMA 17 Motor | motors | 4 | MendelMax | http://ultimachine.com/content/kysan-1124090-nema-17-stepper-motor is also suitable. Desired specs: NEMA17 size, 1.5A or less, 8 mH inductance or less, 62oz.in (44Ncm, 4.4kg.cm) or more of torque, 1.8 or 0.9 degrees per step (200/400 steps/rev respectively) |
| RAMPS electronics | electronics | 1 | RAMPS | Ultimachine.com is also an excellent choice |
| 1″ heat proof spacers | hardware | 4 | Y-axis | Used to rigidly separate the top and bottom plate, Should be heat resistant and preferably not heat conductive. I use hardwood. |
| 12V 30A power Supply | Electronics | 1 | 30A is WAY more than you need, even with a 12V Heated Build Platform, but it should last longer if used well under it’s specified rating, and the difference in price for an extra 10A is only about $10. You can safely use anything as low as 12V 6A with a 120V HBP and 15A with a 12V HBP. http://www.ebay.com/itm/New-12V-DC-30A-350W-Regulated-Switching-Power-Supply-MW-/120692623020?pt=LH_DefaultDomain_0&hash=item1c19d746ac is a known good US seller, but there are other options on ebay that may be better for international buyers. Search for “12V 30A power supply”. With a 30A supply, I happily run two RepRaps from a single power supply. | |
| Aluminum sheet, 9..75x6x0.1″ or 1/8″ | Metal | 1 | Y-axis | Y-axis carriage plate, see above. |
| Aluminum sheet, 9.75x11x0.1″ or 1/8″ | Metal | 1 | Y-axis | Y-axis table, scale as needed. May be cheaper if sourced locally. Other materials are possible, but this is my preferred table design. Alloy is irrelevant, the quoted price is for 3003, which is usually the cheapest. |
| Arduino MEGA 1280 or 2560 | electronics | 1 | RAMPS | Either the 1280 or 2560 works fine, I recommend the 1280. |
| Heated Build Platform | Electronics | 1 | Y Axis | The MendelMax has a slightly larger buld area than a Prusa, but you can use a standard Prusa HBP screwed to the bottom of an aluminum heat spreader. Using a Silicone heater such as McMaster #35765K55 works great too, but requires some expert advice, so consult #mendelMax before ordering. |
| Hobbed bolt | hardware | 1 | Wade’s | It is possible to DIY as well, but for $7 it is not worth the effort. |
| Hot End | Hot End | 1 | MendelMax | http://www.makergear.com/products/operators-pack I recommend the .5mm for 3mm filament to start with. |
| M5-30mm screws | hardware | 4 | Y-axis | Used to connect the two plates. I recommend flat head screws, but you will need to countersink your top plate to use these. You can buy a countersink at your local hardware store. These allow you to set the screw tops flush with the table surface so you will not crash into the screws. |
| M8 or 5/16″ Nuts | hardware | 8 | MendelMax | Any suitable nuts from your local hardware store. Do not use Zinc coated, either plain steel or stainless is fine, and the material does not need to match your rods. |
| M8 or 5/16″ screw or bolt, 25-30mm long | hardware | 2 | MendelMax | Used to mount the the idler bearings on the X & Y axes. You may be able to use leftovers of your threaded rod, in which case you will need two extra nuts above. In the US, you can get these at Fastenal for $0.48 each: http://www.fastenal.com/web/products/detail.ex?sku=73496&ucst=t Again, I use Stainless for aesthetic reasons, but any finish or type of screw will work here as long as it is the right size. |
| M8 or 5/16″ washers | Hardware | 4 | Used for the idlers. If you build the optional filament spool mount you will need an additional four. | |
| NEMA 17 Motor | motors | 1 | Wade’s | An additional stepper is required if you are using a Wade’s extruder. |
| Printed Parts | RP | 1 | MendelMax | Lulzbot.com is selling sets, other sources should be available as well. http://www.lulzbot.com/en/plastic-parts/61-mendelmax-plastic-parts.html |
| Wade’s extruider hardware | hardware | 1 | Wade’s | Misc hardware required by the Wade;s extruder. Since you only need one or two of each, it is best to source these locally. See http://reprap.org/wiki/Wade%27s_Geared_Extruder for the full list. The bearings, hobbed bot (m8-50mm) and the screws and washers for the motor are already in this list. |
| Z Shaft couplers | hardware | 2 | MendelMax | http://www.ebay.com/itm/CNC-5x8mm-Motor-Shaft-Coupler-5mm-8mm-Coupling-/180707733213?pt=LH_DefaultDomain_0&hash=item2a13052edd#ht_4595wt_891. You can also print your own couplers, but I have found printed couplers are considerably less reliable. Printed couplers should work much better if you use the thrust bearings listed above. |
Download Mendelmax 1 @ Github
Download Mendelmax 1 @ Thingiverse