Module – Display – Nokia 5110
Hardware
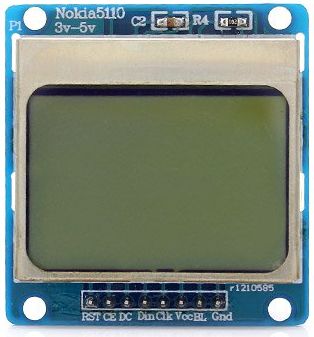
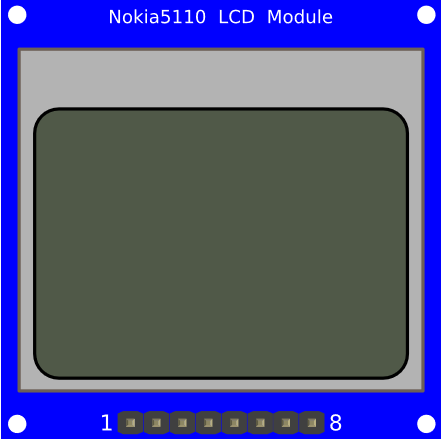
Deze Nokia 5110 displays hebben 84×84 pixels en gebruiken de PCD8544 chip.
Informatie (ENG)
The Nokia 5110 is a basic graphic LCD screen for lots of applications. It was originally intended for as a cell phone screen. This one is mounted on an easy to solder PCB.
It uses the PCD8544 controller, which is the same used in the Nokia 3310 LCD. The PCD8544 is a low power CMOS LCD controller/driver, designed to drive a graphic display of 48 rows and 84 columns. All necessary functions for the display are provided in a single chip, including on-chip generation of LCD supply and bias voltages, resulting in a minimum of external components and low power consumption. The PCD8544 interfaces to microcontrollers through a serial bus interface.
LCD Specificaties (ENG)
- Controller: PCD8544
- Supply: 2.7V to 3.3V
- Interface levels: 2.7V to 5V
- Backlight Colour: Blue
- Backlight supply: 3.3V Max
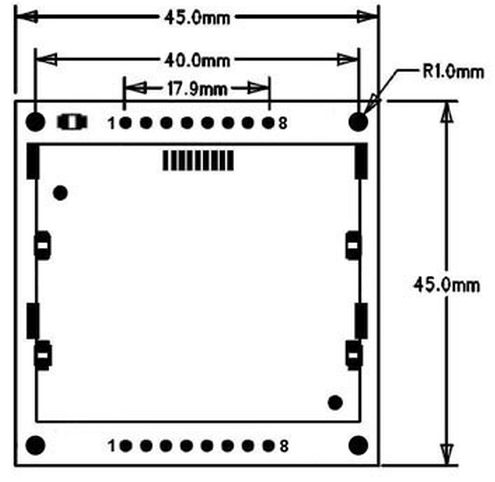
- Module size: W 43.6mm x H 43.1mm
- Working current: < 200uA (Backlight off)
Nokia 5110 LCD Memory Map
The PCD8544 LCD driver has a built-in 504 bytes Graphic Display Data RAM (GDDRAM) for the screen which holds the bit pattern to be displayed. This memory area is organized in 6 banks (from 0 to 5). Each bank contains 84 columns/segments (from 0 to 83). And each column can store 8 bits of data (from 0 to 7). That surely tells us we have
6 banks x 84 segments x 8 bits of data = 4032 bits = 504 bytes
The whole memory map with banks, segments and data is highlighted below.
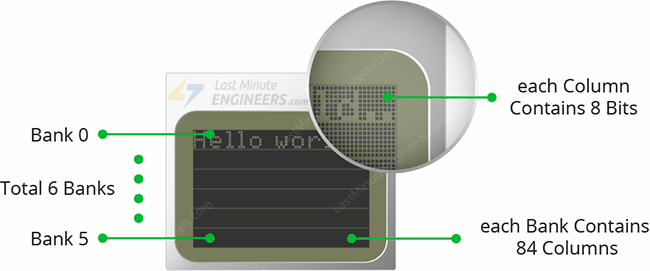
Each bit represents particular pixel on the screen which can be turned ON or OFF programmatically.
Bron: https://lastminuteengineers.com/nokia-5110-lcd-arduino-tutorial/
Pinout

| Pin (van links naar rechts met het display naar boven gericht!) | Afkorting: | Omschrijving: |
|---|---|---|
| 1 | RST | Reset |
| 2 | CE | Chip Enable |
| 3 | DC | Data/Command selection (high = write data / low = write command) |
| 4 | Din | Data in |
| 5 | CLK | Clock |
| 6 | VCC | +5v |
| 7 | BL | +5v (backlight) |
| 8 | GND | Ground |
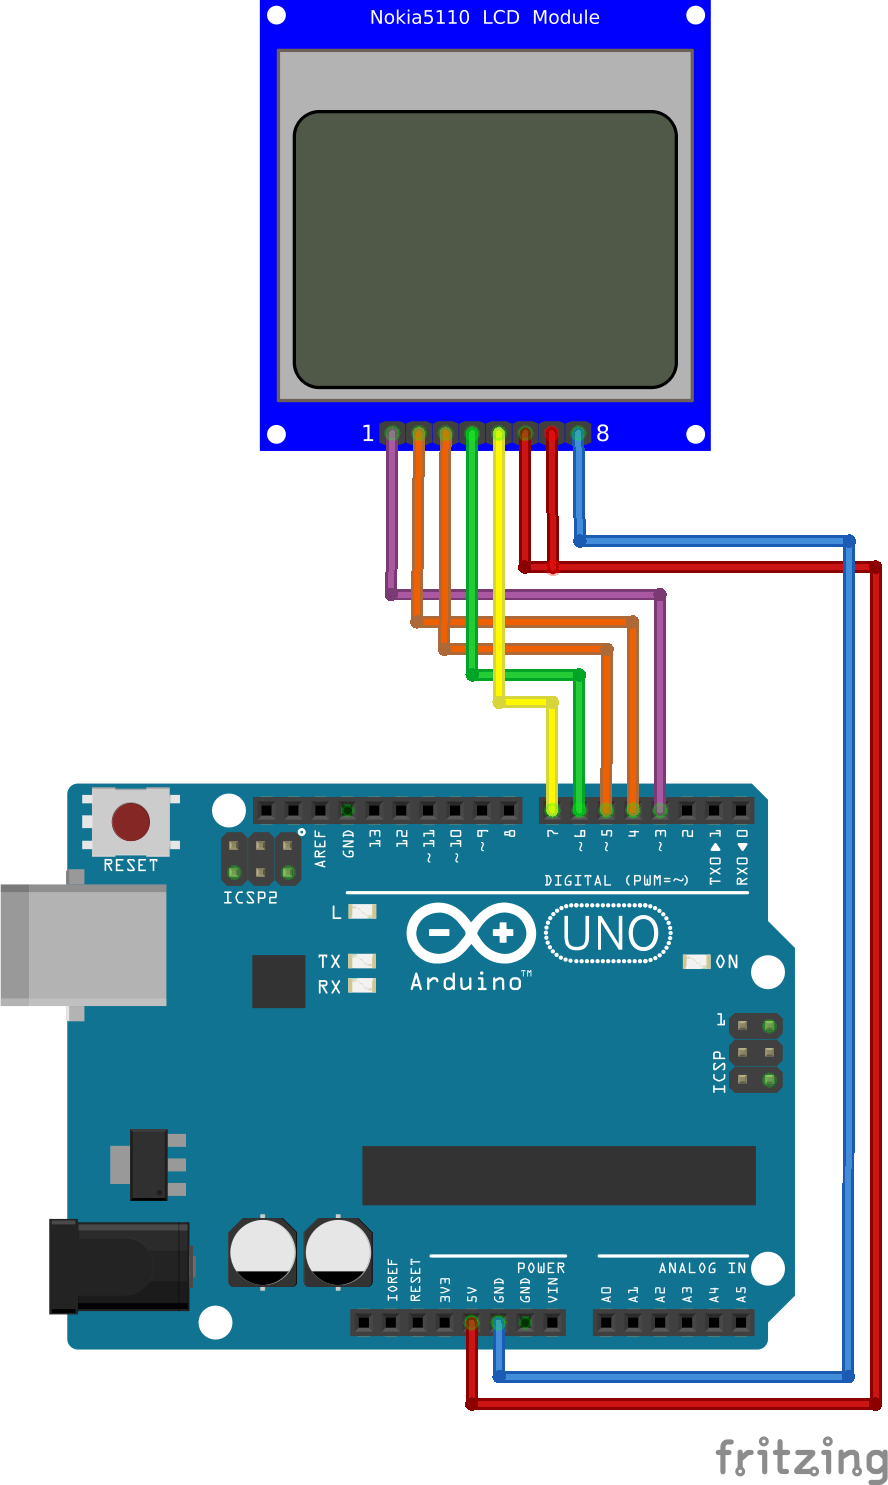
Arduino
Sluit het display aan zoals aangegeven op onderstaand schema:
| Arduino pin: | Display pin: |
|---|---|
| D3 | 1 - RST (Reset) |
| D4 | 2 - CE (Chip Enable) |
| D5 | 3 - DC (Data/Command selection (high = write data / low = write command)) |
| D6 | 4 - Din (Data in) |
| D7 | 5 - CLK (clock) |
| +5v | 6 - VCC (+5v) |
| +5v | 7 - Backlight (+5v) |
| GND | 8 - GND (Ground) |
Scripts
Wat heb je nodig?
1) Arduino EF5110 library
of
2a) Adafruit PCD8544 (Nokia 5110 LCD) library
2b) Adafruit GFX Library
of
3) LCD5110 library
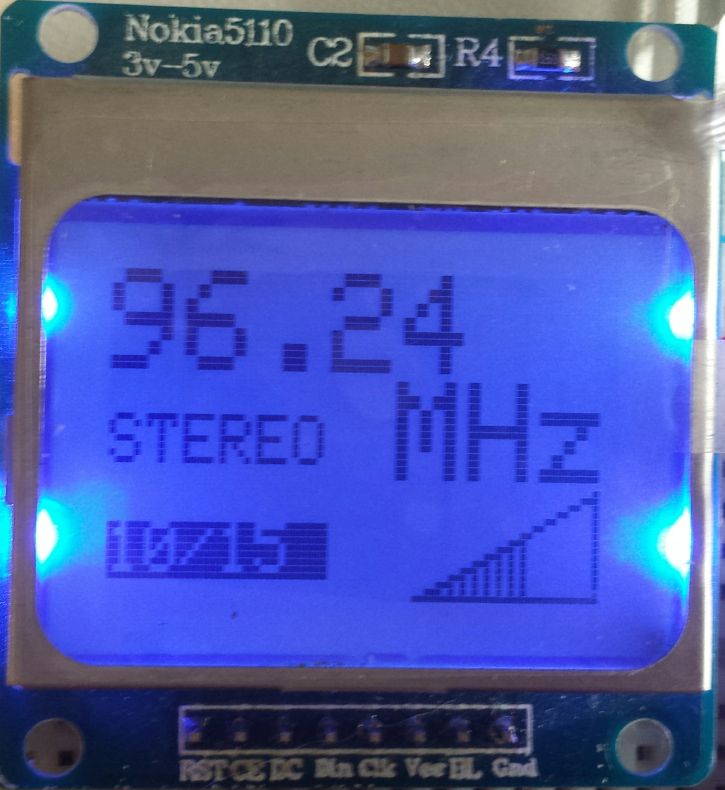
Script met Adafruit PCD8544 bibliotheek
Dit is een geavanceerde bibliotheek met grafische tools, fonts, etc, en neemt meer geheugen in dan EF5110 bibliotheek.
|
1 2 3 4 5 6 7 8 9 10 11 12 13 14 15 16 17 18 19 20 21 22 23 24 25 26 27 28 29 30 31 32 33 34 35 36 37 38 39 40 41 42 |
#include <Adafruit_GFX.h> #include <Adafruit_PCD8544.h> //Constants: Adafruit_PCD8544 display = Adafruit_PCD8544(7, 6, 5, 4, 3 ); //Pinout:(SCLK, DIN, DC, CS, RST) void setup () { display.begin(); display.setContrast(60); display.clearDisplay(); } void loop () { display.setTextSize(2); display.setTextColor(BLACK); display.setCursor(0,0); display.print(display.print("96.2")); display.setCursor(47,15); display.print("MHz"); display.setCursor(0,20); display.setTextSize(1); display.setTextColor(BLACK); display.print("STEREO"); display.setCursor(0,35); display.setTextSize(1); display.setTextColor(WHITE, BLACK); display.print("10"); display.print("/15 "); display.display(); delay (500); display.clearDisplay(); //Draw a signal level triangle... display.drawLine(80, 30, 80, 45, BLACK); display.drawLine(80, 45, 50, 45, BLACK); display.drawLine(50, 45, 80, 30, BLACK); //Fill triangle with signal strength int sl = 10; for (int x = 0; x < sl; x++) { display.drawLine(50+2*x, 45, 50+2*x, 45-x, BLACK); } delay(100); } |
Het resultaat:
Script met EF5110 bibliotheek
Commando’s met de EF5110 bibliotheek
Tekst schrijven:
lcm.write_string([x], [y], “Hallo Wereld!”);
[x] = Aantal pixels vanaf linkerkant
[y] = Het regelnummer 0 t/m 5 (6 regels)
Het font van de EF5110 bibliotheek is standaard: 6×8 pixels
dus je kan de [x] met 6 vermenigvuldigen, het volgende is waar te nemen:
lcm.write_string(0, 0, " Hallo");
is het zelfde als:
lcm.write_string(3*6, 0, "Hallo");
Display leegmaken:
lcm.clearLCM();
Coördinaten instellen:
lcm.set_XY(30,3);
Karakter schrijven:
lcm.write_char(50);
Script voor “Hallo wereld” i.c.m. met de “EF5110 Library”.
|
1 2 3 4 5 6 7 8 9 10 11 12 13 14 15 16 17 18 |
#include <EF5110.h> // D3 -> Nokia 5110 - RST // D4 -> Nokia 5110 - CE/SCE // D5 -> Nokia 5110 - DC // D6 -> Nokia 5110 - Din // D7 -> Nokia 5110 - CLK/SLCK EF_LCM5110 lcm(4,3,5,6,7); // CE/SCE, RST, DC, MOSI, SCLK void setup() { lcm.init(); lcm.clearLCM(); } void loop() { lcm.write_string(0, 0, "Hallo Wereld!"); delay(1000); } |
Het resultaat:

Arduino Library
Installatie van Arduino IDE libraries: Arduino info
Arduino Library – EF5110
This is a library for Monochrome Nokia 5110 84×84 LCD Displays :
These displays use SPI to communicate, 4 or 5 pins are required to interface.
Download: andreimariusdincu @ Github
EF5110 (gedownload 2015-02-14) aangepast voor nieuwe arduino IDE v1.0.x
EF5110 (gedownload 2015-02-14) aangepast voor nieuwe arduino IDE v1.5.8+
Arduino Library – Adafruit PCD8544
![]()
This is a library for our Monochrome Nokia 5110 LCD Displays
Pick one up today in the Adafruit shop! ——> https://www.adafruit.com/product/338
These displays use SPI to communicate, 4 or 5 pins are required to
interface.
Adafruit invests time and resources providing this open source code, please support Adafruit and open-source hardware by purchasing products from Adafruit!
Written by Limor Fried/Ladyada for Adafruit Industries.
BSD license, check license.txt for more information. All text above must be included in any redistribution.
To install, use the Arduino Library Manager to search for ‘Adafruit VCNL4010’ and install the library.
You will also need the Adafruit GFX Graphics core which does all the circles, text, rectangles, etc. You can get it by searching for ‘Adafruit GFX’ in the Arduino Library Manager or check it out here: https://github.com/adafruit/Adafruit-GFX-Library
Download: Adafruit @ Github
Adafruit-PCD8544-Nokia-5110-LCD-library (gedownload 2015-02-14)
Adafruit-PCD8544-Nokia-5110-LCD-library-1.0.0
Arduino Library – LCD5110
Rinky Dink Electronics
These displays were used in old Nokia 5110/3310 cell phones. It is a 84×48 pixel monochrome LCD display. These displays are small, but very readable and come with backlight. This display is made of 84×48 individual pixels, so you can use it for graphics, text or bitmaps. These displays are inexpensive, easy to use, require only a few digital I/O pins and are fairly low power as well
To drive the display, you will need 5 digital output pins. Another pin can be used to control (via on/off or PWM) the backlight, but the library has no support for this function.
The display driver is a PCD8544 chip, and it runs at 3.3V so you will need a 3V supply handy. Logic levels must be 3V to prevent damage so you must use some kind of levelshifter.
Nice to know:
When I timed it a fullscreen bitmap rendered in 20280 µS. In theory you can achieve a framerate of close to 50 FPS.
Download libraries @ rinkydinkelectronics.com
LCD5110 Basic v2.0 (2013-03-18)
Raspberry Pi
Here, we are going to interface Nokia5110 display with Raspberry Pi 3, connect the screen like this:

We will be using theNokia5110 Python library by Adafruit from GitHub.
Download the Adafruit Nokia LCD Python library.
Extract the above library and install it in the directory of above library by executing following command,
|
1 |
sudo python setup.py install |
Also, we need to install python imaging library as given below,
|
1 |
sudo apt-get install python-imaging |
Once the library has been added, we can test the Nokia LCD interfacing with Raspberry Pi by executing existing examples kept in examples folder of library.
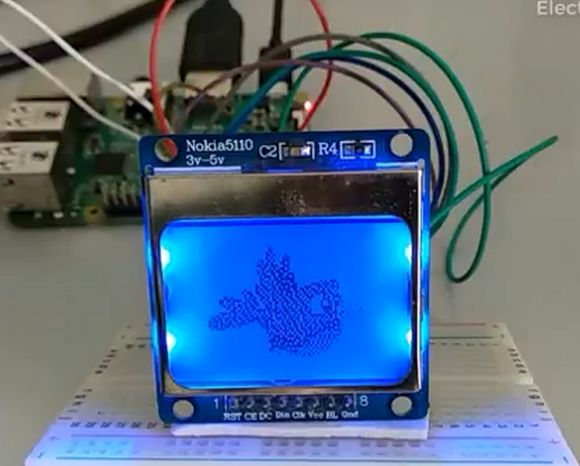
Here, we are going to create a small python program in which we will display text, image and flying bird animation. This python program file along with sample images is kept in “example” folder of library provided in attachment.
Note: While displaying image on Nokia5110 display, we have to provide image to the program. This image should be of display size (84×48 here). If we provide image with other resolution it will give error.
|
1 2 3 4 5 6 7 8 9 10 11 12 13 14 15 16 17 18 19 20 21 22 23 24 25 26 27 28 29 30 31 32 33 34 35 36 37 38 39 40 41 42 43 44 45 46 47 48 49 50 51 52 53 54 55 56 57 58 59 60 61 62 63 64 65 66 67 68 69 70 71 72 73 74 75 76 77 78 79 80 81 82 83 84 85 86 87 88 89 90 91 92 93 94 95 96 97 |
import time import Adafruit_Nokia_LCD as LCD import Adafruit_GPIO.SPI as SPI from PIL import ImageDraw from PIL import Image from PIL import ImageFont # Raspberry Pi hardware SPI config: DC = 23 RST = 24 SPI_PORT = 0 SPI_DEVICE = 0 # Hardware SPI usage: disp = LCD.PCD8544(DC, RST, spi=SPI.SpiDev(SPI_PORT, SPI_DEVICE, max_speed_hz=4000000)) # Initialize library. disp.begin(contrast=40) # Clear display. disp.clear() disp.display() font = ImageFont.load_default() # Load image and convert to 1 bit color. image = Image.new('1', (LCD.LCDWIDTH, LCD.LCDHEIGHT)) draw = ImageDraw.Draw(image) draw.rectangle((0,0,LCD.LCDWIDTH,LCD.LCDHEIGHT), outline=255, fill=255) draw.text((3,24), 'Welcome to EW', font=font) #Display Image disp.image(image) disp.display() time.sleep(1.0) image = Image.open('pi_logo.png').convert('1') # Display image. disp.image(image) disp.display() time.sleep(0.5) print('Press Ctrl-C to quit.') while True: #Create animation of Flying Bird image2 = Image.open('bird_1.png').convert('1') # Display image. disp.image(image2) disp.display() time.sleep(0.1) image2 = Image.open('bird_2.png').convert('1') # Display image. disp.image(image2) disp.display() time.sleep(0.1) image2 = Image.open('bird_3.png').convert('1') # Display image. disp.image(image2) disp.display() time.sleep(0.1) image2 = Image.open('bird_4.png').convert('1') # Display image. disp.image(image2) disp.display() time.sleep(0.1) image2 = Image.open('bird_5.png').convert('1') # Display image. disp.image(image2) disp.display() image2 = Image.open('bird_4.png').convert('1') # Display image. disp.image(image2) disp.display() time.sleep(0.1) image2 = Image.open('bird_3.png').convert('1') # Display image. disp.image(image2) disp.display() time.sleep(0.1) image2 = Image.open('bird_2.png').convert('1') # Display image. disp.image(image2) disp.display() time.sleep(0.1) |
Resultaat:
Bron: https://www.electronicwings.com/raspberry-pi/nokia5110-display-interfacing-with-raspberry-pi
Raspberry Pi Library
Adafruit Nokia LCD Python library
Schema
GEEN GEGEVENS
Eigen symbolen
Zelf symbolen en fonts maken voor je display
Als voorbeeld heb ik zelf wat symbolen gemaakt in een LCD tool, deze zet de pixels om in HEX formaat om deze dan weer te geven via de software en display.
Wat heb je nodig?
1) LCD Tools (in dit voorbeeld: GLCD Font Creator)
Ik heb zelf al een aantal symbolen getekend voor het 6×8 FONT:
124 = Temperatuur
125 = Luchvochtigheid / Regen
126 = Aan / Zon
127 = Baterij 1/7
128 = Baterij 2/7
129 = Baterij 3/7
130 = Baterij 4/7
131 = Baterij 5/7
132 = Baterij 6/7
133 = Baterij 7/7
134 = Graden Celcius
135 = Graden Farenheit
136 = Luidspreker
137 = Bell / Alarm
138 = Bluetooth
140 = Tekstballon
141 = Update / Recycle

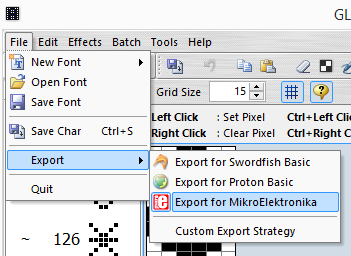
Deze kun je dan exporteren:
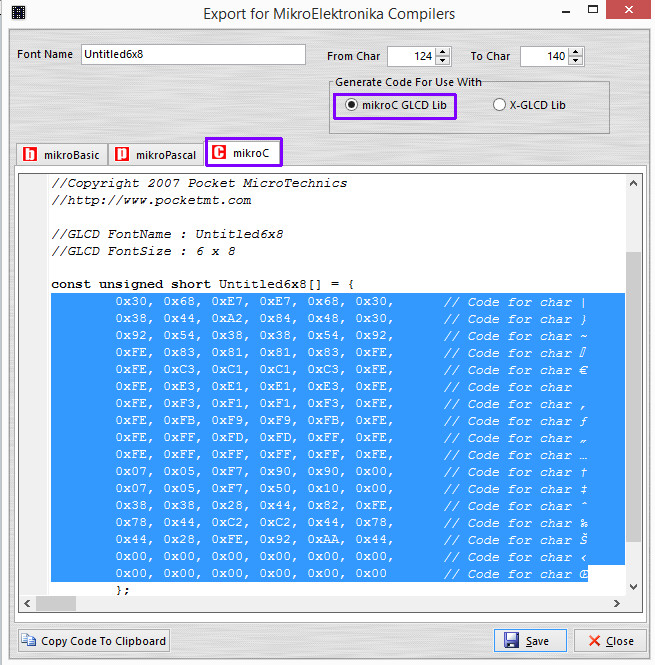
Deze HEX codes van de symbolen kun je dan toevoegen aan de EF5110 bibliotheek:
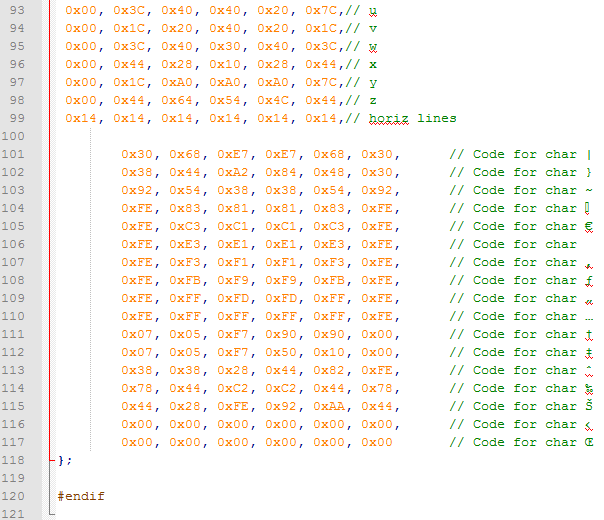
Daarvoor moet je LCD.H openen met een tekstbewerker (notepad) dit bestand is te vinden in:
[Arduino folder]\libraries\EF5110\lcd.h
Plak de volgende code NA de regel met // horiz lines:
|
1 2 3 4 5 6 7 8 9 10 11 12 13 14 15 16 17 |
0x30, 0x68, 0xE7, 0xE7, 0x68, 0x30, // Code for char | 0x38, 0x44, 0xA2, 0x84, 0x48, 0x30, // Code for char } 0x92, 0x54, 0x38, 0x38, 0x54, 0x92, // Code for char ~ 0xFE, 0x83, 0x81, 0x81, 0x83, 0xFE, // Code for char 0xFE, 0xC3, 0xC1, 0xC1, 0xC3, 0xFE, // Code for char € 0xFE, 0xE3, 0xE1, 0xE1, 0xE3, 0xFE, // Code for char 0xFE, 0xF3, 0xF1, 0xF1, 0xF3, 0xFE, // Code for char ‚ 0xFE, 0xFB, 0xF9, 0xF9, 0xFB, 0xFE, // Code for char ƒ 0xFE, 0xFF, 0xFD, 0xFD, 0xFF, 0xFE, // Code for char „ 0xFE, 0xFF, 0xFF, 0xFF, 0xFF, 0xFE, // Code for char … 0x07, 0x05, 0xF7, 0x90, 0x90, 0x00, // Code for char † 0x07, 0x05, 0xF7, 0x50, 0x10, 0x00, // Code for char ‡ 0x38, 0x38, 0x28, 0x44, 0x82, 0xFE, // Code for char ˆ 0x78, 0x44, 0xC2, 0xC2, 0x44, 0x78, // Code for char ‰ 0x44, 0x28, 0xFE, 0x92, 0xAA, 0x44, // Code for char Š 0x00, 0x00, 0x00, 0x00, 0x00, 0x00, // Code for char ‹ 0x00, 0x00, 0x00, 0x00, 0x00, 0x00 // Code for char Œ |
Voorbeeld:
Sla het bestand op.
Nu kun je bijvoorbeeld met
lcm.write_char(130); een (halfvol)batterijtje laten weergeven.
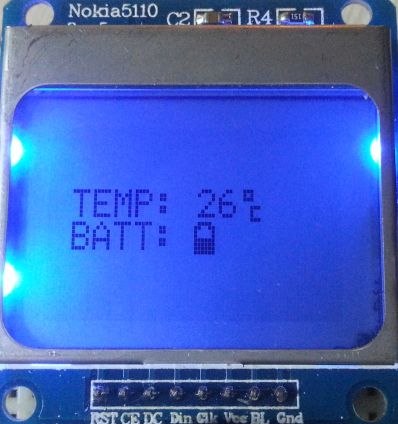
Hieronder heb ik een DEMO code gemaakt om met de symbolen te spelen:
|
1 2 3 4 5 6 7 8 9 10 11 12 13 14 15 16 17 18 19 20 21 22 23 24 25 |
#include <EF5110.h> // D4 -> Nokia 5110 - CE // D3 -> Nokia 5110 - RST // D5 -> Nokia 5110 - Rin // D6 -> Nokia 5110 - DC // D7 -> Nokia 5110 - CLK EF_LCM5110 lcm(4,3,5,6,7); int i; void setup() { lcm.init(); lcm.clearLCM(); lcm.write_string(6,2, "TEMP: 26"); lcm.write_string(6,3, "BATT:"); lcm.set_XY(56,2); lcm.write_char(134); } void loop() { for (i=1; i<7 ;i++) { lcm.set_XY(42,3); lcm.write_char(127+i); delay(500); } } |
Het resultaat:
Afmetingen
Datasheet
Fritzing
Downloads
GEEN GEGEVENS