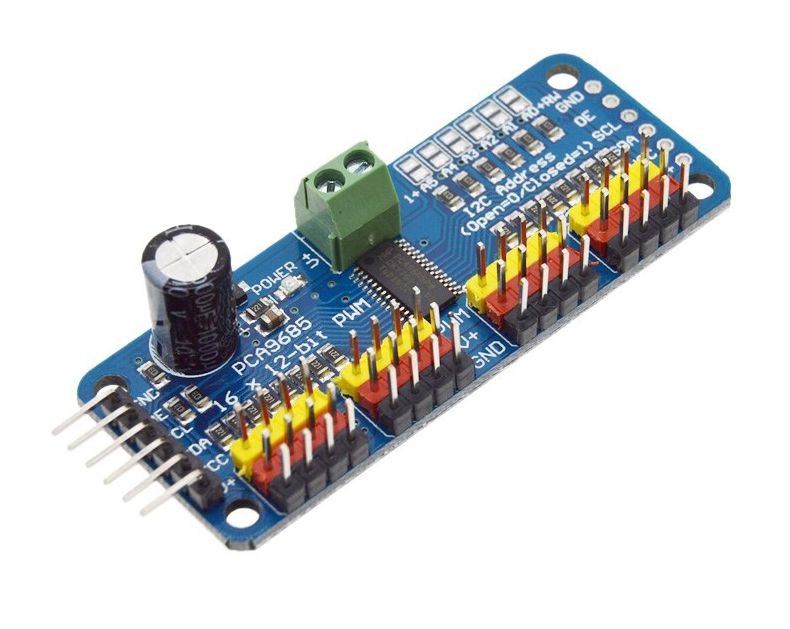
Module – PCA9685 – Servo motor driver PWM 16 Kanaals 12-bit I2C
Hardware
Met deze module kan men 16 servo’s aansturen via I2C met gekoppelde modules (max 62) tot max 992 servo’s!
Specificaties (eng):
- It’s an i2c-controlled PWM driver with a built in clock. That means that, unlike the TLC5940 family, you do not need to continuously send it signal tying up your microcontroller, its completely free running!
- It is 5V compliant, which means you can control it from a 3.3V microcontroller and still safely drive up to 6V outputs (this is good for when you want to control white or blue LEDs with 3.4+ forward voltages)
- 6 address select pins so you can wire up to 62 of these on a single i2c bus, a total of 992 outputs – that’s a lot of servos or LEDs
- Adjustable frequency PWM up to about 1.6 KHz
- 12-bit resolution for each output – for servos, that means about 4us resolution at 60Hz update rate
- Configurable push-pull or open-drain output
- Output enable pin to quickly disable all the outputs
I2C adres instellen

Board 0: Address = 0x40 Offset = binary 00000 (no jumpers required)
Board 1: Address = 0x41 Offset = binary 00001 (bridge A0 as in the photo above)
Board 2: Address = 0x42 Offset = binary 00010 (bridge A1)
Board 3: Address = 0x43 Offset = binary 00011 (bridge A0 & A1)
Board 4: Address = 0x44 Offset = binary 00100 (bridge A2)
Voorbeeld van meerder servo’s aangesloten:
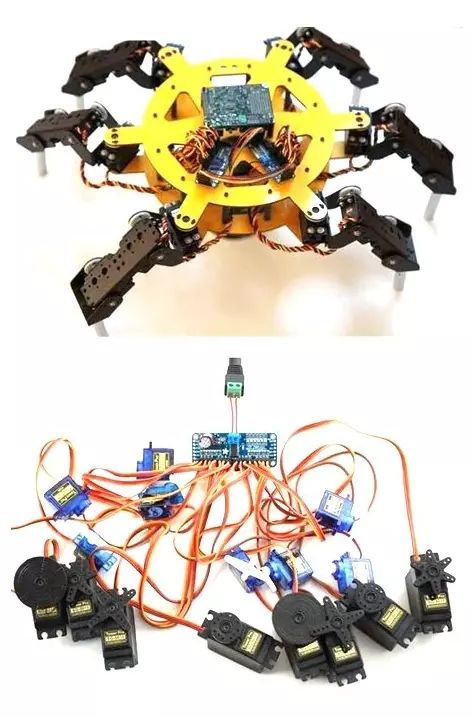
Voorbeeld meerdere modules aangesloten:

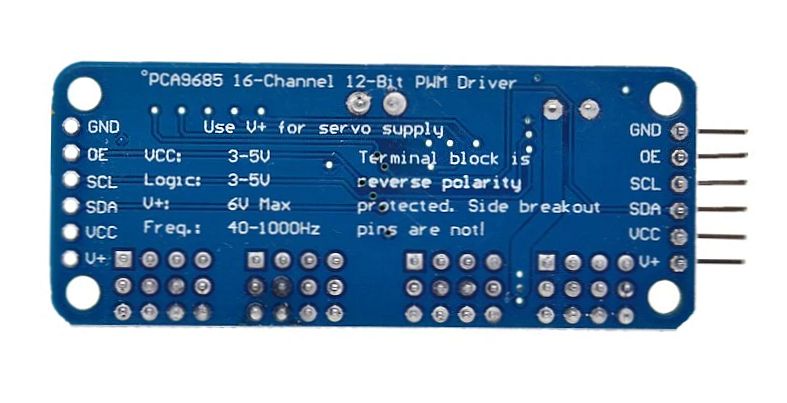
Pinout
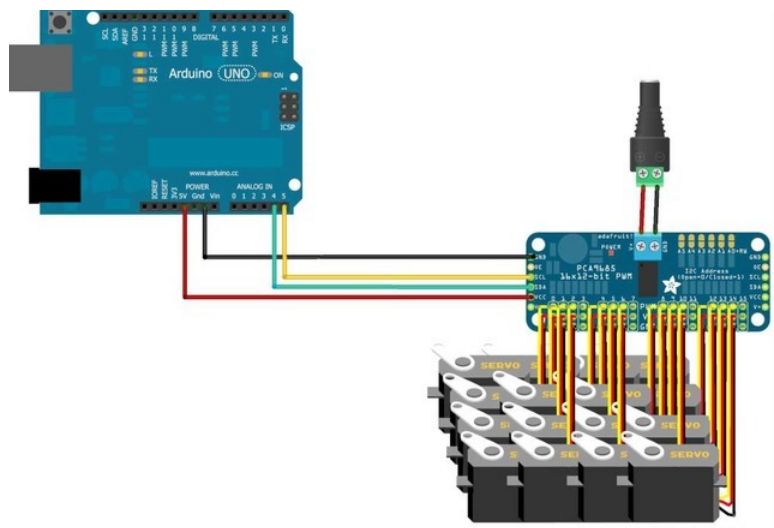
Arduino
Sluit de module aan volgens onderstaand overzicht:

Script
Onderstaand script maakt gebruik van de “Adafruit-PWM-Servo-Drive” bibliotheek.
|
1 2 3 4 5 6 7 8 9 10 11 12 13 14 15 16 17 18 19 20 21 22 23 24 25 26 27 28 29 30 31 32 33 34 35 36 37 38 39 40 41 42 43 44 45 46 47 48 49 50 51 52 53 54 55 56 57 58 59 60 61 62 63 64 |
#include <Wire.h> #include <Adafruit_PWMServoDriver.h> // called this way, it uses the default address 0x40 Adafruit_PWMServoDriver pwm = Adafruit_PWMServoDriver(); // you can also call it with a different address you want //Adafruit_PWMServoDriver pwm = Adafruit_PWMServoDriver(0x41); // you can also call it with a different address and I2C interface //Adafruit_PWMServoDriver pwm = Adafruit_PWMServoDriver(&Wire, 0x40); // Depending on your servo make, the pulse width min and max may vary, you // want these to be as small/large as possible without hitting the hard stop // for max range. You'll have to tweak them as necessary to match the servos you // have! #define SERVOMIN 150 // this is the 'minimum' pulse length count (out of 4096) #define SERVOMAX 600 // this is the 'maximum' pulse length count (out of 4096) // our servo # counter uint8_t servonum = 0; void setup() { Serial.begin(9600); Serial.println("8 channel Servo test!"); pwm.begin(); pwm.setPWMFreq(60); // Analog servos run at ~60 Hz updates delay(10); } // you can use this function if you'd like to set the pulse length in seconds // e.g. setServoPulse(0, 0.001) is a ~1 millisecond pulse width. its not precise! void setServoPulse(uint8_t n, double pulse) { double pulselength; pulselength = 1000000; // 1,000,000 us per second pulselength /= 60; // 60 Hz Serial.print(pulselength); Serial.println(" us per period"); pulselength /= 4096; // 12 bits of resolution Serial.print(pulselength); Serial.println(" us per bit"); pulse *= 1000000; // convert to us pulse /= pulselength; Serial.println(pulse); pwm.setPWM(n, 0, pulse); } void loop() { // Drive each servo one at a time Serial.println(servonum); for (uint16_t pulselen = SERVOMIN; pulselen < SERVOMAX; pulselen++) { pwm.setPWM(servonum, 0, pulselen); } delay(500); for (uint16_t pulselen = SERVOMAX; pulselen > SERVOMIN; pulselen--) { pwm.setPWM(servonum, 0, pulselen); } delay(500); servonum ++; if (servonum > 7) servonum = 0; } |
Arduino Library
Installatie van Arduino IDE libraries: Arduino info
Informatie (ENG):
These drivers use I2C to communicate, 2 pins are required to interface.
Adafruit invests time and resources providing this open source code, please support Adafruit and open-source hardware by purchasing products from Adafruit!
Written by Limor Fried/Ladyada for Adafruit Industries. BSD license, check license.txt for more information.
All text above must be included in any redistribution
Compatibility
| MCU | Tested Works | Doesn’t Work | Not Tested | Notes |
|---|---|---|---|---|
| Atmega328 @ 16MHz | X | |||
| Atmega328 @ 12MHz | X | |||
| Atmega32u4 @ 16MHz | X | |||
| Atmega32u4 @ 8MHz | X | |||
| ESP8266 | X | |||
| Atmega2560 @ 16MHz | X | |||
| ATSAM3X8E | X | Use SDA1/SCL1 | ||
| ATSAM21D | X | |||
| ATtiny85 @ 16MHz | X | |||
| ATtiny85 @ 8MHz | X | |||
| Intel Curie @ 32MHz | X | |||
| STM32F2 | X |
- ATmega328 @ 16MHz : Arduino UNO, Adafruit Pro Trinket 5V, Adafruit Metro 328, Adafruit Metro Mini
- ATmega328 @ 12MHz : Adafruit Pro Trinket 3V
- ATmega32u4 @ 16MHz : Arduino Leonardo, Arduino Micro, Arduino Yun, Teensy 2.0
- ATmega32u4 @ 8MHz : Adafruit Flora, Bluefruit Micro
- ESP8266 : Adafruit Huzzah
- ATmega2560 @ 16MHz : Arduino Mega
- ATSAM3X8E : Arduino Due
- ATSAM21D : Arduino Zero, M0 Pro
- ATtiny85 @ 16MHz : Adafruit Trinket 5V
- ATtiny85 @ 8MHz : Adafruit Gemma, Arduino Gemma, Adafruit Trinket 3V
Raspberry Pi
Sluit de module aan zoals aangegeven op onderstaand schema:
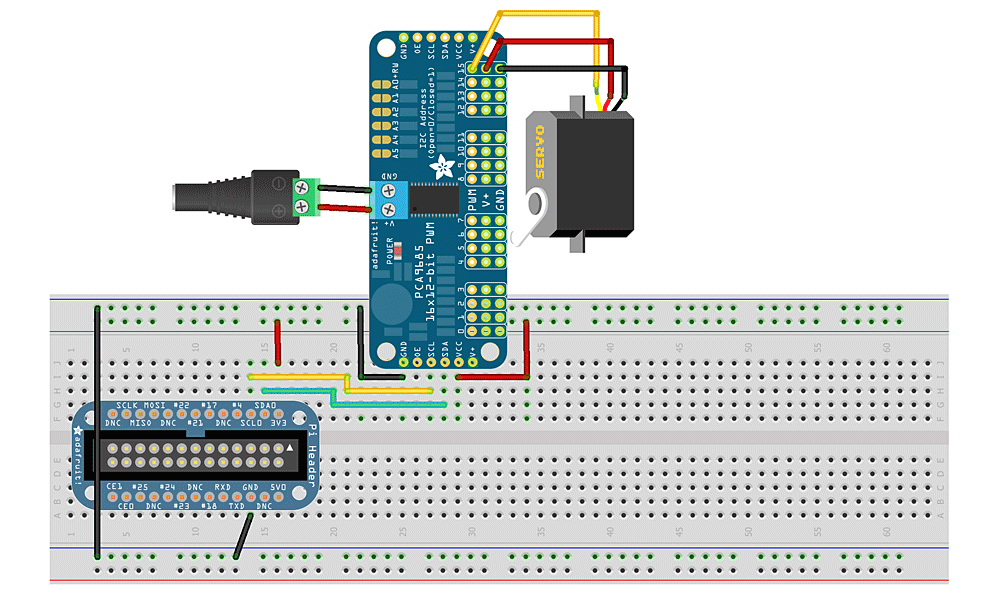
Ps. Altijd de pinout van je Raspberry Pi controleren, deze kan verschillen per versie.
Wat moet je doen?
1) I2C aanzetten op de Pi.
2) SMBUS module installeren voor Python:
Om de I2C bus in Python te gebruiken moet je een module installeren, genaamd SMBUS, dit kan via APT-GET met het commando: sudo apt-get install python-smbus
|
1 2 3 4 5 6 7 8 9 10 11 12 13 14 |
Reading package lists... Done Building dependency tree Reading state information... Done The following NEW packages will be installed: python-smbus 0 upgraded, 1 newly installed, 0 to remove and 79 not upgraded. Need to get 11.9 kB of archives. After this operation, 95.2 kB of additional disk space will be used. Get:1 http://archive.raspberrypi.org/debian/ wheezy/main python-smbus armhf 3.1.1+svn-1 [11.9 kB] Fetched 11.9 kB in 0s (131 kB/s) Selecting previously unselected package python-smbus. (Reading database ... 78301 files and directories currently installed.) Unpacking python-smbus (from .../python-smbus_3.1.1+svn-1_armhf.deb) ... Setting up python-smbus (3.1.1+svn-1) ... |
Je kan dan de module importeren in python door middel van: import smbus
Controleren van de aansluiting
Om de aansluiting van de module te controleren voor je het volgende commando uit: sudo i2cdetect -y 1, je ziet dan het (0x40) adres staan in de lijst:
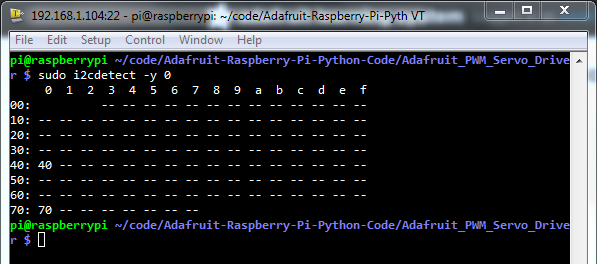
0x40 = Servo board.
Bronnen:
learn.adafruit.com
Afmetingen

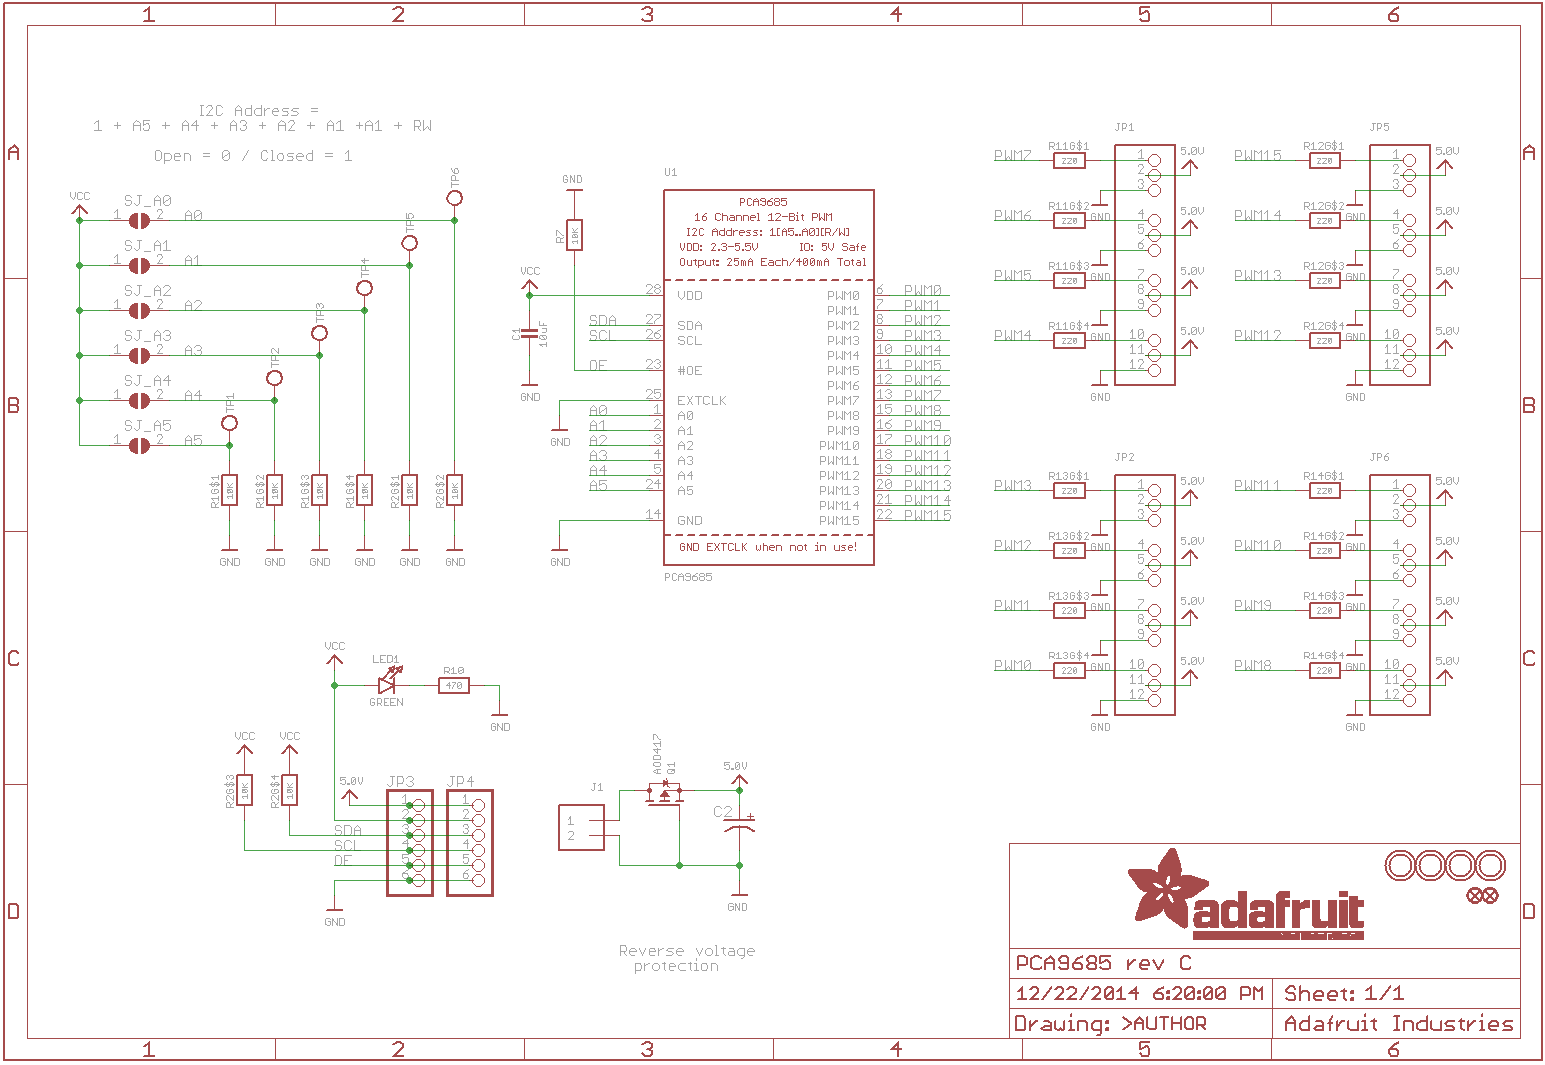
Schema
Teardown
GEEN GEGEVENS
Datasheet
Fritzing

Downloads
GEEN GEGEVENS