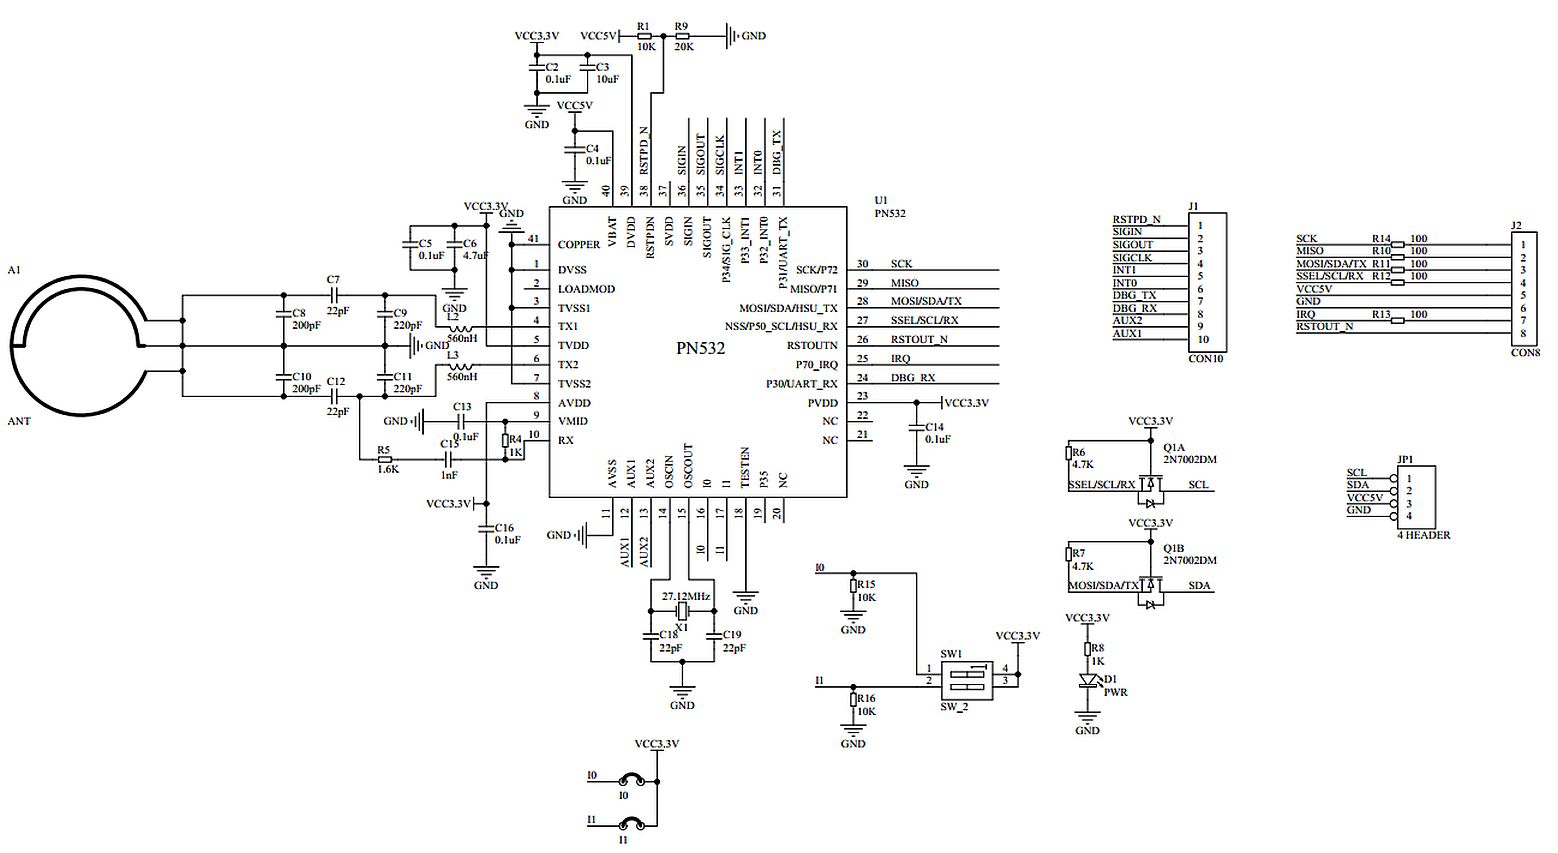
Module – PN532 – RFID/NFC transciever
Hardware

Informatie (ENG)
The PN532 is a 13.56 MHz RFID reader chip. It’s common and very easy to interface to with the PN532 module.
Features and Specifications:
- 80C51 microcontroller core with 40 Kbyte ROM and 1 Kbyte RAM
- Highly integrated analog circuitry to demodulate and decode responses
- Buffered output drivers to connect an antenna with minimum number of external components
- Integrated RF level detector
- Integrated data mode detector
- RFID reader/writer mode support [MIFARE 1k, 4k, Ultra light, and DESFIRE cards, ISO/IEC 14443-4 cards such as CD97BX, CD light, DESFIRE, P5CN072 (SMX), INNOVISION Jewel cards such as IRT5001 card, FELICA cards such as RCS_860 and RCS_854]
- Built in PCB Antenna, with 5cm to7cm communication distance
- Supports MIFIRE higher transfer speed communication at 212Kbits/s and 424 Kbits/s
- Supported host communication: SPI Interface, I2C Interface and High Speed Serial UART
- Flexible interrupt using IRQ pin
- Hard reset with low power function
- Power down mode per embedded firmware
- Automatic wake up on HSU,I2C and SPI interfaces when device is in power down mode
- Programmable timer
- Contactless communication at 13.56MHz
- On-board level shifter, Standard 5V TTL for I2C and UART, 3.3V TTL SPI
- Work as RFID reader and writer
- Work as RFID card or a virtual card
- Operating voltage: +2.7V to +5.5V
- On-board level shifter: Standard 5V TTL for I2C and UART, 3.3V TTL SPI
- Low power modes: Hard-Power-Down mode (1µA typical), Soft-Power-Down mode (22µA typical)
- Operating temperature: -30ºC to +85ºC
How to use PN532 NFC module?
For using PN532 module, first we will choose the mode of communication between MODULE and CONTROLLER. As mentioned earlier this module has three interfaces, of which we have to choose one. Remember at any given point of time only one of three interfaces can be used. All three cannot be used together. We will have to choose the mode of interface using two switches solder to the board. The switches are S1 and S2 shown in pin diagram.
| S1 | S2 | Interface |
| OFF | OFF | HSU (High Speed UART) |
| ON | OFF | I2C |
| ON | ON | SPI |
Choose the mode of interface and corresponding state of switches from above table. Next toggle the switches S1 and S2 to those positions.
After choosing the type of interface, connect the module to the controller or processor. Say if you opted to use I2C, then connect module to I2C of the controller. If you opted to use SPI, then connect module to SPI of controller.
After interfacing you have to download the library files for the module from corresponding websites. Say for ARDUINO platform [https://www.arduinolibraries.info/libraries/adafruit-pn532]. Save the library files in the IDE program files.
Now all that left is to write the program for the controller or ARDUINO in the IDE software. And do call up on the saved library files while writing the program. With those libraries we can directly communicate with the module while skipping all the steps of communication protocol.
Once the programming is done, power up the circuit to get the desired response.
Applications:
Media or Data sharing
Robotics
Smart Phones and Smart devices
Security systems
Computer Peripherals
Package Identification
Theft protection systems
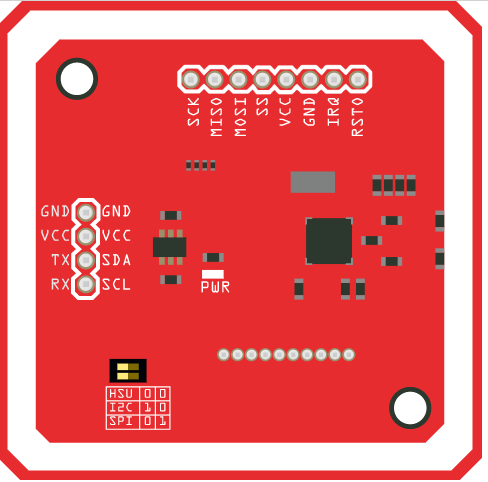
Pinout
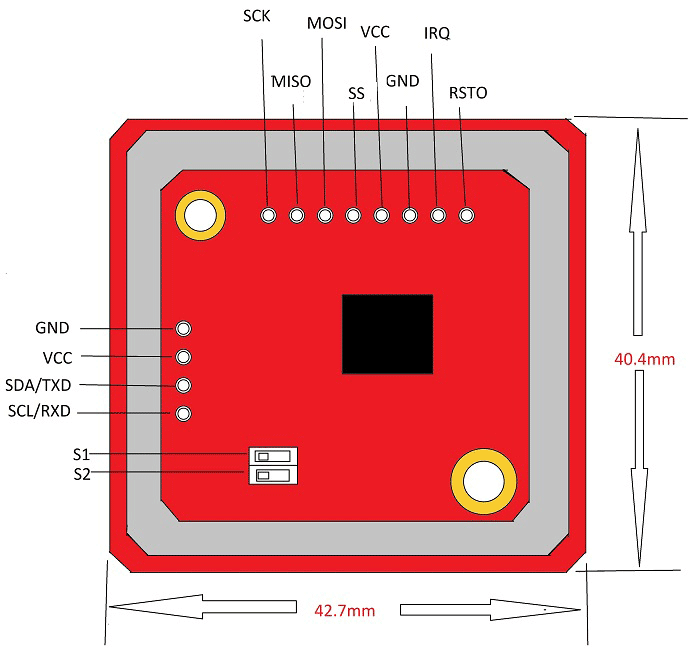
The description of each pin of the module is given below.
| Pin Number | Description |
| VCC | Should be power source. |
| GND | Should be connected to ground. |
| SDA/TXD | SDA: Serial Data pin[I2C Interface]
TXD: Transmit pin[UART Interface] |
| SCL/RXD | SCL: Serial Clock pin[I2C Interface]
RXD: Receive pin [UART Interface] |
| SCK | Serial Clock pin [SPI Interface] |
| MISO | Master Input Slave Output pin [SPI Interface] |
| MOSI | Master Output Slave Input pin [SPI Interface] |
| SS | Slave Select pin [SPI Interface] |
| IRQ | Interrupt Signal pin [SPI Interface] |
| RSTO | Reset pin |
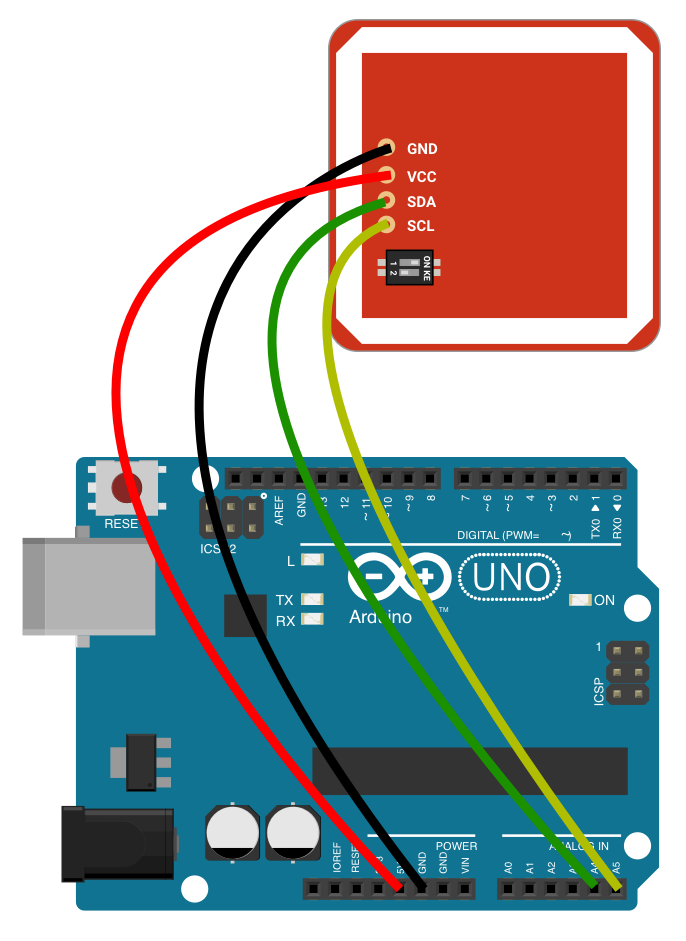
Arduino
I2C mode
Sluit de module aan volgens onderstaand overzicht:
Script met bibliotheek
Wat heb je nodig?
1) PN532 library
Example script from the library
|
1 2 3 4 5 6 7 8 9 10 11 12 13 14 15 16 17 18 19 20 21 22 23 24 25 26 27 28 29 30 31 32 33 34 35 36 37 38 39 40 41 42 43 44 45 46 47 48 49 50 51 52 53 54 55 56 57 58 59 60 61 62 63 64 65 66 67 68 69 70 71 72 73 |
/**************************************************************************/ /*! This example will attempt to connect to an ISO14443A card or tag and retrieve some basic information about it that can be used to determine what type of card it is. Note that you need the baud rate to be 115200 because we need to print out the data and read from the card at the same time! To enable debug message, define DEBUG in PN532/PN532_debug.h */ /**************************************************************************/ #include <Wire.h> #include <PN532_I2C.h> #include <PN532.h> #include <NfcAdapter.h> PN532_I2C pn532i2c(Wire); PN532 nfc(pn532i2c); void setup(void) { Serial.begin(115200); Serial.println("Hello!"); nfc.begin(); uint32_t versiondata = nfc.getFirmwareVersion(); if (! versiondata) { Serial.print("Didn't find PN53x board"); while (1); // halt } // Got ok data, print it out! Serial.print("Found chip PN5"); Serial.println((versiondata>>24) & 0xFF, HEX); Serial.print("Firmware ver. "); Serial.print((versiondata>>16) & 0xFF, DEC); Serial.print('.'); Serial.println((versiondata>>8) & 0xFF, DEC); // Set the max number of retry attempts to read from a card // This prevents us from waiting forever for a card, which is // the default behaviour of the PN532. nfc.setPassiveActivationRetries(0xFF); // configure board to read RFID tags nfc.SAMConfig(); Serial.println("Waiting for an ISO14443A card"); } void loop(void) { boolean success; uint8_t uid[] = { 0, 0, 0, 0, 0, 0, 0 }; // Buffer to store the returned UID uint8_t uidLength; // Length of the UID (4 or 7 bytes depending on ISO14443A card type) // Wait for an ISO14443A type cards (Mifare, etc.). When one is found // 'uid' will be populated with the UID, and uidLength will indicate // if the uid is 4 bytes (Mifare Classic) or 7 bytes (Mifare Ultralight) success = nfc.readPassiveTargetID(PN532_MIFARE_ISO14443A, &uid[0], &uidLength); if (success) { Serial.println("Found a card!"); Serial.print("UID Length: ");Serial.print(uidLength, DEC);Serial.println(" bytes"); Serial.print("UID Value: "); for (uint8_t i=0; i < uidLength; i++) { Serial.print(" 0x");Serial.print(uid[i], HEX); } Serial.println(""); // Wait 1 second before continuing delay(1000); } } |
Script met block reads:
|
1 2 3 4 5 6 7 8 9 10 11 12 13 14 15 16 17 18 19 20 21 22 23 24 25 26 27 28 29 30 31 32 33 34 35 36 37 38 39 40 41 42 43 44 45 46 47 48 49 50 51 52 53 54 55 56 57 58 59 60 61 62 63 64 65 66 67 68 69 70 71 72 73 74 75 76 77 78 79 80 81 82 83 84 85 86 87 88 89 90 91 92 93 94 95 96 97 98 99 100 101 102 103 104 105 106 107 108 109 110 111 112 113 114 115 116 117 118 119 120 121 122 123 124 125 126 127 128 129 130 131 132 133 134 135 136 137 138 139 140 141 142 143 144 145 146 147 148 149 150 151 152 153 154 155 |
/**************************************************************************/ /*! This example will wait for any ISO14443A card or tag, and depending on the size of the UID will attempt to read from it. If the card has a 4-byte UID it is probably a Mifare Classic card, and the following steps are taken: - Authenticate block 4 (the first block of Sector 1) using the default KEYA of 0XFF 0XFF 0XFF 0XFF 0XFF 0XFF - If authentication succeeds, we can then read any of the 4 blocks in that sector (though only block 4 is read here) If the card has a 7-byte UID it is probably a Mifare Ultralight card, and the 4 byte pages can be read directly. Page 4 is read by default since this is the first 'general- purpose' page on the tags. To enable debug message, define DEBUG in PN532/PN532_debug.h */ /**************************************************************************/ #if 0 #include <SPI.h> #include <PN532_SPI.h> #include "PN532.h" PN532_SPI pn532spi(SPI, 10); PN532 nfc(pn532spi); #elif 1 #include <PN532_HSU.h> #include <PN532.h> PN532_HSU pn532hsu(Serial1); PN532 nfc(pn532hsu); #else #include <Wire.h> #include <PN532_I2C.h> #include <PN532.h> #endif void setup(void) { Serial.begin(115200); Serial.println("Hello!"); nfc.begin(); uint32_t versiondata = nfc.getFirmwareVersion(); if (! versiondata) { Serial.print("Didn't find PN53x board"); while (1); // halt } // Got ok data, print it out! Serial.print("Found chip PN5"); Serial.println((versiondata>>24) & 0xFF, HEX); Serial.print("Firmware ver. "); Serial.print((versiondata>>16) & 0xFF, DEC); Serial.print('.'); Serial.println((versiondata>>8) & 0xFF, DEC); // configure board to read RFID tags nfc.SAMConfig(); Serial.println("Waiting for an ISO14443A Card ..."); } void loop(void) { uint8_t success; uint8_t uid[] = { 0, 0, 0, 0, 0, 0, 0 }; // Buffer to store the returned UID uint8_t uidLength; // Length of the UID (4 or 7 bytes depending on ISO14443A card type) // Wait for an ISO14443A type cards (Mifare, etc.). When one is found // 'uid' will be populated with the UID, and uidLength will indicate // if the uid is 4 bytes (Mifare Classic) or 7 bytes (Mifare Ultralight) success = nfc.readPassiveTargetID(PN532_MIFARE_ISO14443A, uid, &uidLength); if (success) { // Display some basic information about the card Serial.println("Found an ISO14443A card"); Serial.print(" UID Length: ");Serial.print(uidLength, DEC);Serial.println(" bytes"); Serial.print(" UID Value: "); nfc.PrintHex(uid, uidLength); Serial.println(""); if (uidLength == 4) { // We probably have a Mifare Classic card ... Serial.println("Seems to be a Mifare Classic card (4 byte UID)"); // Now we need to try to authenticate it for read/write access // Try with the factory default KeyA: 0xFF 0xFF 0xFF 0xFF 0xFF 0xFF Serial.println("Trying to authenticate block 4 with default KEYA value"); uint8_t keya[6] = { 0xFF, 0xFF, 0xFF, 0xFF, 0xFF, 0xFF }; // Start with block 4 (the first block of sector 1) since sector 0 // contains the manufacturer data and it's probably better just // to leave it alone unless you know what you're doing success = nfc.mifareclassic_AuthenticateBlock(uid, uidLength, 4, 0, keya); if (success) { Serial.println("Sector 1 (Blocks 4..7) has been authenticated"); uint8_t data[16]; // If you want to write something to block 4 to test with, uncomment // the following line and this text should be read back in a minute // data = { 'a', 'd', 'a', 'f', 'r', 'u', 'i', 't', '.', 'c', 'o', 'm', 0, 0, 0, 0}; // success = nfc.mifareclassic_WriteDataBlock (4, data); // Try to read the contents of block 4 success = nfc.mifareclassic_ReadDataBlock(4, data); if (success) { // Data seems to have been read ... spit it out Serial.println("Reading Block 4:"); nfc.PrintHexChar(data, 16); Serial.println(""); // Wait a bit before reading the card again delay(1000); } else { Serial.println("Ooops ... unable to read the requested block. Try another key?"); } } else { Serial.println("Ooops ... authentication failed: Try another key?"); } } if (uidLength == 7) { // We probably have a Mifare Ultralight card ... Serial.println("Seems to be a Mifare Ultralight tag (7 byte UID)"); // Try to read the first general-purpose user page (#4) Serial.println("Reading page 4"); uint8_t data[32]; success = nfc.mifareultralight_ReadPage (4, data); if (success) { // Data seems to have been read ... spit it out nfc.PrintHexChar(data, 4); Serial.println(""); // Wait a bit before reading the card again delay(1000); } else { Serial.println("Ooops ... unable to read the requested page!?"); } } } } |
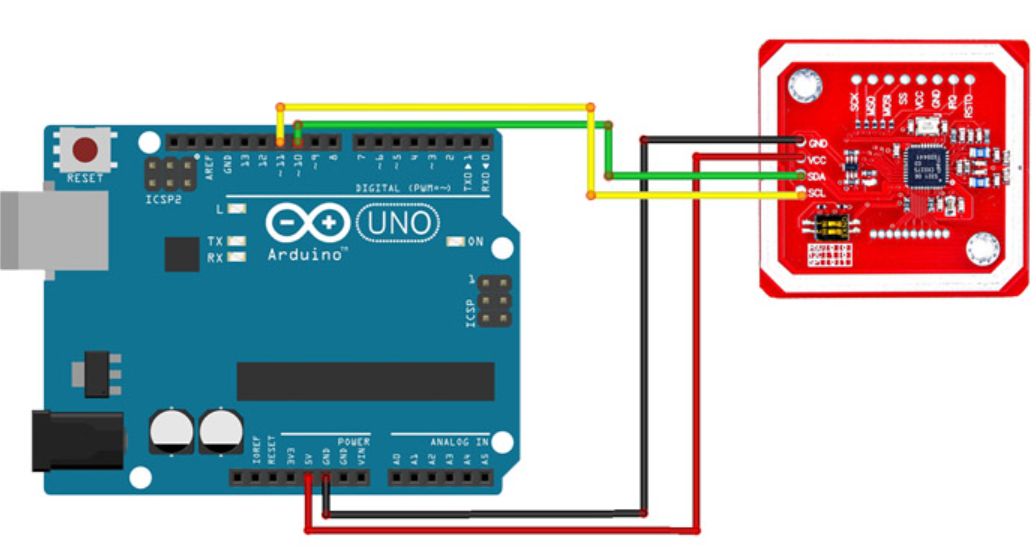
RX/TX mode
Sluit de module aan volgens onderstaand overzicht:
Script met bibliotheek
Wat heb je nodig?
1) PN532 library
Example script from the library
|
1 2 3 4 5 6 7 8 9 10 11 12 13 14 15 16 17 18 19 20 21 22 23 24 25 26 27 28 29 30 31 32 33 34 35 36 37 38 39 40 41 42 43 44 45 46 47 48 49 50 51 52 53 54 55 56 57 58 59 60 61 62 63 64 65 66 67 68 69 70 71 72 73 74 75 76 77 78 79 80 81 82 83 84 85 86 87 88 89 90 91 92 93 94 95 96 97 98 99 100 |
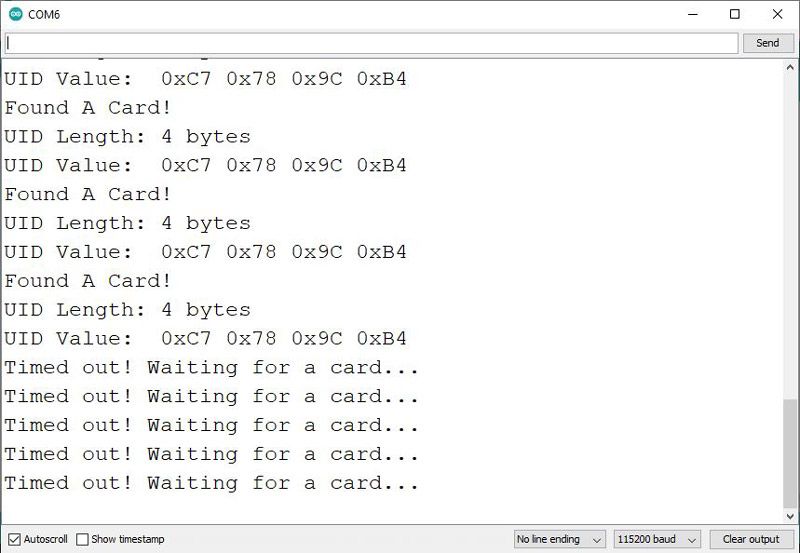
/* PN532-NFC-RFID-Module-Library modified on 18 Nov 2020 by Amir Mohammad Shojaee @ Electropeak https://electropeak.com/learn/ based on www.electroschematics.com Arduino Examples */ #include <SoftwareSerial.h> #include <PN532_SWHSU.h> #include <PN532.h> SoftwareSerial SWSerial( 10, 11 ); // RX, TX PN532_SWHSU pn532swhsu( SWSerial ); PN532 nfc( pn532swhsu ); void setup(void) { Serial.begin(115200); Serial.println("Hello Maker!"); nfc.begin(); uint32_t versiondata = nfc.getFirmwareVersion(); if (! versiondata) { Serial.print("Didn't Find PN53x Module"); while (1); // Halt } // Got valid data, print it out! Serial.print("Found chip PN5"); Serial.println((versiondata>>24) & 0xFF, HEX); Serial.print("Firmware ver. "); Serial.print((versiondata>>16) & 0xFF, DEC); Serial.print('.'); Serial.println((versiondata>>8) & 0xFF, DEC); // Configure board to read RFID tags nfc.SAMConfig(); Serial.println("Waiting for an ISO14443A Card ..."); } void loop(void) { boolean success; uint8_t uid[] = { 0, 0, 0, 0, 0, 0, 0 }; // Buffer to store the returned UID uint8_t uidLength; // Length of the UID (4 or 7 bytes depending on ISO14443A card type) success = nfc.readPassiveTargetID(PN532_MIFARE_ISO14443A, &uid[0], &uidLength); if (success) { Serial.println("Found A Card!"); Serial.print("UID Length: ");Serial.print(uidLength, DEC);Serial.println(" bytes"); Serial.print("UID Value: "); for (uint8_t i=0; i < uidLength; i++) { Serial.print(" 0x");Serial.print(uid[i], HEX); } Serial.println(""); // 2 second halt delay(2000); } else { // PN532 probably timed out waiting for a card Serial.println("Timed out! Waiting for a card..."); } } |
Output
Bronnen:
https://electropeak.com/learn/interfacing-pn532-nfc-rfid-reader-writer-module-i2c-spi-with-arduino/
Arduino Library
Installatie van Arduino IDE libraries: Arduino info
NFC library for Arduino
This is an Arduino library for PN532 to use NFC technology. It’s based on Adafruit_NFCShield_I2C , improved by Seeed Studio, added HSU(High Speed Uart) driver by Elechouse.
Features
- Support all interfaces of PN532 (I2C, SPI, HSU )
- Read/write Mifare Classic Card
- Works with Don’s NDEF Library
- Support Peer to Peer communication(exchange data with android 4.0+)
- Support mbed platform
Getting Started
- Download zip file and extract the three folders(PN532, PN532_SPI, PN532_HSU and PN532_I2C) into libraries of Arduino.
- Downlaod Don’s NDEF library and extract it into libraries of Arduino’s into a new folder called “NDEF” (Note if you leave this folder as NDEF-Master Arduino will not be able to use it as a library)
- Follow the examples of the PN532 library
To do
- Card emulation
HSU Interface
HSU is short for High Speed Uart. HSU interface needs only 4 wires to connect PN532 with Arduino, Sensor Shield can make it more easier. For some Arduino boards like Leonardo, DUE, Mega ect, there are more than one Serial on these boards, so we can use this additional Serial to control PN532, HSU uses 115200 baud rate .
To use the Serial1 control PN532, refer to the code below.
|
1 2 3 4 5 6 7 8 9 10 11 |
#include <PN532_HSU.h> #include <PN532.h> PN532_HSU pn532hsu(Serial1); PN532 nfc(pn532hsu); void setup(void) { nfc.begin(); //... } |
If your Arduino has only one serial interface and you want to keep it for control or debugging with the Serial Monitor, you can use the SoftwareSerial library to control the PN532 by emulating a serial interface. Include PN532_SWHSU.h instead of PN532_HSU.h:
|
1 2 3 4 5 6 7 8 9 10 11 12 13 14 |
#include <SoftwareSerial.h> #include <PN532_SWHSU.h> #include <PN532.h> SoftwareSerial SWSerial( 10, 11 ); // RX, TX PN532_SWHSU pn532swhsu( SWSerial ); PN532 nfc( pn532swhsu ); void setup(void) { nfc.begin(); //... } |
Download: https://github.com/elechouse/PN532
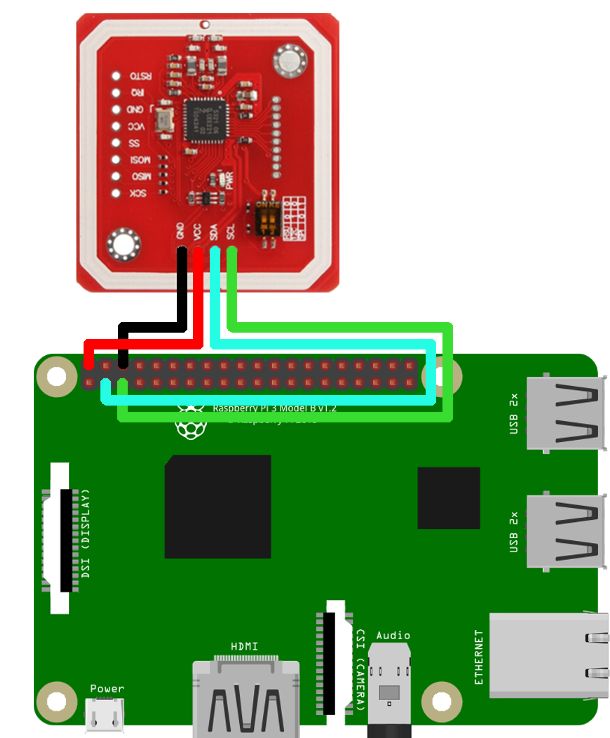
Raspberry Pi
Sluit de module aan volgens onderstaand overzicht:
Instalation script for PN532 on raspberry Pi:
|
1 2 3 4 5 6 7 8 9 10 11 12 13 14 15 16 17 18 19 20 21 22 23 24 25 26 27 28 29 30 31 32 33 34 35 36 37 38 39 40 41 42 43 44 45 46 47 48 49 50 51 52 53 54 55 56 57 58 59 60 61 62 63 |
#!/bin/sh red=`tput setaf 1` green=`tput setaf 2` reset=`tput sgr0` echo "${red}PN532 installer${reset}" echo "${green}Installing dependencies${reset}" sudo apt-get install -y libusb-dev libpcsclite-dev echo "${green}Installed.${reset}" if [ -d /home/pi/libnfc-1.7.1/ ] then echo "${green}libnfc directory found." cd /home/pi/libnfc-1.7.1/ echo "Starting configure.${reset}" ./configure --prefix=/usr --sysconfdir=/etc echo "${green}Successfully configured." echo "Make started.${reset}" make sudo make install echo "${green}Succesfully maked the libnfc library.${reset}" else echo "${green}libnfc directory not found." cd /home/pi/ echo "${green}Downloading libnfc library.${reset}" wget http://dl.bintray.com/nfc-tools/sources/libnfc-1.7.1.tar.bz2 echo "${green}libnfc library downloaded.${reset}" echo "${green}Unpacking libnfc library.${reset}" tar -xf libnfc-1.7.1.tar.bz2 echo "${green}Unpaked libnfc library.${reset}" cd /home/pi/libnfc-1.7.1/ echo "Starting configure.${reset}" ./configure --prefix=/usr --sysconfdir=/etc echo "${green}Successfully configured." echo "Make started.${reset}" make sudo make install echo "${green}Succesfully maked the libnfc library.${reset}" fi file="/etc/nfc/libnfc.conf" if [ -d /etc/nfc ] then echo "${green}NFC directory found.${reset}" echo "allow_autoscan = true">$file echo "allow_intrusive_scan = false">>$file echo "log_level = 1">>$file echo "device.name = \"Itead_PN532\"">>$file echo "device.connstring = \"pn532_i2c:/dev/i2c-1\"">>$file echo "${green}Configuration file created.${reset}" else echo "${red}NFC directory not found.${reset}" echo "${green}Creating NFC directory.${reset}" mkdir /etc/nfc echo "${green}NFC directory created.${reset}" echo "allow_autoscan = true">$file echo "allow_intrusive_scan = false">>$file echo "log_level = 1">>$file echo "device.name = \"Itead_PN532\"">>$file echo "device.connstring = \"pn532_i2c:/dev/i2c-1\"">>$file echo "${green}Configuration file created.${reset}" fi |
Example python script:
|
1 2 3 4 5 6 7 8 9 10 11 12 13 14 |
#!/usr/bin/env python import time from subprocess import call def main(): try: while True: call('nfc-poll') except: KeyboardInterrupt() if __name__ == "__main__": main() |
Bronnen:
https://ozeki.hu/p_3023-how-to-setup-a-nfc-reader-on-raspberry-pi.html
Schema
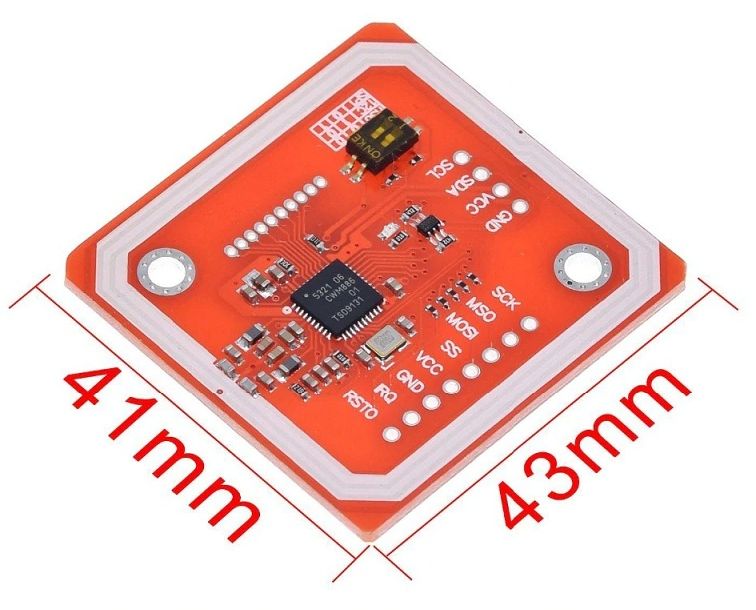
Afmetingen
Teardown
GEEN GEGEVENS
Datasheet
Fritzing
Downloads
GEEN GEGEVENS