Raspberry Pi – I2C-bus gebruiken
Wat is de I2C-bus?
De I2C-bus? (spreek uit als: I kwadraat C bus), eertijds aangeduid met IIC-bus (Inter-IC-bus), is een synchrone, seriële bus, ontwikkeld voor datacommunicatie tussen microprocessoren en andere IC’s, meestal op één enkele printplaat.
Meer informatie over de I2C-bus
Welke core versie heb ik?
Voordat je de I2C bus aanzet op de Raspberry Pi, controleer eerst de Linux core versie met het commando uname -a , de manier van inschakelen verschilt op bepaalde core versies.
Aanzetten van de I2C-bus op een Raspberry Pi met Core 3.18+:
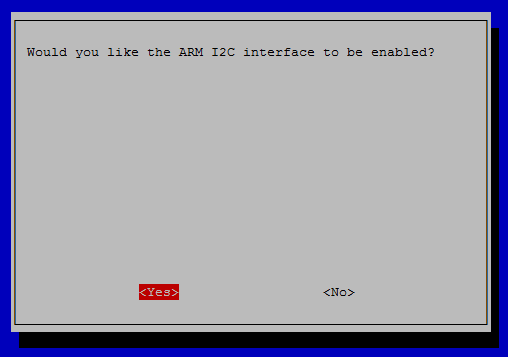
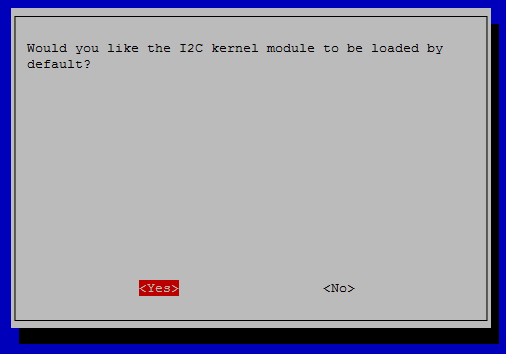
Het aanzetten van de I2C bus op de raspberry pi met core 3.18 is makkelijker gemaakt, dit is aan te zetten via het configuratiemenu van de Raspberry Pi (het commando: sudo raspi-config ), onder advanced options –> I2C kun je i2c op de raspberry Pi 2 inschakelen.
Er wordt dan het volgende weggeschreven naar /boot/config.txt :
dtparam=i2c_arm=on
In scriptform via de bash:
sudo bash -c "echo 'dtparam=i2c_arm=on' >> /boot/config.txt"
Aanzetten van de I2C-bus op een Raspberry Pi met Core < 3.18:
Volg de bovenste stappen, als extra komt erbij dat je i2c-dev toe moet voegen aan /etc/modules bewerk dit bestand met het commando: sudo nano /etc/modules
Wanneer bovenstaande regel is toegevoegd voer het volgende commando uit: sudo modprobe i2c-dev
Controleren of I2C aan staat
Controleren of I2C aan staat kan met het commando: lsmod | grep i2c_
Of (uitgevoerd op de RPi2):
I2C hardware controleren/testen
1) Installeer i2c-tools met het commando: sudo apt-get install i2c-tools
|
1 2 3 4 5 6 7 8 9 10 11 12 13 14 15 16 17 |
Reading package lists... Done Building dependency tree Reading state information... Done Suggested packages: libi2c-dev python-smbus The following NEW packages will be installed: i2c-tools 0 upgraded, 1 newly installed, 0 to remove and 73 not upgraded. Need to get 0 B/51.3 kB of archives. After this operation, 227 kB of additional disk space will be used. Selecting previously unselected package i2c-tools. (Reading database ... 126323 files and directories currently installed.) Preparing to unpack .../i2c-tools_3.1.1+svn-2_armhf.deb ... Unpacking i2c-tools (3.1.1+svn-2) ... Processing triggers for man-db (2.7.0.2-5) ... Setting up i2c-tools (3.1.1+svn-2) ... /run/udev or .udevdb or .udev presence implies active udev. Aborting MAKEDEV invocation. |
2) Zet de Raspberry Pi uit met het commando:
sudo shutdown -h now
3) Sluit de hardware aan op de juiste GPIO pinnen van de Raspberry Pi
4) Zet de Raspberry Pi aan en gebruik het volgende commando:
Rasberry Pi 2/3 : sudo i2cdetect -y 1
Rasberry Pi 1: sudo i2cdetect -y 0
Dan krijg je ziets als dit te zien (aangesloten is een lichtsensor BH1750 met 0x23):
|
1 2 3 4 5 6 7 8 9 |
0 1 2 3 4 5 6 7 8 9 a b c d e f 00: -- -- -- -- -- -- -- -- -- -- -- -- -- 10: -- -- -- -- -- -- -- -- -- -- -- -- -- -- -- -- 20: -- -- -- 23 -- -- -- -- -- -- -- -- -- -- -- -- 30: -- -- -- -- -- -- -- -- -- -- -- -- -- -- -- -- 40: -- -- -- -- -- -- -- -- -- -- -- -- -- -- -- -- 50: -- -- -- -- -- -- -- -- -- -- -- -- -- -- -- -- 60: -- -- -- -- -- -- -- -- -- -- -- -- -- -- -- -- 70: -- -- -- -- -- -- -- -- |
Of zoals hier een BMP180 sensor:
|
1 2 3 4 5 6 7 8 9 |
0 1 2 3 4 5 6 7 8 9 a b c d e f 00: -- -- -- -- -- -- -- -- -- -- -- -- -- 10: -- -- -- -- -- -- -- -- -- -- -- -- -- -- -- -- 20: -- -- -- -- -- -- -- -- -- -- -- -- -- -- -- -- 30: -- -- -- -- -- -- -- -- -- -- -- -- -- -- -- -- 40: -- -- -- -- -- -- -- -- -- -- -- -- -- -- -- -- 50: -- -- -- -- -- -- -- -- -- -- -- -- -- -- -- -- 60: -- -- -- -- -- -- -- -- -- -- -- -- -- -- -- -- 70: -- -- -- -- -- -- -- 77 |
Foutmeldingen
Krijg je foutmeldingen als deze (hardware aangesloten en Raspberry niet opnieuw opgestart?):
|
1 2 |
Error: Could not open file `/dev/i2c-1' or `/dev/i2c/1': No such file or directory Error: Could not open file `/dev/i2c-0' or `/dev/i2c/0': No such file or directory |
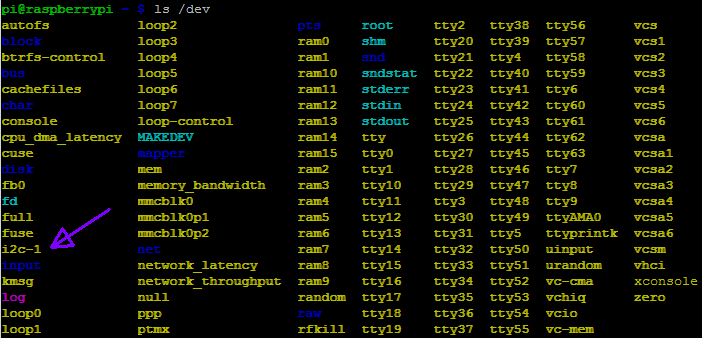
Probeer dan dit commando: sudo modprobe i2c-dev, dan verschijnt I2C in de devices:
Gebruik van de I2C bus in Python
Om de I2C in Python te gebruiken moet je een module installeren, genaamd SMBUS, dit kan via APT-GET met het commando:
sudo apt-get install python-smbus
|
1 2 3 4 5 6 7 8 9 10 11 12 13 14 |
Reading package lists... Done Building dependency tree Reading state information... Done The following NEW packages will be installed: python-smbus 0 upgraded, 1 newly installed, 0 to remove and 79 not upgraded. Need to get 11.9 kB of archives. After this operation, 95.2 kB of additional disk space will be used. Get:1 http://archive.raspberrypi.org/debian/ wheezy/main python-smbus armhf 3.1.1+svn-1 [11.9 kB] Fetched 11.9 kB in 0s (131 kB/s) Selecting previously unselected package python-smbus. (Reading database ... 78301 files and directories currently installed.) Unpacking python-smbus (from .../python-smbus_3.1.1+svn-1_armhf.deb) ... Setting up python-smbus (3.1.1+svn-1) ... |
Je kan dan de module importeren in python door middel van: import smbus
I2C repeterende startcommando
Wat is het? (ENG):
A way to claim the bus
During an I2C transfer there is often the need to first send a command and then read back an answer right away. This has to be done without the risk of another (multimaster) device interrupting this atomic operation. The I2C protocol defines a so-called repeated start condition. After having sent the address byte (address and read/write bit) the master may send any number of bytes followed by a stop condition. Instead of sending the stop condition it is also allowed to send another start condition again followed by an address (and of course including a read/write bit) and more data. This is defined recursively allowing any number of start conditions to be sent. The purpose of this is to allow combined write/read operations to one or more devices without releasing the bus and thus with the guarantee that the operation is not interrupted.

Regardless of the number of start conditions sent during one transfer the transfer must be ended by exactly one stop condition.
Hier volgt een kleine handleiding om repeterende startcommando’s toe te laten op de I2C bus.
/sys/module/i2c_bcm2708/parameters/combined moet op Y staan, dat gaat met het commando:
sudo su -c 'echo "Y" > /sys/module/i2c_bcm2708/parameters/combined'
Controle met het commando:
cat /sys/module/i2c_bcm2708/parameters/combined
|
1 2 3 4 5 |
pi@raspberrypi:~ $ cat /sys/module/i2c_bcm2708/parameters/combined N pi@raspberrypi:~ $ sudo su -c 'echo "Y" > /sys/module/i2c_bcm2708/parameters/combined' pi@raspberrypi:~ $ cat /sys/module/i2c_bcm2708/parameters/combined Y |
Daarna moet deze regel nog toegevoegd worden om instellingen bij het herstarten te behouden, deze regel:
options i2c-bcm2708 combined=1
moet dan staan in sudo nano /etc/modprobe.d/i2c.conf
Dan kan met het commando:
sudo bash -c "echo 'options i2c-bcm2708 combined=1' >> /etc/modprobe.d/i2c.conf"
Optioneel -> Reboot hierna de Raspberry pi met het commando: sudo reboot


