Raspberry Pi – VNC – Teamviewer
![]()
![]()
Source: https://pimylifeup.com/raspberry-pi-teamviewer/
Step 1
As we are already using the command line, we can do that by running the following command. This command will use wget to download the .deb file from TeamViewer’s server.
A .deb file is a package file designed for the Debian systems package management system. The .deb file is an archive containing all the files that we need for TeamViewer.
Use wget and:
https://download.teamviewer.com/download/linux/teamviewer-host_armhf.deb
|
1 2 3 4 5 6 7 8 9 10 11 12 13 14 15 |
--2020-06-14 14:31:25-- https://download.teamviewer.com/download/linux/teamviewer-host_armhf.deb Herleiden van download.teamviewer.com (download.teamviewer.com)... 104.16.63.16, 104.16.62.16, 2606:4700::6810:3e10, ... Verbinding maken met download.teamviewer.com (download.teamviewer.com)|104.16.63.16|:443... verbonden. HTTP-verzoek is verzonden; wachten op antwoord... 302 Found Locatie: https://dl.teamviewer.com/download/linux/version_15x/teamviewer-host_15.6.7_armhf.deb [volgen...] --2020-06-14 14:31:26-- https://dl.teamviewer.com/download/linux/version_15x/teamviewer-host_15.6.7_armhf.deb Herleiden van dl.teamviewer.com (dl.teamviewer.com)... 104.16.62.16, 104.16.63.16, 2606:4700::6810:3e10, ... Verbinding maken met dl.teamviewer.com (dl.teamviewer.com)|104.16.62.16|:443... verbonden. HTTP-verzoek is verzonden; wachten op antwoord... 200 OK Lengte: 10837486 (10M) [application/octet-stream] Wordt opgeslagen als: ‘teamviewer-host_armhf.deb’ teamviewer-host_armhf.deb 100%[=======================================================>] 10,33M 4,02MB/s in 2,6s 2020-06-14 14:31:28 (4,02 MB/s) - '‘teamviewer-host_armhf.deb’' opgeslagen [10837486/10837486] |
Step 2
Now that we have the TeamViewer deb file available on our Raspberry Pi lets go ahead and install it by running the following command.
To install the TeamViewer deb package, we will be making use of the dpkg utility which is the base of the Debian package management software.
sudo dpkg -i teamviewer-host_armhf.deb
|
1 2 3 4 5 6 7 8 9 10 11 12 13 14 15 16 17 18 19 20 21 22 23 24 25 26 27 28 29 30 31 32 33 34 35 36 37 38 |
Voorheen niet geselecteerd pakket teamviewer-host wordt geselecteerd. (Database wordt ingelezen ... 154464 bestanden en mappen momenteel geïnstalleerd.) Uitpakken van teamviewer-host_armhf.deb wordt voorbereid... Bezig met uitpakken van teamviewer-host (15.6.7) ... dpkg: vereistenproblemen verhinderen de configuratie van teamviewer-host: teamviewer-host is afhankelijk van libqt5qml5 (>= 5.5) | qt56-teamviewer; maar: Pakket libqt5qml5 is niet geïnstalleerd. Pakket qt56-teamviewer is niet geïnstalleerd. teamviewer-host is afhankelijk van libqt5quick5 (>= 5.5) | qt56-teamviewer; maar: Pakket libqt5quick5 is niet geïnstalleerd. Pakket qt56-teamviewer is niet geïnstalleerd. teamviewer-host is afhankelijk van libqt5webkit5 (>= 5.5) | qt56-teamviewer; maar: Pakket libqt5webkit5 is niet geïnstalleerd. Pakket qt56-teamviewer is niet geïnstalleerd. teamviewer-host is afhankelijk van qml-module-qtquick2 (>= 5.5) | qt56-teamviewer; maar: Pakket qml-module-qtquick2 is niet geïnstalleerd. Pakket qt56-teamviewer is niet geïnstalleerd. teamviewer-host is afhankelijk van qml-module-qtquick-controls (>= 5.5) | qt56-teamviewer; maar: Pakket qml-module-qtquick-controls is niet geïnstalleerd. Pakket qt56-teamviewer is niet geïnstalleerd. teamviewer-host is afhankelijk van qml-module-qtquick-dialogs (>= 5.5) | qt56-teamviewer; maar: Pakket qml-module-qtquick-dialogs is niet geïnstalleerd. Pakket qt56-teamviewer is niet geïnstalleerd. teamviewer-host is afhankelijk van qml-module-qtquick-window2 (>= 5.5) | qt56-teamviewer; maar: Pakket qml-module-qtquick-window2 is niet geïnstalleerd. Pakket qt56-teamviewer is niet geïnstalleerd. teamviewer-host is afhankelijk van qml-module-qtquick-layouts (>= 5.5) | qt56-teamviewer; maar: Pakket qml-module-qtquick-layouts is niet geïnstalleerd. Pakket qt56-teamviewer is niet geïnstalleerd. dpkg: fout bij verwerken van pakket teamviewer-host (--install): vereistenproblemen - blijft ongeconfigureerd Bezig met afhandelen van triggers voor gnome-menus (3.31.4-3) ... Bezig met afhandelen van triggers voor desktop-file-utils (0.23-4) ... Bezig met afhandelen van triggers voor mime-support (3.62) ... Bezig met afhandelen van triggers voor hicolor-icon-theme (0.17-2) ... Fouten gevonden tijdens verwerken van: teamviewer-host |
Step 3
Upon running the above command, you will notice a bunch of errors about specific packages not being installed.
To fix this, we will have to make use of our package manager to repair the “broken install”.
The apt package manager will automatically detect the missing packages and attempt to download the best versions available for the software.
Now let’s utilize the apt tool by running the command below.
sudo apt --fix-broken install
|
1 2 3 4 5 6 7 8 9 10 11 12 13 14 15 16 17 18 19 20 21 22 23 24 25 26 27 28 29 30 31 32 33 34 35 36 37 38 39 40 41 42 43 44 45 46 47 48 49 50 51 52 53 54 55 56 57 58 59 60 61 62 63 64 65 66 67 68 69 70 71 72 73 74 75 76 77 78 79 80 81 82 83 84 85 86 87 88 89 90 91 92 93 94 95 96 97 98 99 100 101 102 103 104 105 106 107 108 109 110 111 112 113 114 115 116 117 118 119 120 121 122 123 124 125 126 127 128 129 130 131 132 133 134 135 136 137 138 |
Pakketlijsten worden ingelezen... Klaar Boom van vereisten wordt opgebouwd De statusinformatie wordt gelezen... Klaar Vereisten worden gecorrigeerd... Klaar De volgende extra pakketten zullen geïnstalleerd worden: geoclue-2.0 iio-sensor-proxy libmbim-glib4 libmbim-proxy libmm-glib0 libqmi-glib5 libqmi-proxy libqt5positioning5 libqt5qml5 libqt5quick5 libqt5sensors5 libqt5webchannel5 libqt5webkit5 modemmanager qml-module-qtgraphicaleffects qml-module-qtquick-controls qml-module-qtquick-dialogs qml-module-qtquick-layouts qml-module-qtquick-privatewidgets qml-module-qtquick-window2 qml-module-qtquick2 Voorgestelde pakketten: qt5-qmltooling-plugins De volgende NIEUWE pakketten zullen geïnstalleerd worden: geoclue-2.0 iio-sensor-proxy libmbim-glib4 libmbim-proxy libmm-glib0 libqmi-glib5 libqmi-proxy libqt5positioning5 libqt5qml5 libqt5quick5 libqt5sensors5 libqt5webchannel5 libqt5webkit5 modemmanager qml-module-qtgraphicaleffects qml-module-qtquick-controls qml-module-qtquick-dialogs qml-module-qtquick-layouts qml-module-qtquick-privatewidgets qml-module-qtquick-window2 qml-module-qtquick2 0 opgewaardeerd, 21 nieuw geïnstalleerd, 0 te verwijderen en 172 niet opgewaardeerd. 1 niet volledig geïnstalleerd of verwijderd. Er moeten 14,7 MB aan archieven opgehaald worden. Na deze bewerking zal er 57,1 MB extra schijfruimte gebruikt worden. Wilt u doorgaan? [J/n] J Ophalen:1 http://mirror.transip.net/raspbian/raspbian buster/main armhf libqt5qml5 armhf 5.11.3-4 [1001 kB] Ophalen:2 http://mirror.transip.net/raspbian/raspbian buster/main armhf libqt5quick5 armhf 5.11.3-4 [1049 kB] Ophalen:3 http://mirror.transip.net/raspbian/raspbian buster/main armhf libqt5positioning5 armhf 5.11.3+dfsg-2 [159 kB] Ophalen:4 http://mirror.transip.net/raspbian/raspbian buster/main armhf libqt5sensors5 armhf 5.11.3-2 [94,6 kB] Ophalen:5 http://mirror.transip.net/raspbian/raspbian buster/main armhf libqt5webchannel5 armhf 5.11.3-2 [41,5 kB] Ophalen:6 http://mirror.transip.net/raspbian/raspbian buster/main armhf libqt5webkit5 armhf 5.212.0~alpha2-21+rpi1 [8306 kB] Ophalen:7 http://mirror.transip.net/raspbian/raspbian buster/main armhf qml-module-qtquick2 armhf 5.11.3-4 [45,0 kB] Ophalen:8 http://mirror.transip.net/raspbian/raspbian buster/main armhf qml-module-qtquick-window2 armhf 5.11.3-4 [31,6 kB] Ophalen:9 http://mirror.transip.net/raspbian/raspbian buster/main armhf qml-module-qtgraphicaleffects armhf 5.11.3-2 [67,0 kB] Ophalen:10 http://mirror.transip.net/raspbian/raspbian buster/main armhf qml-module-qtquick-layouts armhf 5.11.3-4 [51,2 kB] Ophalen:11 http://mirror.transip.net/raspbian/raspbian buster/main armhf qml-module-qtquick-controls armhf 5.11.3-2 [627 kB] Ophalen:12 http://mirror.transip.net/raspbian/raspbian buster/main armhf qml-module-qtquick-privatewidgets armhf 5.11.3-2 [38,0 kB] Ophalen:13 http://mirror.transip.net/raspbian/raspbian buster/main armhf qml-module-qtquick-dialogs armhf 5.11.3-2 [109 kB] Ophalen:14 http://mirror.transip.net/raspbian/raspbian buster/main armhf libmm-glib0 armhf 1.10.0-1 [903 kB] Ophalen:15 http://mirror.transip.net/raspbian/raspbian buster/main armhf geoclue-2.0 armhf 2.5.2-1 [75,5 kB] Ophalen:16 http://mirror.transip.net/raspbian/raspbian buster/main armhf iio-sensor-proxy armhf 2.4-2 [42,3 kB] Ophalen:17 http://mirror.transip.net/raspbian/raspbian buster/main armhf libmbim-glib4 armhf 1.18.0-1 [142 kB] Ophalen:18 http://mirror.transip.net/raspbian/raspbian buster/main armhf libmbim-proxy armhf 1.18.0-1 [70,7 kB] Ophalen:19 http://mirror.transip.net/raspbian/raspbian buster/main armhf libqmi-glib5 armhf 1.22.0-1.2 [443 kB] Ophalen:20 http://mirror.transip.net/raspbian/raspbian buster/main armhf libqmi-proxy armhf 1.22.0-1.2 [9032 B] Ophalen:21 http://mirror.transip.net/raspbian/raspbian buster/main armhf modemmanager armhf 1.10.0-1 [1363 kB] 14,7 MB opgehaald in 4s (3528 kB/s) Voorheen niet geselecteerd pakket libqt5qml5:armhf wordt geselecteerd. (Database wordt ingelezen ... 154577 bestanden en mappen momenteel geïnstalleerd.) Uitpakken van .../00-libqt5qml5_5.11.3-4_armhf.deb wordt voorbereid... Bezig met uitpakken van libqt5qml5:armhf (5.11.3-4) ... Voorheen niet geselecteerd pakket libqt5quick5:armhf wordt geselecteerd. Uitpakken van .../01-libqt5quick5_5.11.3-4_armhf.deb wordt voorbereid... Bezig met uitpakken van libqt5quick5:armhf (5.11.3-4) ... Voorheen niet geselecteerd pakket libqt5positioning5:armhf wordt geselecteerd. Uitpakken van .../02-libqt5positioning5_5.11.3+dfsg-2_armhf.deb wordt voorbereid... Bezig met uitpakken van libqt5positioning5:armhf (5.11.3+dfsg-2) ... Voorheen niet geselecteerd pakket libqt5sensors5:armhf wordt geselecteerd. Uitpakken van .../03-libqt5sensors5_5.11.3-2_armhf.deb wordt voorbereid... Bezig met uitpakken van libqt5sensors5:armhf (5.11.3-2) ... Voorheen niet geselecteerd pakket libqt5webchannel5:armhf wordt geselecteerd. Uitpakken van .../04-libqt5webchannel5_5.11.3-2_armhf.deb wordt voorbereid... Bezig met uitpakken van libqt5webchannel5:armhf (5.11.3-2) ... Voorheen niet geselecteerd pakket libqt5webkit5:armhf wordt geselecteerd. Uitpakken van .../05-libqt5webkit5_5.212.0~alpha2-21+rpi1_armhf.deb wordt voorbereid... Bezig met uitpakken van libqt5webkit5:armhf (5.212.0~alpha2-21+rpi1) ... Voorheen niet geselecteerd pakket qml-module-qtquick2:armhf wordt geselecteerd. Uitpakken van .../06-qml-module-qtquick2_5.11.3-4_armhf.deb wordt voorbereid... Bezig met uitpakken van qml-module-qtquick2:armhf (5.11.3-4) ... Voorheen niet geselecteerd pakket qml-module-qtquick-window2:armhf wordt geselecteerd. Uitpakken van .../07-qml-module-qtquick-window2_5.11.3-4_armhf.deb wordt voorbereid... Bezig met uitpakken van qml-module-qtquick-window2:armhf (5.11.3-4) ... Voorheen niet geselecteerd pakket qml-module-qtgraphicaleffects:armhf wordt geselecteerd. Uitpakken van .../08-qml-module-qtgraphicaleffects_5.11.3-2_armhf.deb wordt voorbereid... Bezig met uitpakken van qml-module-qtgraphicaleffects:armhf (5.11.3-2) ... Voorheen niet geselecteerd pakket qml-module-qtquick-layouts:armhf wordt geselecteerd. Uitpakken van .../09-qml-module-qtquick-layouts_5.11.3-4_armhf.deb wordt voorbereid... Bezig met uitpakken van qml-module-qtquick-layouts:armhf (5.11.3-4) ... Voorheen niet geselecteerd pakket qml-module-qtquick-controls:armhf wordt geselecteerd. Uitpakken van .../10-qml-module-qtquick-controls_5.11.3-2_armhf.deb wordt voorbereid... Bezig met uitpakken van qml-module-qtquick-controls:armhf (5.11.3-2) ... Voorheen niet geselecteerd pakket qml-module-qtquick-privatewidgets:armhf wordt geselecteerd. Uitpakken van .../11-qml-module-qtquick-privatewidgets_5.11.3-2_armhf.deb wordt voorbereid... Bezig met uitpakken van qml-module-qtquick-privatewidgets:armhf (5.11.3-2) ... Voorheen niet geselecteerd pakket qml-module-qtquick-dialogs:armhf wordt geselecteerd. Uitpakken van .../12-qml-module-qtquick-dialogs_5.11.3-2_armhf.deb wordt voorbereid... Bezig met uitpakken van qml-module-qtquick-dialogs:armhf (5.11.3-2) ... Voorheen niet geselecteerd pakket libmm-glib0:armhf wordt geselecteerd. Uitpakken van .../13-libmm-glib0_1.10.0-1_armhf.deb wordt voorbereid... Bezig met uitpakken van libmm-glib0:armhf (1.10.0-1) ... Voorheen niet geselecteerd pakket geoclue-2.0 wordt geselecteerd. Uitpakken van .../14-geoclue-2.0_2.5.2-1_armhf.deb wordt voorbereid... Bezig met uitpakken van geoclue-2.0 (2.5.2-1) ... Voorheen niet geselecteerd pakket iio-sensor-proxy wordt geselecteerd. Uitpakken van .../15-iio-sensor-proxy_2.4-2_armhf.deb wordt voorbereid... Bezig met uitpakken van iio-sensor-proxy (2.4-2) ... Voorheen niet geselecteerd pakket libmbim-glib4:armhf wordt geselecteerd. Uitpakken van .../16-libmbim-glib4_1.18.0-1_armhf.deb wordt voorbereid... Bezig met uitpakken van libmbim-glib4:armhf (1.18.0-1) ... Voorheen niet geselecteerd pakket libmbim-proxy wordt geselecteerd. Uitpakken van .../17-libmbim-proxy_1.18.0-1_armhf.deb wordt voorbereid... Bezig met uitpakken van libmbim-proxy (1.18.0-1) ... Voorheen niet geselecteerd pakket libqmi-glib5:armhf wordt geselecteerd. Uitpakken van .../18-libqmi-glib5_1.22.0-1.2_armhf.deb wordt voorbereid... Bezig met uitpakken van libqmi-glib5:armhf (1.22.0-1.2) ... Voorheen niet geselecteerd pakket libqmi-proxy wordt geselecteerd. Uitpakken van .../19-libqmi-proxy_1.22.0-1.2_armhf.deb wordt voorbereid... Bezig met uitpakken van libqmi-proxy (1.22.0-1.2) ... Voorheen niet geselecteerd pakket modemmanager wordt geselecteerd. Uitpakken van .../20-modemmanager_1.10.0-1_armhf.deb wordt voorbereid... Bezig met uitpakken van modemmanager (1.10.0-1) ... Instellen van iio-sensor-proxy (2.4-2) ... iio-sensor-proxy.service is a disabled or a static unit, not starting it. Instellen van libqt5positioning5:armhf (5.11.3+dfsg-2) ... Instellen van libqt5qml5:armhf (5.11.3-4) ... Instellen van libqt5webchannel5:armhf (5.11.3-2) ... Instellen van libmm-glib0:armhf (1.10.0-1) ... Instellen van libqt5sensors5:armhf (5.11.3-2) ... Instellen van libqt5quick5:armhf (5.11.3-4) ... Instellen van qml-module-qtquick-privatewidgets:armhf (5.11.3-2) ... Instellen van libmbim-glib4:armhf (1.18.0-1) ... Instellen van qml-module-qtquick-window2:armhf (5.11.3-4) ... Instellen van geoclue-2.0 (2.5.2-1) ... geoclue.service is a disabled or a static unit, not starting it. Instellen van libmbim-proxy (1.18.0-1) ... Instellen van libqt5webkit5:armhf (5.212.0~alpha2-21+rpi1) ... Instellen van qml-module-qtquick-layouts:armhf (5.11.3-4) ... Instellen van qml-module-qtquick-dialogs:armhf (5.11.3-2) ... Instellen van qml-module-qtquick2:armhf (5.11.3-4) ... Instellen van libqmi-glib5:armhf (1.22.0-1.2) ... Instellen van qml-module-qtgraphicaleffects:armhf (5.11.3-2) ... Instellen van qml-module-qtquick-controls:armhf (5.11.3-2) ... Instellen van libqmi-proxy (1.22.0-1.2) ... Instellen van modemmanager (1.10.0-1) ... Created symlink /etc/systemd/system/dbus-org.freedesktop.ModemManager1.service → /lib/systemd/system/ModemManager.service. Created symlink /etc/systemd/system/multi-user.target.wants/ModemManager.service → /lib/systemd/system/ModemManager.service. Instellen van teamviewer-host (15.6.7) ... Bezig met afhandelen van triggers voor libc-bin (2.28-10+rpi1) ... Bezig met afhandelen van triggers voor man-db (2.8.5-2) ... Bezig met afhandelen van triggers voor dbus (1.12.16-1) ... Bezig met afhandelen van triggers voor desktop-file-utils (0.23-4) ... Bezig met afhandelen van triggers voor mime-support (3.62) ... Bezig met afhandelen van triggers voor hicolor-icon-theme (0.17-2) ... Bezig met afhandelen van triggers voor gnome-menus (3.31.4-3) ... |
TeamViewer should now be up and running on your Raspberry Pi. The software is automatically set up so that it will start up on boot, so you do not have to worry about that.
Note
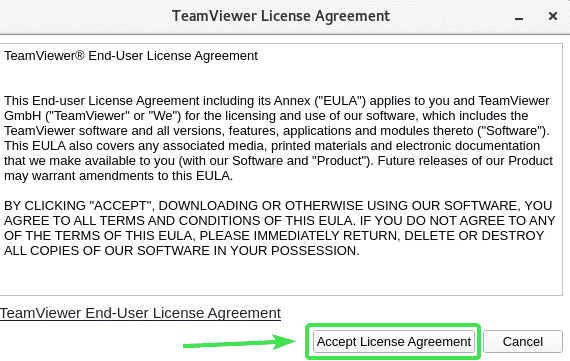
Upon installing TeamViewer to your Raspberry Pi, you will be greeted with the screen below asking you to accept TeamViewer’s license agreement.
To continue with this guide, you will need to click the Accept License Agreement button:
Once you have agreed to the license agreement, you will be returned to the desktop.
To open up the Teamviewer host software click the TeamViewer icon in the taskbar as shown in the screenshot below.

Step 4
Before you can access the Raspberry Pi from a TeamViewer client, we will first have to designate a password for the server.
We can do that by running the following command, where “<password>” is the password that you want to utilize.
Make sure you keep this password secure as it will allow someone access to your Raspberry Pi if they manage to get your TeamViewer ID and its password.
sudo teamviewer passwd raspberry
response will be: ok
Step 5
Now that we have set a password for TeamViewer on our Raspberry Pi let’s now go ahead and retrieve the TeamViewer ID.
The TeamViewer ID is the ID that you will utilize to make a connection to the TeamViewer server sitting on the Raspberry Pi.
To retrieve the TeamViewer ID type in the following command into the terminal.
Note: you have to use sudo for access to the info
sudo teamviewer info
|
1 2 3 4 5 6 7 8 9 10 11 12 13 14 15 16 17 |
TeamViewer 15.6.7 (DEB) TeamViewer ID: 12047545581 teamviewerd status ● teamviewerd.service - TeamViewer remote control daemon Loaded: loaded (/etc/systemd/system/teamviewerd.service; enabled; vendor preset: enabled) Active: active (running) since Sun 2020-06-14 14:33:28 CEST; 37s ago Process: 1914 ExecStart=/opt/teamviewer/tv_bin/teamviewerd -d (code=exited, status=0/SUCCESS) Main PID: 1916 (teamviewerd) Tasks: 17 (limit: 4035) Memory: 2.7M CGroup: /system.slice/teamviewerd.service └─1916 /opt/teamviewer/tv_bin/teamviewerd -d jun 14 14:33:28 raspberrypi systemd[1]: Starting TeamViewer remote control daemon... jun 14 14:33:28 raspberrypi systemd[1]: teamviewerd.service: Can't open PID file /run/teamviewerd.pid (yet?) after start: No such file or directory jun 14 14:33:28 raspberrypi systemd[1]: Started TeamViewer remote control daemon. |
You will get a result from this command you can see your TeamViewer ID, write this number down as you will need this to connect to your Raspberry Pi.
Note
Now you have got the ID and set the password you can access it with teamviewer!
Download DEB: