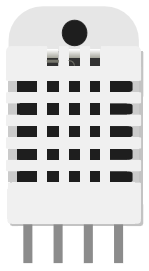
Sensor – DHT – Temperatuur en Luchtvochtigheid sensor
Hardware
Informatie
Met deze module kun je de temperatuur en luchtvochtigheid meten, hij is door de fabrikant al behoorlijk geijkt, eventuele aanpassingen (bijvoorbeeld ijken) kunnen softwarematig gedaan worden, de meetwaarden van de DHT22 zijn nauwkeuriger dan zijn broertje, de DHT11.
– Werkt op: 3-5V.
– 2.5mA max stroomverbruik wanneer data opgevraagd wordt.
– Temperatuur bereik: -40 t/m 80 ºC.
– Temperatuur nauwkeurigheid: ±0,5 ºC.
– Vochtigheid bereik: 20-95% RH.
– Vochtigheid nauwkeurigheid: ±5,0% RH.
– Response tijd: < 5 sec.
Let op: de DHT11 geeft geen decimalen weer, de DHT22 wel!
Ps. Voor velen wordt deze sensor als een oude reliek gezien, maar….het is de enige sensor die kan communiceren over lange afstanden met kabel, de modernere sensoren hebben een I2C of SPI interface, en zijn daardoor beperkt met een max. kabellengte van 15-30 cm!
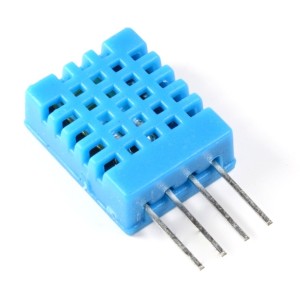
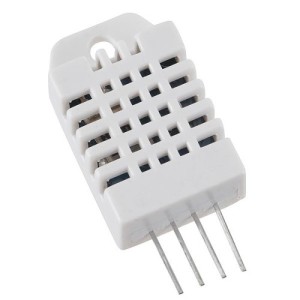
Vergelijking tussen de DHT121 en DHT22:
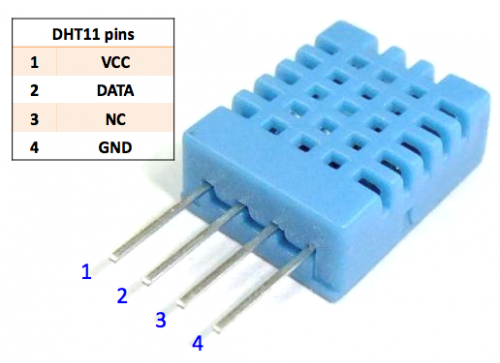
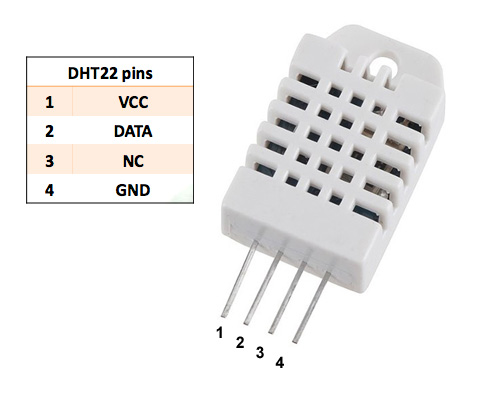
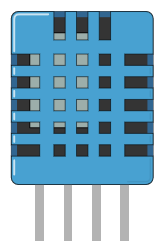
Pinout
Arduino
De sensor werkt met binaire data, er zijn daarvoor diverse bibliotheeken geschreven om het makkelijk te maken.
1) Weerstand 4,7 kOhm
2) Arduino DHT bibliotheek
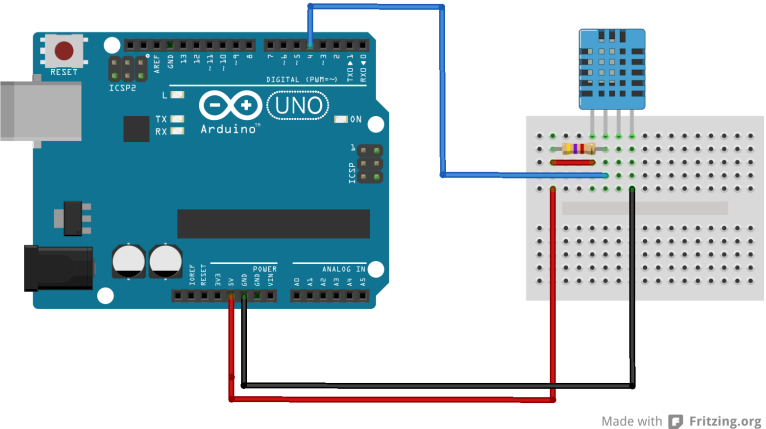
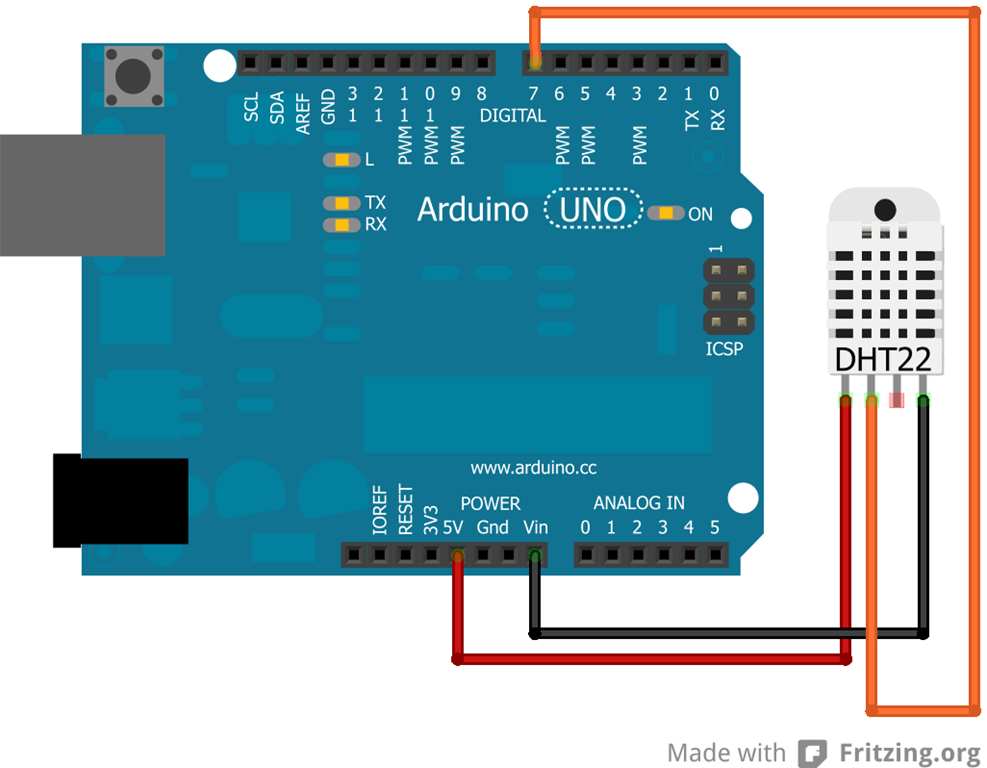
Sluit de module aan volgens onderstaand overzicht:
Ps. de weerstand is nodig voor de pull-up!
| Arduino pin: | BMP280 pin: |
|---|---|
| +5V | +5V (VCC) |
| GND | GND |
| A5 | SCL Serial Clock (line) |
| A4 | SCA Serial Clock (data) |
Script (voorbeeld Markruys bibliotheek)
|
1 2 3 4 5 6 7 8 9 10 11 12 13 14 15 16 17 18 19 20 21 22 23 24 25 26 27 |
#include "DHT.h" DHT dht; void setup() { Serial.begin(9600); Serial.println(); Serial.println("Status\tVochtigheid (%)\tTemperatuur (C)\t(F)"); // DHT aangesloten op data pin 2. dht.setup(2); } void loop() { delay(dht.getMinimumSamplingPeriod()); // Haal de data uit de DHT module en zet deze om in een variabele. float vochtigheid = dht.getHumidity(); float temperatuur = dht.getTemperature(); // Print de gegevens naar de seriele monitor. Serial.print(dht.getStatusString()); Serial.print("\t"); Serial.print(vochtigheid, 1); Serial.print("\t\t"); Serial.print(temperatuur, 1); Serial.print("\t\t"); Serial.println(dht.toFahrenheit(temperatuur), 1); } |
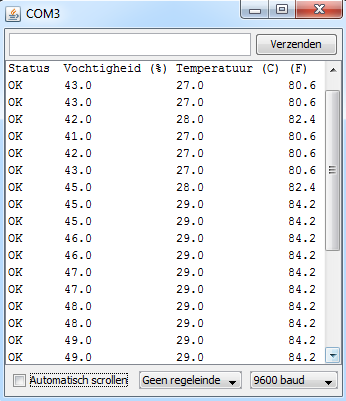
Output
Script (RobTillaart “DHTlib” library)
Voorbeeld met een DHT22 sensor
|
1 2 3 4 5 6 7 8 9 10 11 12 13 14 15 16 17 18 19 20 21 22 23 24 25 26 27 |
#include "DHT.h" DHT dht; void setup() { Serial.begin(9600); Serial.println(); Serial.println("StatustVochtigheid (%)tTemperatuur (C)t(F)"); // DHT aangesloten op data pin 2. dht.setup(2); } void loop() { delay(dht.getMinimumSamplingPeriod()); // Haal de data uit de DHT module en zet deze om in een variabele. float vochtigheid = dht.getHumidity(); float temperatuur = dht.getTemperature(); // Print de gegevens naar de seriele monitor. Serial.print(dht.getStatusString()); Serial.print("t"); Serial.print(vochtigheid, 1); Serial.print("tt"); Serial.print(temperatuur, 1); Serial.print("tt"); Serial.println(dht.toFahrenheit(temperatuur), 1); } |
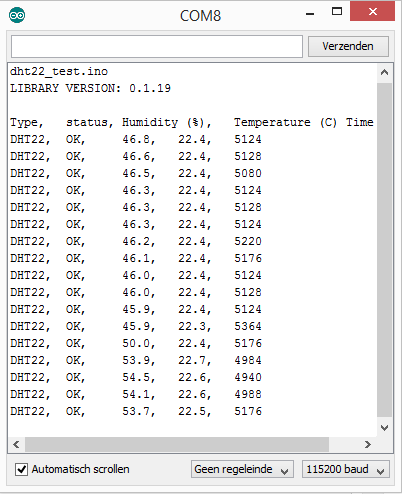
Output
Arduino Library
Installatie van Arduino IDE libraries: Arduino info
DHT informatie @ Arduino Playground
RobTillaart “DHTlib” library (aanbevolen voor Arduino)
The DHT11, 21, 22, 33 and 44 are relative inexpensive sensors for measuring temperature and humidity.
This library can be used for reading both values from these DHT sensors.
The DHT11 only returns integers (e.g. 20) and does not support negative values.
The others are quite similar and provide one decimal digit (e.g. 20.2)
The hardware pins of the sensors and handshake are identical so ideal to combine in one lib.
The library (0.1.13 version) is confirmed to work on:
UNO (tested myself)
2009 (tested myself)
MEGA2560
DUE
attiny85 @8MHz
Digistump Digix @ 84 MHz
|
1 2 3 4 5 6 7 8 9 |
version 0.1.13 is the last stable version for both AVR and ARM version 0.1.14 and up are not compatible anymore with pre 1.0 Arduino version 0.1.14 and up have breaking changes wrt ARM based arduino's e.g DUE. version 0.1.15 is stable version for AVR only version 0.1.16 and 0.1.17 have breaking changes for DHT11 version 0.1.18 works again for DHT11 (avr only) version 0.1.19 fixed masking bug DHT11 (avr only) version 0.1.20 Reduce footprint (34 bytes) by using int8_t as error codes. (thanks to chaveiro) version 0.1.21 replace delay with delayMicroseconds() + small fix (thanks to codingforfun) |
Dowload Robtillaart DHTlib library @ Github
Markruys “arduino-DHT” library (arduino)
- Ondersteuning voor DHT11. DHT22, AM2302, RHT03.
- Detecteert automatisch het sensor model.
- Verbruikt weinig geheugen.
- Zeer kleine code.
Dowload Markruys arduino-DHT library @ Github
Adafruit “DHT library” (arduino)
This is an Arduino library for the DHT series of low cost temperature/humidity sensors.
To download. click the DOWNLOADS button in the top right corner, rename the uncompressed folder DHT. Check that the DHT folder contains DHT.cpp and DHT.h. Place the DHT library folder your <arduinosketchfolder>/libraries/ folder. You may need to create the libraries subfolder if its your first library. Restart the IDE.
Dowload Adafruit DHT library @ Github
Niesteszeck “idDHT11” library
De DHT bibliotheek van Niesteszeck is interrupt gedreven en belast de atmega minder, zodat er capaciteit overblijft voor andere taken.
Dowload Niesteszeck – idDHT11 library @ Github
Bronnen:
ControlEverythongCommunity @ Github.com
raspberrypi-spy.co.uk
- Robtillaart - DHTlib v0.1.21.7z 4,54 kb
- Robtillaart - DHTlib v0.1.19.7z 4,24 kb
- Robtillaart - DHTlib v0.1.15.7z 3,82 kb
- Robtillaart - DHTlib v0.1.14.7z 3,44 kb
- Robtillaart - DHTlib v0.1.13.7z 3,22 kb
- Robtillaart - DHTlib v0.1.09.7z 2,79 kb
- Niesteszeck - idDHT11 v0.1 (interrupt gedreven).7z 3,75 kb
- Markruys - arduino-DHT v2013-07-01.7z 41,07 kb
- Adafruit - DHT-sensor-library v1.2.3.7z 4,97 kb
- Adafruit - DHT-sensor-library v1.0.0 (gedownload op 2015-02-07).7z 3,06 kb
Raspberry Pi
Let op: Soms krijg je geen uitslag/resultaat van de scripts, dat komt omdat Linux de (precieze) timing van de aanroepen niet kan garanderen!, bij voorkeur zijn de DHT sensoren niet geschikt voor een Raspberry Pi
De sensor werkt met binaire data, er is daarvoor een bibliotheek geschreven om het makkelijk te maken.
1) Python DHT sensors bibliotheek
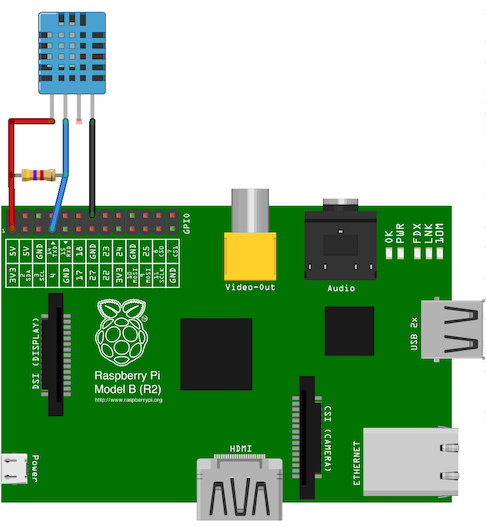
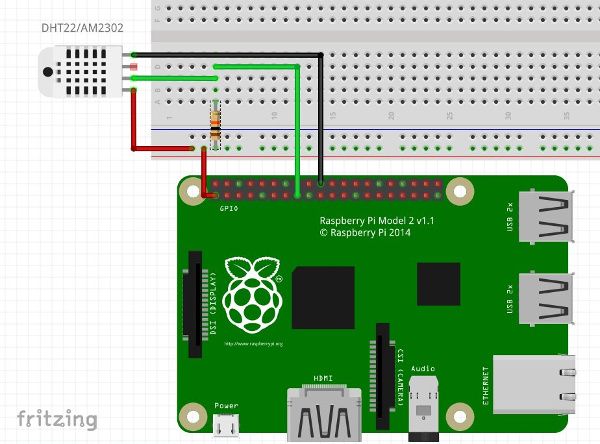
Aansluiten op de Raspberry Pi
Sluit de DHT sensor aan zoals aangegeven op onderstaand schema:
| Raspberry Pi pin: | DHT11 pin: |
|---|---|
| 1 (+3.3v) | 1 (+3.3 - 5v) |
| 7 | 2 (data) |
| 14 (GND) | 4 (GND) |
Ps. de weerstand is nodig voor de pull-up!
| Raspberry Pi pin: | DHT22 pin: |
|---|---|
| 1 (+3.3v) | 1 (+3.3 - 5v) |
| 18 | 2 (data) |
| 14 (GND) | 4 (GND) |
Scripts
Onderstaand script leest eenvoudig een DHT 11 sensor uit op GPIO 4, en geeft de waarden weer via de console.
Maak een bestand aan, bijvoorbeeld /usr/src/dht.py (evt onder root, en vergeet niet chmod te gebruiken om het bestand uit te kunnen voeren), voeg deze inhoud daar in toe:
|
1 2 3 4 5 6 7 8 9 10 11 12 |
# Importeer Adafruit DHT bibliotheek. import Adafruit_DHT humidity, temperature = Adafruit_DHT.read_retry(Adafruit_DHT.DHT11, 4) humidity = round(humidity, 2) temperature = round(temperature, 2) if humidity is not None and temperature is not None: print 'Temperatuur = {0:0.1f}*C Luchtvochtigheid = {1:0.1f}%'.format(temperature, humidity) else: print 'Kan de sensor niet uitlezen!' |
Commandolijn parameters
Wil je commandolijn parameters gebruiken?, bijvoorbeeld als je meerdere DHT sensors hebt aangesloten via de GPIO pinnen, gebruik deze voorbeeld code.
Start het script met commandolijn: sudo python /usr/src/dht.py [11/22/2302] [GPIO pin]
Het commando sudo python /usr/src/dht.py 22 24 leest bijvoorbeeld een DHT22 sensor uit die aangesloten is op GPIO pin 24 (Broadcom SOC)
|
1 2 3 4 5 6 7 8 9 10 11 12 13 14 15 16 17 18 19 20 21 22 |
# Importeer Adafruit DHT bibliotheek. import Adafruit_DHT # Importeer bibliotheek voor systeemfuncties. import sys # Commandolijn parameters verwerken. sensor_args = { '11': Adafruit_DHT.DHT11, '22': Adafruit_DHT.DHT22, '2302': Adafruit_DHT.AM2302 } if len(sys.argv) == 3 and sys.argv[1] in sensor_args: sensor = sensor_args[sys.argv[1]] pin = sys.argv[2] humidity, temperature = Adafruit_DHT.read_retry(sensor, pin) humidity = round(humidity, 2) temperature = round(temperature, 2) if humidity is not None and temperature is not None: print 'Temperatuur = {0:0.1f}*C Luchtvochtigheid = {1:0.1f}%'.format(temperature, humidity) else: print 'Kan de sensor niet uitlezen!' |
Gegevens wegschrijven naar CSV bestand
Je kan de gegevens ook opslaan in een CSV bestand, onderstaand script maakt ook gebruik van de commandolijn parameters en slaat gegevens op in een bestand (per maand) in /usr/src/DHT_DATA_[YYYY]_[MM].csv
|
1 2 3 4 5 6 7 8 9 10 11 12 13 14 15 16 17 18 19 20 21 22 23 24 25 26 27 28 29 30 31 32 33 34 35 36 37 38 39 40 41 42 |
# Importeer Adafruit DHT bibliotheek. import Adafruit_DHT # Importeer bibliotheek voor systeemfuncties. import sys # Importeer bibliotheek voor tijdfuncties. import time # Importeer bibliotheek voor CSV functies. import csv # Definieer variabelen. DY = time.strftime("%Y") DM = time.strftime("%m") DD = time.strftime("%d") TH = time.strftime("%H") TM = time.strftime("%M") # Commandolijn parameters verwerken. sensor_args = { '11': Adafruit_DHT.DHT11, '22': Adafruit_DHT.DHT22, '2302': Adafruit_DHT.AM2302 } if len(sys.argv) == 3 and sys.argv[1] in sensor_args: sensor = sensor_args[sys.argv[1]] pin = sys.argv[2] humidity, temperature = Adafruit_DHT.read_retry(sensor, pin) humidity = round(humidity, 2) temperature = round(temperature, 2) if humidity is not None and temperature is not None: print 'Temperatuur = {0:0.1f}*C Luchtvochtigheid={1:0.1f}%'.format(temperature, humidity) else: print 'Kan de sensor niet uitlezen!' data = [DY, DM, DD, TH, TM, humidity, temperature] # Sla gegevens op in een bestand (per maand) in /usr/src/DHT_DATA_[YYYY]_[MM].csv csvfile = "/usr/src/DHT_DATA_" + DY + DM + ".csv" # Open het csv bestand en schijf door achter de bestaande inhoud. with open(csvfile, "a") as output: writer = csv.writer(output, delimiter=";", lineterminator='\n') writer.writerow(data) |
De inhoud van het CSV bestand ziet er zo uit:
|
1 2 3 4 5 6 |
2015;03;13;13;56;35.0;23.0 2015;03;13;13;59;35.0;23.0 2015;03;13;14;06;35.0;23.0 2015;03;13;14;06;35.0;23.0 2015;03;13;14;06;36.0;23.0 2015;03;13;14;06;47.0;29.0 |
Script met Adafruit bibliotheek
Onderstaand script leest eenvoudig een DHT 22 sensor uit op GPIO 18, en geeft de waarden weer via de console.
Maak een bestand aan, bijvoorbeeld /usr/src/dht.py (evt onder root, en vergeet niet chmod te gebruiken om het bestand uit te kunnen voeren), voeg deze inhoud daar in toe:
|
1 2 3 4 5 6 7 8 9 10 11 12 13 |
#!/usr/bin/python import Adafruit_DHT gpiopin = 18 HUM = 0.0 TEMP = 0.0 HUM, TEMP = Adafruit_DHT.read(Adafruit_DHT.DHT22, gpiopin) if HUM >0 and TEMP >0: HUM = round(HUM, 2) TEMP = round(TEMP, 2) print '{0:0.1f}'.format(TEMP) + ';' + '{0:0.1f}'.format(HUM) else: print '0;0' |
Bronnen:
community.mydevices.com
raspberrytips.nl
Python Library
Python library to read the DHT series of humidity and temperature sensors on a Raspberry Pi or Beaglebone Black.
Currently the library is only tested with Python 2.6/2.7.
For all platforms (Raspberry Pi and Beaglebone Black) make sure your system is able to compile Python extensions. On Raspbian or Beaglebone Black’s Debian/Ubuntu image you can ensure your system is ready by executing:
|
1 2 |
apt-get update sudo apt-get install build-essential python-dev |
Installatie via GIT (github)
|
1 2 |
cd /usr/src/ sudo git clone https://github.com/adafruit/Adafruit_Python_DHT.git |
|
1 2 3 4 5 |
Cloning into 'Adafruit_Python_DHT'... remote: Counting objects: 112, done. remote: Total 112 (delta 0), reused 0 (delta 0), pack-reused 112 Receiving objects: 100% (112/112), 38.30 KiB, done. Resolving deltas: 100% (66/66), done. |
|
1 2 |
cd Adafruit_Python_DHT sudo python setup.py install |
|
1 2 3 4 5 6 7 8 9 10 11 12 13 14 15 16 17 18 19 20 21 22 23 24 25 26 27 28 29 30 31 32 33 34 35 36 37 38 39 40 41 42 43 44 45 46 47 48 49 50 51 52 53 54 55 56 57 58 59 60 61 62 63 64 65 66 67 68 69 70 71 72 73 74 75 76 77 78 79 80 81 82 83 84 |
Downloading https://pypi.python.org/packages/source/s/setuptools/setuptools-4.0.1.zip Extracting in /tmp/tmpbzKAm3 Now working in /tmp/tmpbzKAm3/setuptools-4.0.1 Building a Setuptools egg in /usr/src/Adafruit_Python_DHT /usr/src/Adafruit_Python_DHT/setuptools-4.0.1-py2.7.egg running install running bdist_egg running egg_info creating Adafruit_DHT.egg-info writing Adafruit_DHT.egg-info/PKG-INFO writing top-level names to Adafruit_DHT.egg-info/top_level.txt writing dependency_links to Adafruit_DHT.egg-info/dependency_links.txt writing manifest file 'Adafruit_DHT.egg-info/SOURCES.txt' reading manifest file 'Adafruit_DHT.egg-info/SOURCES.txt' writing manifest file 'Adafruit_DHT.egg-info/SOURCES.txt' installing library code to build/bdist.linux-armv6l/egg running install_lib running build_py creating build creating build/lib.linux-armv6l-2.7 creating build/lib.linux-armv6l-2.7/Adafruit_DHT copying Adafruit_DHT/common.py -> build/lib.linux-armv6l-2.7/Adafruit_DHT copying Adafruit_DHT/Beaglebone_Black.py -> build/lib.linux-armv6l-2.7/Adafruit_DHT copying Adafruit_DHT/__init__.py -> build/lib.linux-armv6l-2.7/Adafruit_DHT copying Adafruit_DHT/Raspberry_Pi_2.py -> build/lib.linux-armv6l-2.7/Adafruit_DHT copying Adafruit_DHT/Raspberry_Pi.py -> build/lib.linux-armv6l-2.7/Adafruit_DHT copying Adafruit_DHT/Test.py -> build/lib.linux-armv6l-2.7/Adafruit_DHT copying Adafruit_DHT/platform_detect.py -> build/lib.linux-armv6l-2.7/Adafruit_DHT running build_ext building 'Adafruit_DHT.Raspberry_Pi_Driver' extension creating build/temp.linux-armv6l-2.7 creating build/temp.linux-armv6l-2.7/source creating build/temp.linux-armv6l-2.7/source/Raspberry_Pi gcc -pthread -fno-strict-aliasing -DNDEBUG -g -fwrapv -O2 -Wall -Wstrict-prototypes -fPIC -I/usr/inclu de/python2.7 -c source/_Raspberry_Pi_Driver.c -o build/temp.linux-armv6l-2.7/source/_Raspberry_Pi_Driv er.o -std=gnu99 gcc -pthread -fno-strict-aliasing -DNDEBUG -g -fwrapv -O2 -Wall -Wstrict-prototypes -fPIC -I/usr/include/python2.7 -c source/common_dht_read.c -o build/temp.linux-armv6l-2.7/source/common_dht_read.o -std=gnu99 gcc -pthread -fno-strict-aliasing -DNDEBUG -g -fwrapv -O2 -Wall -Wstrict-prototypes -fPIC -I/usr/include/python2.7 -c source/Raspberry_Pi/pi_dht_read.c -o build/temp.linux-armv6l-2.7/source/Raspberry_Pi/pi_dht_read.o -std=gnu99 gcc -pthread -fno-strict-aliasing -DNDEBUG -g -fwrapv -O2 -Wall -Wstrict-prototypes -fPIC -I/usr/include/python2.7 -c source/Raspberry_Pi/pi_mmio.c -o build/temp.linux-armv6l-2.7/source/Raspberry_Pi/pi_mmio.o -std=gnu99 gcc -pthread -shared -Wl,-O1 -Wl,-Bsymbolic-functions -Wl,-z,relro build/temp.linux-armv6l-2.7/source/_Raspberry_Pi_Driver.o build/temp.linux-armv6l-2.7/source/common_dht_read.o build/temp.linux-armv6l-2.7/source/Raspberry_Pi/pi_dht_read.o build/temp.linux-armv6l-2.7/source/Raspberry_Pi/pi_mmio.o -lrt -o build/lib.linux-armv6l-2.7/Adafruit_DHT/Raspberry_Pi_Driver.so creating build/bdist.linux-armv6l creating build/bdist.linux-armv6l/egg creating build/bdist.linux-armv6l/egg/Adafruit_DHT copying build/lib.linux-armv6l-2.7/Adafruit_DHT/Raspberry_Pi_Driver.so -> build/bdist.linux-armv6l/egg/Adafruit_DHT copying build/lib.linux-armv6l-2.7/Adafruit_DHT/common.py -> build/bdist.linux-armv6l/egg/Adafruit_DHT copying build/lib.linux-armv6l-2.7/Adafruit_DHT/Beaglebone_Black.py -> build/bdist.linux-armv6l/egg/Adafruit_DHT copying build/lib.linux-armv6l-2.7/Adafruit_DHT/__init__.py -> build/bdist.linux-armv6l/egg/Adafruit_DHT copying build/lib.linux-armv6l-2.7/Adafruit_DHT/Raspberry_Pi_2.py -> build/bdist.linux-armv6l/egg/Adafruit_DHT copying build/lib.linux-armv6l-2.7/Adafruit_DHT/Raspberry_Pi.py -> build/bdist.linux-armv6l/egg/Adafruit_DHT copying build/lib.linux-armv6l-2.7/Adafruit_DHT/Test.py -> build/bdist.linux-armv6l/egg/Adafruit_DHT copying build/lib.linux-armv6l-2.7/Adafruit_DHT/platform_detect.py -> build/bdist.linux-armv6l/egg/Adafruit_DHT byte-compiling build/bdist.linux-armv6l/egg/Adafruit_DHT/common.py to common.pyc byte-compiling build/bdist.linux-armv6l/egg/Adafruit_DHT/Beaglebone_Black.py to Beaglebone_Black.pyc byte-compiling build/bdist.linux-armv6l/egg/Adafruit_DHT/__init__.py to __init__.pyc byte-compiling build/bdist.linux-armv6l/egg/Adafruit_DHT/Raspberry_Pi_2.py to Raspberry_Pi_2.pyc byte-compiling build/bdist.linux-armv6l/egg/Adafruit_DHT/Raspberry_Pi.py to Raspberry_Pi.pyc byte-compiling build/bdist.linux-armv6l/egg/Adafruit_DHT/Test.py to Test.pyc byte-compiling build/bdist.linux-armv6l/egg/Adafruit_DHT/platform_detect.py to platform_detect.pyc creating stub loader for Adafruit_DHT/Raspberry_Pi_Driver.so byte-compiling build/bdist.linux-armv6l/egg/Adafruit_DHT/Raspberry_Pi_Driver.py to Raspberry_Pi_Driver.pyc creating build/bdist.linux-armv6l/egg/EGG-INFO copying Adafruit_DHT.egg-info/PKG-INFO -> build/bdist.linux-armv6l/egg/EGG-INFO copying Adafruit_DHT.egg-info/SOURCES.txt -> build/bdist.linux-armv6l/egg/EGG-INFO copying Adafruit_DHT.egg-info/dependency_links.txt -> build/bdist.linux-armv6l/egg/EGG-INFO copying Adafruit_DHT.egg-info/top_level.txt -> build/bdist.linux-armv6l/egg/EGG-INFO writing build/bdist.linux-armv6l/egg/EGG-INFO/native_libs.txt zip_safe flag not set; analyzing archive contents... creating dist creating 'dist/Adafruit_DHT-1.1.0-py2.7-linux-armv6l.egg' and adding 'build/bdist.linux-armv6l/egg' to it removing 'build/bdist.linux-armv6l/egg' (and everything under it) Processing setuptools-4.0.1-py2.7.egg Copying setuptools-4.0.1-py2.7.egg to /usr/local/lib/python2.7/dist-packages Adding setuptools 4.0.1 to easy-install.pth file Installing easy_install script to /usr/local/bin Installing easy_install-2.7 script to /usr/local/bin Installed /usr/local/lib/python2.7/dist-packages/setuptools-4.0.1-py2.7.egg Processing dependencies for setuptools==4.0.1 Finished processing dependencies for setuptools==4.0.1 Processing Adafruit_DHT-1.1.0-py2.7-linux-armv6l.egg Copying Adafruit_DHT-1.1.0-py2.7-linux-armv6l.egg to /usr/local/lib/python2.7/dist-packages Adding Adafruit-DHT 1.1.0 to easy-install.pth file Installed /usr/local/lib/python2.7/dist-packages/Adafruit_DHT-1.1.0-py2.7-linux-armv6l.egg Processing dependencies for Adafruit-DHT==1.1.0 Finished processing dependencies for Adafruit-DHT==1.1.0 |
Download Adafruit_Python_DHT @ Github
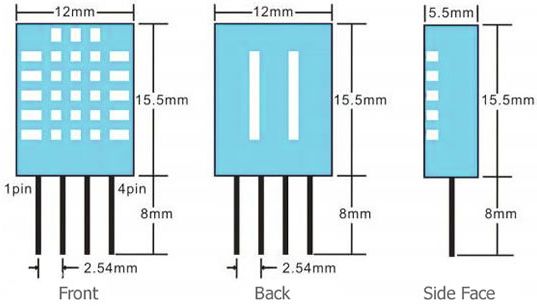
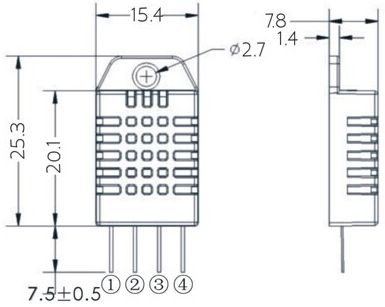
Afmetingen
Teardown
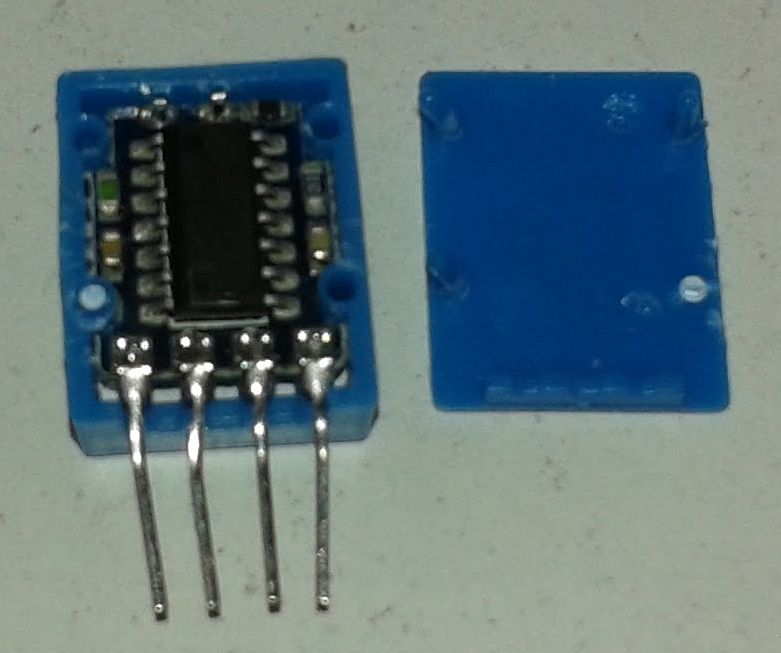
Inside the case is a small PCB with a SOIC 14 packaged IC unfortunately the part number has been removed so there is really no way to tell if this is a custom part or a specially programmed MCU. along the edge of the IC are couple of ceramic capacitors for decoupling and noise suppression, and some other misc passive components. The green resistor I can assume is a precision resistor for the humility sensor (explained in more detail later).
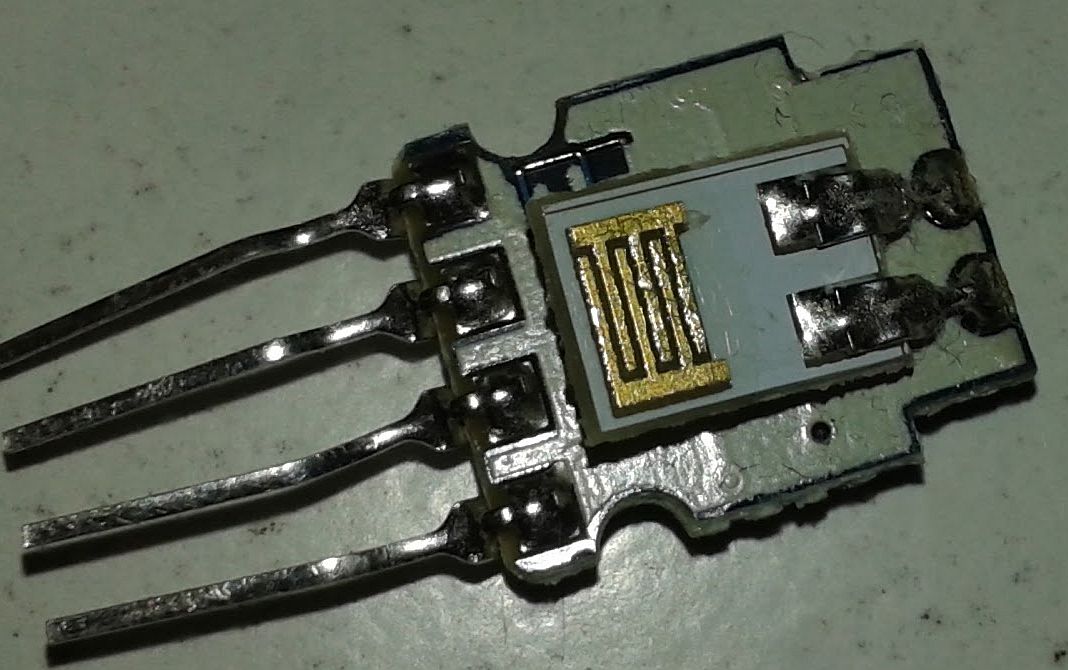
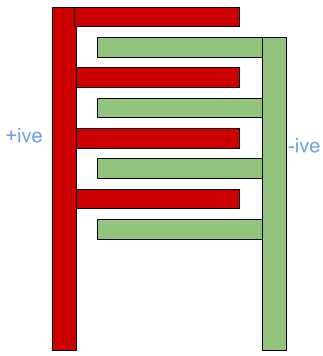
On the other side the sensor hardware itself. This consists of a PCB with interlaced traces that creates capacitance this with change based on the amount of moisture present in the air around it.
HOW DOES IT WORK
Datasheet
Fritzing
Downloads
GEEN GEGEVENS


