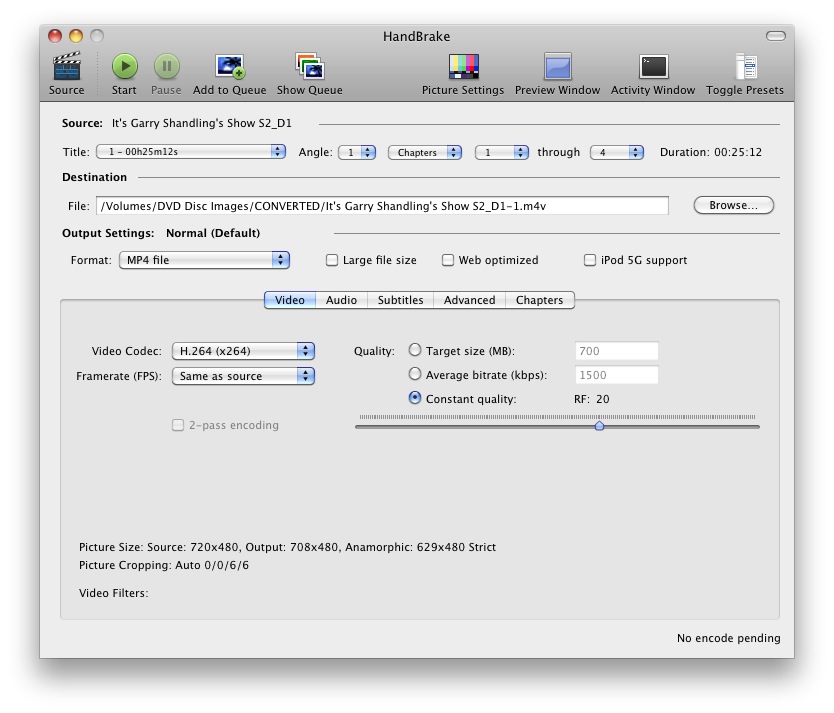
Video Transcoder – HandBrake – Presets en instellingen
![]()

Op internet zijn vele vele voorbeelden en meningen te vinden over hoe je het beste een video kan omzetten van bijvoorbeeld DVD naar MP4.
Hieronder vind je een verzameling van gevonden ideeën op forum en internet, doe je voordeel ermee!
Mijn instelling voor TEKENFILMS is:
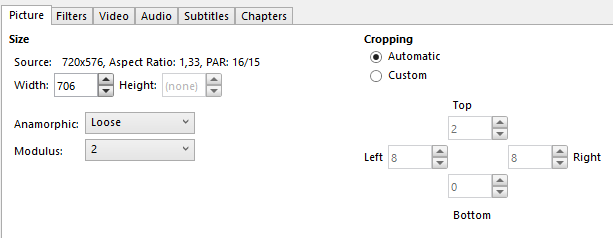

Voor FILMS en SERIES dezelfde instellingen alleen bij “video” TAB:
– x264 tune op: Film
– Constant Quality: 21 RF
Best Quality Handbrake Settings for BRRips Re-Encoding
Bron: torrent-invites.com
‘ve been Re-encoding Blu-Ray sources for along time in Handbrake & I remember when I wasn’t really sure what options to use to maximize quality & compression. I thought I’d share what I’ve found to be the most important settings for High Quality/Compression. This Tutorial focuses on the advanced tab quality compression not bitrate or anything that is subjective to taste. They are based on my time spent in Handbrake forums back a few years ago in beta & were the Max “Sane” Values according to the author of handbrake’s posts in the forums back then when I was active. Suposedly now adays CQ can acheive “as good quality as my 2pass encodes” & takes less time but the advanced compression settings here are still relevant. I will always use 2pass because I’m compressing for filesize sake (you can only fit so much video on one hard drive). If I have a 720p drama that has almost no action & no graphical artistic content I don’t understand dedicating 4-8gb when I can’t tell the difference at 1.5gb with max sane compression settings.
These settings I’ve used that keep almost max quality even with lower bitrates. For an example: A 720p rip at 1280×528 keeps almost all quality (if there’s not tons of grainy snow or hd rainfall/waterfalls to encode) with only 1650 video bitrate & 160bit audio with these settings. The downside is it takes a long time to encode, around 6hrs, sometimes up to 10hrs at 1080p (times are with 3ghz dual core). If you want to play it safe use the preview feature or add a few hundred kbps.
**again, I know alot of encoding groups choose CQ instead of 2pass & go like 30% over max sane values to get less then 1% more quality but this is for those that want to pick the file size they want to give to a particular movie, also excuse the lamens terms, I’m trying to simplify this as much as possible**
On Video Tab select 2pass & turbo first pass & desired bitrate (1800 is even fine with these settings at full 1280×720 resolution 16:9)
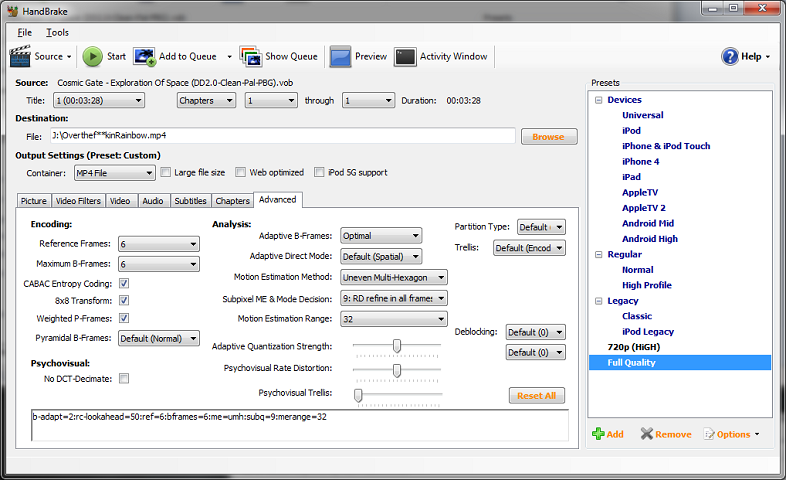
**On Advanced Tab**
Reference Frames – 6
Maximum B-Frames – 5
CABAC Entropy Coding – Yes
8×8 Transform – Yes
Weighted P-Frames – Yes
Pyramidal B-Frames – Normal
Adaptive B-Frames – Optimal
Adaptive Direct Mode – Spatial
Motion Estimation Method – UnevenMulti-Hexagon
Subpixel ME & Mode Decision – 9
Motion Estimation Range – 32
** click add button to save changes to a preset **
– Ref & B frames are the max sane values for normal content but if you have alot of computer animation you can set Max B-Frames to 6 or more if you want a little more quality per bitrate.
– Container Mp4 or Mkv doesn’t have any bearing on Quality only Compatability, if you use iDevices or play it on different devices, I recommend mp4 with a single stereo audio track is very compatible.
– I’ve also found that Japanimation & older animation can lower Motion settings. I use 16 MErange, & 8 Motion Decision to speed up encode. You could also put UMH to hexegon in ME method.
(For DVD Video You may want to turn Video filters Detelecine & Decomb to Default if you want to remove interlacing & such)
Best Suggested Handbrake Bluray Rip Settings
Bron: winxdvd.com
An ordinary Bluray disc is 25GB or 50GB. It is not convenient not even yet possible to copy all the Blu-ray content to computer hard disc. So shrink Bluray content to smaller size is reasonable when you want to create Bluray collection on computer rather than BD shelf. If do not count in Bluray supplements like menu, chapter points, Director Commentary, etc, the main movie may be around 30GB. But it is still too large to our Hard disk storage. Ideally, it is possible to rip 30GB Blu-ray to 8-5GB MKV file while still keeps HD visual quality. Here are tips about how to preset when using Handbrake rip Bluray.
1. MKV container, H.264 Video Codec, High Profile preset, disable detelecine and decomb unless you need them. Drop the width to 1280 (while the length will automatically drop to 720). Drop the quality setting to RF (Contant Quality): 25.
2. Raise the rate factor until you can’t stand it anymore. You still won’t hit 5G for a feature length film.
3. And use the nightly, since it supports the BR disk structure. A lot of movies are split across multiple M2TS.
4. No matter what, just keep only one audio/subtitle track.
5. Pirates are rarely as space efficient as you’re targeting. They normally take 1GB just for a 42 minute 720p TV episode.
6. And make your x264 advanced options string bframes=8:b-adapt=2:direct=auto:me=umh:merange=24:partitions=all:rc-lookahead=60:ref=16:subme=10:trellis=2.
Best setting for ripping DVDs
Bron: forums.plex.tv
have over a thousand DVDs -movie and television- I have ripped to my server. After a lot of trial and error and several times ripping my entire collection, here’s the process I use:
1. Download and start Fairmount (free download, Fairmount allows real-time encryption free disc access).
2. Insert DVD and let Fairmount mount it.
3. Open DVD folder and copy all the files to the hard drive in a folder with the DVD name.
4. Eject DVD
5. Start Handbrake
6. I use a custom profile for movie/tv rips. Here are the details (using normal profile, making the following changes):
6a. Video Pane: Video quality set to Constant Quality – RF: 19 (normal profile is 20)
6b. Picture Settings: Video filters set to Detelecine (Default) and Decomb (Default) (normally off, set these under picture settings)
6c. Audio Pane: Audio has an additional track of AC3 Passthru
6d. Advanced Pane:
6d1. Reference frames: 6
6d2. Maximum B-Frames: 5
6d3. 8×8 transform: checked
6d4. Adaptive B-Frames: Optimal
6d5. Motion Estimation: Uneven Multi-hexagon
6d6. Subpixel ME: Default (7)
6d7. Motion Estimation Range: 32
6d8. Trellis: Default (Encode only)
7. Save those settings in a custom profile (ensuring the profile also saves the picture settings).
8. Point Handbrake to the folder from step 3.
9. If it is a movie, select the title which is the length of the movie. Sometimes it will be on there multiple times, especially if it includes deleted scenes or a director’s cut.
10. If it is a TV show, select the first title that is the tv show length. Sometimes all the shows (end to end) are in one title, but also listed separately. You want the separate ones.
11. Set the output location.
12. Set any subtitle or chapter info you want for this particular movie.
13. Add to queue or click start.
I copy from Fairmount to the hard drive for three reasons: 1) Handbrake seems to perform better if it works from the internal hard drive (or Thunderbolt drive) rather than directly from optical media, 2) I then copy the raw, uncompressed rip to my archive server in case I want to convert to a different format in the future (or just have a soft copy back up of the DVD), and 3) if Fairmount shows bad sectors during the copy, I know I need to move to another rip solution because the encryption is high. Alternatives include RipIt (I just copy the file to hard drive, I do not use its compression), or boot into Windows and use AnyDVD. Unfortunately, the nature of the encryption game is that sometimes you will have to try three or four different programs to get a good rip. Once you have a good rip, Handbrake will do anything you want.
These are the settings I choose to use. Let me preemptively say that I SHALL NOT return to this post to defend my settings. Others will post about how they think my settings/processes are stupid and why don’t you blah blah blah. This is the process that works for me. I have a Mac Mini server in the basement and I stream video all over the house. I choose quality over compression, but I want to maintain portability by sticking with MP4. The resulting files are large, yes, but they look great on an iPhone 4S or my 47 inch TV. If you would rather have highly compressed files and aren’t worried about quality, or if portability (to iPhone, iPad, Roku, etc.) is not a concern, then you would choose other settings.
Handbrake settings that work for me
Bron: thegreenbutton.tv
After reading several of the replies and comments on the Ceton Echo Extender about play back of movies from you own personal library, as I was having issues with this. I decided to do a little testing myself. I have found setting that work for me. So far I have converted two movies and both seem to play well on the Echo. One a romantic comedy, You’ve Got Mail, and an action Matrix Revolutions. The ideal was to test two different types of movies for shudder etc. which was the issues I was having. Different types of movies will produce either more or less shuddering. These setting seem to work for both types of movies. My test bed: Main computer AMD 8 core 3.1ghz, 16gig, SSD – System, 4tbyte raid 27″Asus Monitor; living room – 4core 2.66ghz intel, 8gig, SSD 60″Sharp TV; bedroom1; Ceton Echo Extender 36″ Polorid TV; bedroom 2- Dell 2.2 ghz, 4gig, 120 gig disk 24″Dell Monitor. Home network highspeed supports wired and dual band wireless, Internet TWC Turbo, Cable TWC cable card w/HD HomeRun. All computers are running Win7. By setting share options on main computer with home group allows me to use it as a workstation/server. All movies are decoded/encoded and stored on the main computer using AnyDvD and Handbrake. I have tested by both using a MKV file previously encoded using Handbrake defaults for original DVD and encoding directly from a HD-DVD. It seems to work either way.
Handbrake settings
Container: MKV, High Profile
Picture: Ananmorphic: loose Modulus: 16, Cropping: Auto unless settings are not zero, then custom and set top, bottom, left, right to zero.
Video: Codec: H.264, Framerate: Same as source, select Constant Frame rate, select Constant Quality RF:20,
Audio: Codec; AAC(faac); Mixdown: Dobly Prologic II; Samplerate – Auto, Bitrate – 320, DRC & Gain: 0
After encoding and re-encoding movies, I played them on the Echo and all TV units. All worked well including the Ceton Echo Extender. I hope this info helps.
How To Encode Like a Pro With Handbrake
Bron: maclife.com
If you want to get your DVD collection onto your Mac, Apple TV or portable iOS device, chances are you’ve already discovered the free Handbrake software, which handles the task like a champ. What you may not know is that there are some simple tricks and tweaks to make Handbrake really sing, particularly if you’ve been challenged by getting commercial discs from your personal collection properly encoded.
VLC: Crack That Copy Protection
While Handbrake alone will tackle encoding videos just fine from homemade recordable DVD-Rs, you’ll need to beef up your arsenal if you want to put your favorite movie or television show episodes on your iPad without paying a tax to Apple by buying it all over again on iTunes.
Commercial DVDs are CSS encrypted to prevent them from being copied by nefarious pirates who would seek to profit from illegal copies of studio content. Unfortunately, that also locks you, the law-abiding citizen who purchased the official release, out of easily making copies as well. Assuming you own the DVD in question, you’re legally permitted to make a copy to watch on other devices that you own – although Hollywood studios often won’t make it easy for you to do.
While Handbrake used to include its own methods for cracking CSS encryption, in recent versions, the programmers have instead turned to the free, open-source VLC Media Player software. All you need to do is download and install the latest version of VLC for Mac OS X. Next time you open Handbrake and load a commercial DVD as a source, the application will quietly use components of VLC in the background to make the magic happen — you won’t even see VLC launch, since it doesn’t have to actually be open to work its mojo.
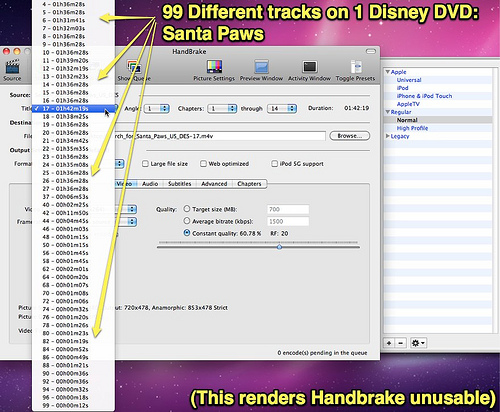
Dealing with 99 Title Sets on Commercial Discs
If you thought Hollywood was going to stop at CSS encryption when foiling your disc-encoding plans, think again! DVD authoring companies have come up with unique ways to throw you a curveball and potentially hose your encoding process. Thankfully, there’s a way around this, if you know what to look for.
DVDs are made up of “title sets,” which are essentially containers for video content. The most annoying method currently employed by studios is to create a disc using all 99 available title sets, every one of which looks like they could be the real deal. Encode the wrong one and you’ll get files that end prematurely or simply won’t play at all – assuming the encode doesn’t fail altogether. If you load a commercial disc into HandBrake and see 99 title sets, you’ll know immediately that you’ve found one of these tricky discs.
In order to determine which of the 99 title sets is the real McCoy, you’ll need to insert the DVD into your computer and launch Apple’s DVD Player. Open the disc (File > Open DVD), then click the Play button to start. Once you’ve gotten past any corporate logos or advertising at the beginning (feel free to skip past them, if you can), select the main menu option to start the movie. Now, click the Controller’s time indicator in DVD Player twice to switch from time display to remaining time and finally title display. You’ll now see something like “17/99” — the number on the left-hand side will show you the currently playing title set, and that’s the correct one you want to select in HandBrake to get a proper encode. Anything else is likely a dummy title to throw you off the scent and can be ignored.
Multiple Title Sets and TV Shows
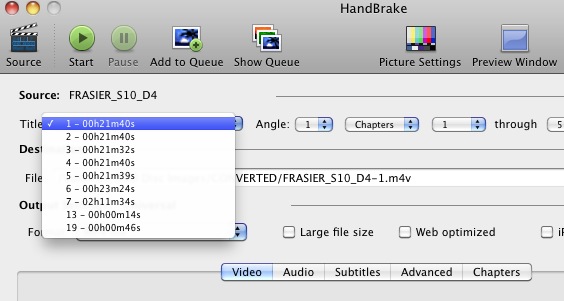
If your media tastes tend to lean toward television shows, you’ll have even more work ahead of you, depending upon the company who releases your favorites. DVD authoring companies frequently build discs with multiple titles in a way where the episodes will show up twice: One title set for all episodes on the disc (usually three to eight, depending on the show length), and then each episode in its own title set.
For instance, let’s look at a disc from the tenth season of Frasier. Popping the disc into the computer and choosing it as your Source in HandBrake will reveal that Title Set 7 is more than two hours in length, which means the six 21-minute episodes on this particular disc are laid out one after another. While it might be convenient to encode one long file, you won’t get the benefit of individually tagging episodes in iTunes this way. Thankfully, the six title sets preceding the longest one represent the separate episodes, so you can easily select each one, add it to your HandBrake queue and wind up with separate files for each episode.
Occasionally you’ll come across discs from a studio where discs appear to be authored in a completely nonsensical way (Shout! Factory, we’re looking at you). For the classic Valerie Harper sitcom Rhoda, the studio created duplicate title sets for each episode, presumably so you won’t know which is the real one. However, simply playing a few seconds of each episode via Apple’s DVD Player will reveal the true title set as shown in the previous step.
With It’s Garry Shandling’s Show, the studio created further confusion by not only creating duplicate title sets, but also mixing them up in a random order. In this case, certain episodes that appear to be the correct title set in DVD Player still won’t encode in HandBrake, causing the application to completely skip that title or create an unfinished file. To correct this situation, jot down the proper title sets in DVD Player first, then in HandBrake, open the Preview Window and step through the sample images – you should see each one change accordingly, but if you find two that appear identical, it’s time to look for another title set with the exact same running time. Try previewing again and then encode from the title set that displays correctly.
How To Choose (and Save) The Best Preset
Perhaps acknowledging that its target audience is mostly interested in encoding for iOS devices, HandBrake has worked hard to create presets for each of Apple’s product categories, with the most recent 0.9.5 update offering ready-made presets for the iPad, iPhone 4 and second-generation black Apple TV. However, if you own more than one of these devices, you’ll likely want to use the Universal preset as a starting point for all of your encodes.
HandBrake’s Universal preset provides the optimal quality and size for everything it encodes, maintaining compatibility with all of Apple’s mobile products — at least from the sixth-generation iPod or later, which includes all models of iPhone, iPod touch Apple TV and of course, the iPad. Simply put, if you use even one of these devices, you’re better off encoding everything with the Universal preset so you will have the best chance of future-proofing your content.
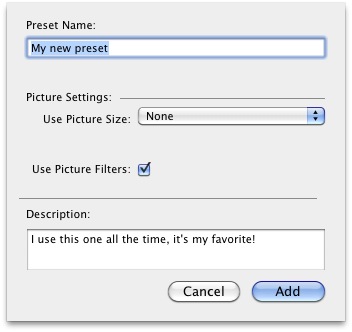
If you find yourself encoding a lot of your DVD collection, you’ve no doubt discovered that the Universal preset may not tackle every disc the same way – for example, some discs have 5.1 surround sound (more on that in a moment), some don’t. Thankfully, you can use the Universal preset as a starting point, tweaking settings and saving new presets for certain discs such as television shows, where you might want to return days, weeks or months later to encode additional discs from the same series.
To save a new preset, start with Universal and make any necessary changes. Click the + button at the bottom of the presets window, give your preset a name and optionally, check the “Use Picture Filters” option to include any changes you made there in the new preset, then click Add to save it. You can also enter a short description to help you remember what the preset is for. (We suggest leaving “Use Picture Size” as None, since that option is best set by the application as you insert each disc, unless you have very specific reasons to save changes.)
Saving 5.1 Surround Sound for Your Apple TV
If you own or are thinking of owning an Apple TV (first or second generation) and have a multi-channel receiver in your home theatre, you should consider including the AC3 5.1 surround audio featured on many DVDs as part of your encoded files. Apple has a very specific method for doing this — AC3 5.1 has to be on a second track — since other devices such as the iPad and iPhone can’t make use of AC3-encoded audio, which means you’ll also want to include an AAC-encoded version as well.
In order for Apple devices to play nice with HandBrake encodes that include 5.1 surround, you’ll want to use the Audio tab to create two tracks of audio in your encoded file. For the first audio track, select your AC3 5.1 source under Track, then AAC (CoreAudio) for Codec and Dolby Surround for Mixdown (Sample Rate should be Auto, and Bitrate 160 kbps). Add the second track by again selecting the AC3 5.1 source on the next row, but this time the Codec and Mixdown should both be “AC Passthru” – this essentially copies the AC3 track into a second audio track that only the Apple TV can read, while keeping an AAC-encoded, two-channel stereo version on the first track for all other devices to use.
To simplify the process, the Universal and Apple TV presets in HandBrake will choose the correct audio configuration for both tracks, although if your disc doesn’t contain AC3 5.1 audio, it’s best to change the second track to None to keep your file size smaller.

Identifying Your Source Material
If you’re encoding disc content that was produced more than a few years ago, chances are you’ll need to address the issue of interlaced video. The problem stems from the way most content used to be recorded, which was 29.97 frames per second video, with each frame comprised of two fields (commonly known as 60i, or 60 field interlaced).
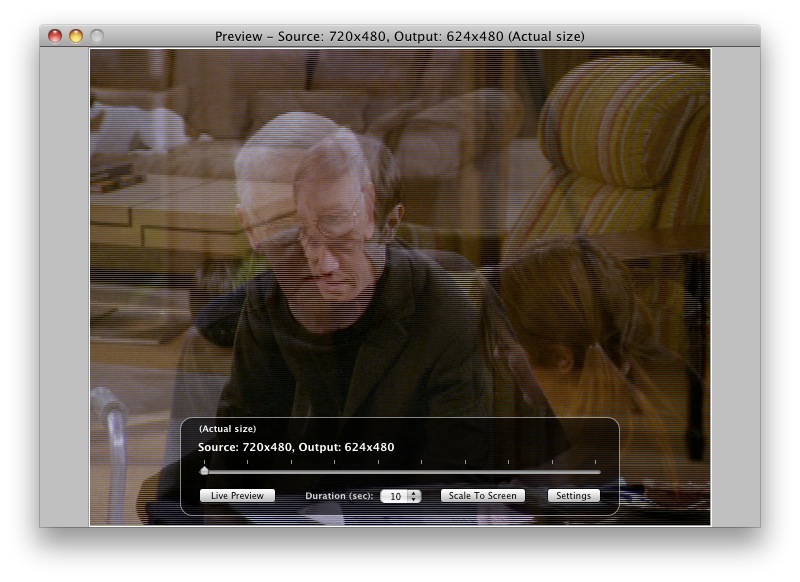
Thankfully, it’s usually easy to spot interlaced video prior to encoding it, thanks to HandBrake’s Preview Window. Load a Source, select the desired title set, then click Preview Window; now you’ll see one of 10 still-frame images from your chosen source material, and you can step through them by clicking on any of the hash marks that appear in the floating palette.
If at any point during your preview you see jaggy horizontal lines wherever there is motion in the frame, then you’ve got interlaced material and you’ll need to address it accordingly. However, if the motion in your preview frame is blurred, chances are that the content is progressive, meaning it was recorded at 24 frames per second (better known as 24p, even although it’s technically 23.976 frames per second).
There’s a free, sure-fire way to determine what kind of source material you’re dealing with: Download and install MediaInfo Mac, which lets you load any video file and get a full report on its content. In order for MediaInfo Mac to properly report video on a CSS-encrypted disc, you’ll first want to open Apple’s DVD Player and play the disc for a few seconds.
Now you can launch MediaInfo Mac, open the VIDEO_TS folder on your mounted DVD disc and browse for a series of 1GB files beginning with VTS (Video Title Set) and ending in .VOB. The series with the most number of files will be your main DVD content; drag and drop one of the files from the middle of the series into MediaInfo Mac, which will then display a list of details about the content.
Pay close attention to the Video Stream #1 area, taking note of both the Frame Rate (either 29.970 or 23.976 fps) and Scan Rate (either Interlaced or Progressive). If your content is progressive, you can encode without having to do anything further. However, if you have interlaced content, you’ll want to have a look at our final pro tip.
Using the Decomb Filter on Interlaced Video
Now that we’ve identified what interlacing is, here’s how to combat it using HandBrake. The software includes a filter option for deinterlacing, which is the process of removing those horizontal jagged lines from your encodes so you’ll get buttery-smooth video. However, we don’t recommend using deinterlacing – not only can it ultimately degrade your picture quality, but it’s also a time-intensive task that will slow down the encoding process.
The best solution is to use the decomb filter, which HandBrake recommends for tackling only the frames that suffer from interlacing in the first place, while leaving the rest of the frame alone. It’s so good at what it does that the developers of HandBrake claim you can leave it on all the time and therefore never worry about interlacing.
After using MediaInfo Mac to confirm that your disc content was recorded using interlaced video, return to HandBrake and open the Picture Settings window, which will appear as a floating palette outside of the main HandBrake interface. Click on the Filters tab and you’ll be presented with a number of options for dealing with pesky problems such as interlacing, noise and blockiness.
In this case, you’ll want to make sure that the Decomb option is switched on (toggled left, rather than toggled right for Deinterlace), then select Default from the Decomb pulldown. Now your encode will be channeled through the Decomb filter, stripping the final video of interlacing and making all right with the world. If you plan to frequently use the Decomb filter, you can select it and then save a new preset which will include it by making sure that “Use Picture Filters” is checked when you add the preset to your list.

Best Handbrake Settings for Universal Tasks
Bron: wondershare.com
Things you should know before adjusting Handbrake settings:
1.Good to good, crap to crap. The video output is mainly depended by the quality of your input source. You can’t get a much better video quality if your original video quality is terrible.
2.Quality definitely differs between low, medium and high but low isn’t going to make your video look like crap either. All your options are designed to be watch-able, but the bigger the screen the higher you’ll want to set the quality. When in doubt, Medium is always a good choice.
3.If you’re encoding for your portable device, be sure to check its encoding specifications (like resolution, frame rate, bit rate, etc.). Please double-check this especially when you want to put a long movie to your portable device. Or you can use a short movie to have a test.
4.Handbrake settings are not an exact science, as perception of quality varies from person to person, from application to application.
1.Handbrake Picture Settings
a.Size: The size options allow you to reduce the dimensions of your movie. The Keep Aspect Ratio option makes it possible that the Width or Height setting changes and the other setting will follow, maintaining the same aspect ratio as the source movie. For a widescreen movie, the Width will be 720 or 1080. There are 4 items in the Anamorphic drop-down list. The Strict option ensures that the aspect ratio conforms exactly to the ratio of the original movie. A Loose setting alters the dimensions so they are more efficiently encoded. To make a custom video dimension, select Custom.
b.Crop: By default, HandBrake attempts to remove black bars by cropping them away. If it works no good, do it yourself. On the other hand, if your source material is a DVD burned from a video tape and that video has scan lines at the top or bottom, you can use crop option to remove them.
2.Handbrake Quality Settings
The Handbrake video quality settings are pretty open to experimentation, but it’s widely accepted that doing a constant quality encode is the best option, and usually about 55% (or an RF of 22) will get you as much space savings as possible but still be nearly “transparent”, or indiscernible from the original to your eyes. Again, this is personal preference, though, so if you have particularly sensitive eyes you may want to move it closer to, say, 59%, or if you can’t tell the difference, you could probably slide it down more for saving more spac3. 55% is the setting that a lot people tend to use and recommend, and it works well for me.
3. Best Handbrake Settings for iPad 2
iPad 2 is recently released. So what are the best Handbrake settings for iPad 2? Do the settings for iPad still work the best? In fact, There is no option at present for selecting iPad 2 profile for the output format.
Tips: Video Converter has built in profile for converting and converting video for your Apple iPad 2, so you don’t worry about the output video and audio. You would instantly enjoy movies on iPad 2 without any hassle.
To hack on Handbrake, here are the potential best Handbrake settings for iPad 2, try at your own risk. iPad 2 and Apple TV can both handle higher resolution, so you are recommended to use Apple TV profile if you want to make the most of your iPad2’s HD feature. Besides, the iPad 2 supports 720p 30fps video, so a good maximum resolution would be 1920*1080. Among Apple devices, iPod has lowest restriction, you could use iPod profile, but these are definitely not the best Handbrake settings for iPad 2.
4. Best Handbrake Settings for DVD Movie Library
a. Video Settings: select MP4 file container, video codec is H.264, check Avg Bite rate (kbps) and input 1400.
b. Audio Settings: if possible, audio codec is AAC while mixdown is usually Dolby Pro Logic II, sample rate is either Auto or 48, and bit rate is 160, try to always use higher settings because you won’t regret it later.
By the above Handbrake settings, you can convert your DVD collections to a computer or a portable device like PS3, through which you can watch DVD movie on TV with similar quality. Using these settings, Handbrake will produce about 1.5GB video from a 2 hour DVD disc.