Apparaat – Thermische printer
Hardware
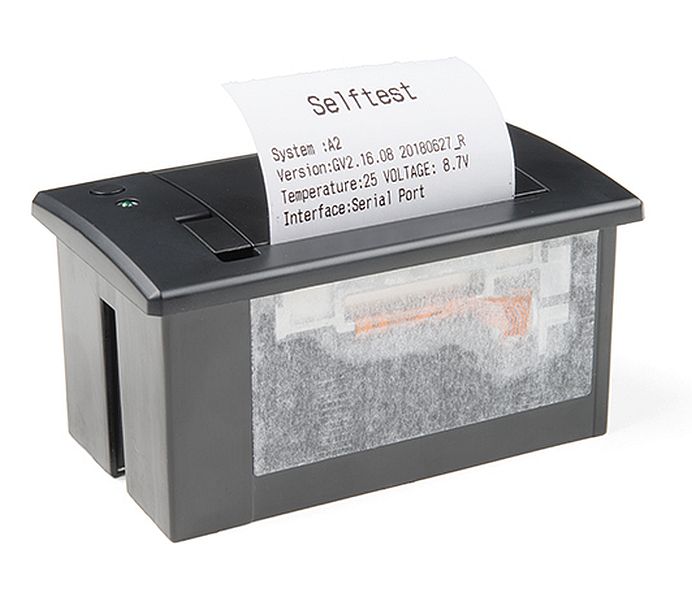
Thermische printers komen veel voor in Point Of Sale (POS) systemen, veelal zijn ze eenvoudig aan te sturen via Serieel TTL/UART of USB aansluiting. Ze gebruiken geen inkt maar gebruiken hitte en speciaal papier om te printen
o.a. voor gebruik via/met:
– USB Serial stick
– Arduino
– Raspberry Pi
These printers use a thermal head to heat the special receipt paper and draw images and text. That makes the printer very small — there’s no moving ink head — but it means they require a lot of power. This printer in particular requires 5 to 9 Volts, 1.5 Amps current! That means you will need a fairly beefy supply and you cannot run it off of USB power. An external adapter is required!
De meeste POS printers maken gebruik van ESC commando’s om verschillende lettertypen en functies te gebruiken voor het printen.
Pinout
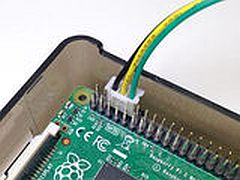
The “Mini Thermal Printer”s data cable has three wires
- black = GROUND
- yellow = data IN to the printer
- green = data OUT of the printer
Arduino
Ps. pas de BAUDrate aan aan de instellingen die je printer gebruikt!
|
1 2 3 4 5 6 7 8 9 10 11 12 13 14 15 16 17 18 19 20 21 22 23 24 25 26 27 28 29 30 31 32 33 34 35 |
void setup() { Serial.begin(9600); // Init Serial.write(27); Serial.write(40); // Align left Serial.write(27); Serial.write(97); Serial.write(0); Serial.println("Links"); // Align center Serial.write(27); Serial.write(97); Serial.write(1); Serial.println("midden"); // Align right Serial.write(27); Serial.write(97); Serial.write(2); Serial.println("rechts"); // Dubbele hoogte en breedte Serial.write(27); Serial.write(33); Serial.write(48); Serial.println("GROOT"); } void loop() { delay(50); } |
Je kan ook de Softwareserial bibliotheek gebruiken zodat je de RX/TX nog kan gebruiken voor de console:
|
1 2 3 4 5 6 7 8 9 10 11 12 13 14 15 16 17 18 19 20 21 22 23 24 25 26 27 28 29 30 31 32 33 34 35 36 37 38 39 40 41 |
#include "SoftwareSerial.h" #define TX_PIN 6 // Arduino transmit YELLOW WIRE labeled RX on printer #define RX_PIN 5 // Arduino receive GREEN WIRE labeled TX on printer SoftwareSerial mySerial(RX_PIN, TX_PIN); // Declare SoftwareSerial obj first void setup() { mySerial.begin(9600); // Initialize SoftwareSerial // Init mySerial.write(27); mySerial.write(40); // Align left mySerial.write(27); mySerial.write(97); mySerial.write(41); mySerial.println("Links"); // Align center mySerial.write(27); mySerial.write(97); mySerial.write(42); mySerial.println("midden"); // Align right mySerial.write(27); mySerial.write(97); mySerial.write(43); mySerial.println("rechts"); // Dubbele hoogte en breedte mySerial.write(27); mySerial.write(33); mySerial.write(48); mySerial.println("GROOT"); } void loop() { delay(50); } |
Ook is er een bibliotheek gemaakt voor de Arduino om eenvoudig te kunnen printen zonder al de ESC commando’s
https://github.com/gdsports/ESC_POS_Printer
DL: Pos-Printer-Library-master
Voorbeeldscript voor barcodes:
|
1 2 3 4 5 6 7 8 9 10 11 12 13 14 15 16 17 18 19 20 21 22 23 24 25 26 27 28 29 30 31 32 33 34 35 36 37 38 39 40 41 42 43 44 45 46 47 48 49 50 51 52 53 54 55 56 57 58 59 60 61 62 63 64 65 66 67 68 69 70 71 72 73 74 75 76 77 78 79 80 81 82 83 84 85 86 87 88 89 90 91 92 93 94 95 96 97 98 99 100 101 102 |
/*------------------------------------------------------------------------ Example sketch for POS Printer library for Arduino. Demonstrates the available gamut of barcodes. See 'A_printertest' sketch for a more generalized printing example. BARCODE AVAILABILITY VARIES WITH FIRMWARE. Not all barcodes may be displayed, this is normal. Sketch may need changes for older firmware. ------------------------------------------------------------------------*/ #include "Pos_Printer.h" // Here's the syntax when using SoftwareSerial (e.g. Arduino Uno) -------- // If using hardware serial instead, comment out or remove these lines: #include "SoftwareSerial.h" #define TX_PIN 6 // Arduino transmit YELLOW WIRE labeled RX on printer #define RX_PIN 5 // Arduino receive GREEN WIRE labeled TX on printer SoftwareSerial mySerial(RX_PIN, TX_PIN); // Declare SoftwareSerial obj first Pos_Printer printer(&mySerial); // Pass addr to printer constructor // Then see setup() function regarding serial & printer begin() calls. // Here's the syntax for hardware serial (e.g. Arduino Due) -------------- // Un-comment the following line if using hardware serial: //Pos_Printer printer(&Serial1); // Or Serial2, Serial3, etc. // ----------------------------------------------------------------------- void setup() { // This line is for compatibility with the Adafruit IotP project pack, // which uses pin 7 as a spare grounding point. You only need this if // wired up the same way (w/3-pin header into pins 5/6/7): pinMode(7, OUTPUT); digitalWrite(7, LOW); mySerial.begin(9600); // Initialize SoftwareSerial //Serial1.begin(9600); // Use this instead if using hardware serial printer.begin(); // Init printer (same regardless of serial type) printer.justify('C'); printer.boldOn(); printer.println(F("BARCODE EXAMPLES\n")); printer.boldOff(); printer.justify('L'); // There seems to be some conflict between datasheet descriptions // of barcode formats and reality. Try Wikipedia and/or: // http://www.barcodeisland.com/symbolgy.phtml // Also note that strings passed to printBarcode() are always normal // RAM-resident strings; PROGMEM strings (e.g. F("123")) are NOT used. printer.setBarcodeHeight(150); // UPC-A: 12 digits printer.print(F("UPC-A:")); printer.printBarcode("123456789012", UPC_A); // UPC-E: 6 digits ??? /* Commented out because I can't get this one working yet printer.print(F("UPC-E:")); printer.printBarcode("123456", UPC_E); */ // EAN-13: 13 digits (same as JAN-13) printer.print(F("EAN-13:")); printer.printBarcode("1234567890123", EAN13); // EAN-8: 8 digits (same as JAN-8) printer.print(F("EAN-8:")); printer.printBarcode("12345678", EAN8); // CODE 39: variable length w/checksum?, 0-9,A-Z,space,$%+-./: printer.print(F("CODE 39:")); printer.printBarcode("ADAFRUT", CODE39); // ITF: 2-254 digits (# digits always multiple of 2) printer.print(F("ITF:")); printer.printBarcode("1234567890", ITF); // CODABAR: variable length 0-9,A-D,%+-./: printer.print(F("CODABAR:")); printer.printBarcode("1234567890", CODABAR); // CODE 93: compressed version of Code 39? printer.print(F("CODE 93:")); printer.printBarcode("ADAFRUIT", CODE93); /* Commented out because I can't get this one working yet // CODE 128: 2-255 characters (ASCII 0-127) printer.print(F("CODE128:")); printer.printBarcode("Adafruit", CODE128); */ printer.feed(10); printer.cut(); printer.setDefault(); // Restore printer to defaults } void loop() { } |
Ook is er een bibliotheek van Adafruit:
Arduino Library
SEE ARDUINO CODE EXAMPLES
Raspberry Pi
Aansluiten op Raspberry Pi:
Voorbeeld code (console)
|
1 2 |
stty -F /dev/serial0 19200 echo -e "This is a test.\\n\\n\\n" > /dev/serial0 |
Ps. vopor oudere Raspbian versies kan eventueel /DEV/AMA0 gebruikt worden.
Python
Voor python is er een bibliotheek gemaakt door adafruit:
https://github.com/adafruit/Python-Thermal-Printer
DL: Python-Thermal-Printer-master
Één van de testscripts:
|
1 2 3 4 5 6 7 8 9 10 11 12 13 14 15 16 17 18 19 20 21 22 23 24 25 26 27 28 29 30 31 32 33 34 35 36 37 38 39 40 41 42 43 44 45 46 47 48 49 50 51 52 53 54 55 56 57 58 59 60 61 62 63 64 65 66 67 68 |
#!/usr/bin/python from Adafruit_Thermal import * printer = Adafruit_Thermal("/dev/serial0", 19200, timeout=5) # Test inverse on & off printer.inverseOn() printer.println("Inverse ON") printer.inverseOff() # Test character double-height on & off printer.doubleHeightOn() printer.println("Double Height ON") printer.doubleHeightOff() # Set justification (right, center, left) -- accepts 'L', 'C', 'R' printer.justify('R') printer.println("Right justified") printer.justify('C') printer.println("Center justified") printer.justify('L') printer.println("Left justified") # Test more styles printer.boldOn() printer.println("Bold text") printer.boldOff() printer.underlineOn() printer.println("Underlined text") printer.underlineOff() printer.setSize('L') # Set type size, accepts 'S', 'M', 'L' printer.println("Large") printer.setSize('M') printer.println("Medium") printer.setSize('S') printer.println("Small") printer.justify('C') printer.println("normal\nline\nspacing") printer.setLineHeight(50) printer.println("Taller\nline\nspacing") printer.setLineHeight() # Reset to default printer.justify('L') # Barcode examples printer.feed(1) # CODE39 is the most common alphanumeric barcode printer.printBarcode("ADAFRUT", printer.CODE39) printer.setBarcodeHeight(100) # Print UPC line on product barcodes printer.printBarcode("123456789123", printer.UPC_A) # Print the 75x75 pixel logo in adalogo.py import gfx.adalogo as adalogo printer.printBitmap(adalogo.width, adalogo.height, adalogo.data) # Print the 135x135 pixel QR code in adaqrcode.py import gfx.adaqrcode as adaqrcode printer.printBitmap(adaqrcode.width, adaqrcode.height, adaqrcode.data) printer.println("Adafruit!") printer.feed(2) printer.sleep() # Tell printer to sleep printer.wake() # Call wake() before printing again, even if reset printer.setDefault() # Restore printer to defaults |
Bron: learn.adafruit.com
Schema
GEEN GEGEVENS
Teardown
GEEN GEGEVENS
Datasheet
PDF ESC POS: ESC POS Command Manual
Fritzing
Downloads
GEEN GEGEVENS


