Booten vanaf een netwerk – PXE Boot
Wat is PXE?
Het Preboot Execution Environment (PXE, ook Pre-Execution Environment) is een manier om een computer te laten zelfstarten via het netwerk, onafhankelijk van eventuele programma’s op opslaggeheugens (harde schijf, cd/dvd, diskette, USB-geheugen). De computer haalt de software van een andere daarvoor geconfigureerde computer.
PXE maakt gebruikt van verschillende netwerkprotocollen zoals IP, UDP, DHCP en TFTP en van concepten als GUID/UUID en Universal Network Device Interface. De firmware van de PXE-client (de computer die zelfstart via PXE) wordt uitgebreid met een aantal voorgedefinieerde API’s.
Bron: Wiki
Meer info (ENG):
PXE started in the early 1990s as an improvement to a series of protocols used to bootstrap diskless clients. The idea was to provide a complete boot configuration over the network, so a diskless client, or a computer with no operating system installed, could download a complete configuration at boot time
Previous protocols, such as BOOTP, had similar goals; however, these tools were very error prone and brittle. The old tools also needed lots of customization, and different clients required different configurations. Intel addressed these issues in the late 1990s with its “Wired for Management” standard. Part of Intel’s system was PXE. Other manufacturers later followed suit and adopted the PXE design.
Understanding PXE
Like its predecessors, the PXE protocol uses the Trivial File Transfer Protocol (TFTP) to transfer files and DHCP for delivering network configuration data, such as an IP address. PXE also mixes in additional components to create an easy-to-use infrastructure suitable for installing servers, as well as booting diskless clients.
When PXE initiates at boot time, it sends out a request for a DHCP server. The server then replies with a special option that points the machine to look at the TFTP server. The boot file is then pulled down via TFTP, and the system boots. Once the initial boot occurs, the server kickstarts an install using the configuration file built using the Kickstart Configurator
PXE via het netwerk
Om PXE te gebruiken moet je een DHCP server hebben en een PXE/TFTP server, bijvoorbeeld een Router of Synology NAS die op het (huis)netwerk aangesloten is.
LET OP: Modems en/of routers van kabel/glasvezel aanbieders hebben geen of slechte PXE/TFTP functionaliteit i.c.m. met DHCP.
Client instellen
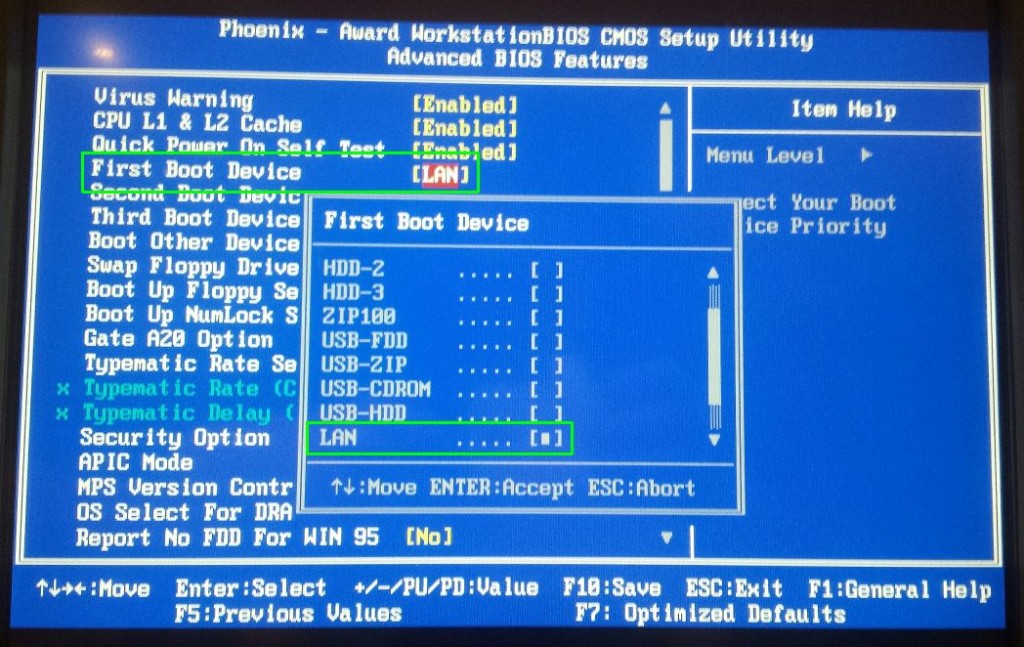
Stel een client computer zo in dat hij start vanaf het netwerk, door de optie LAN aan de zetten als BOOT Device:
Veelal is tijdens de boot ook nog de PXE confguratie aan te passen (in mijn geval met SHIFT+F10 tijdens het opstarten), voorbeeld:
Boot bestanden
Het voorbeeld wat ik hier maak is voor een Synology NAS met PXE actief, maar er is ook PXE/TFTP software voor elke PC te krijgen, zodat het niet perse via een NAS hoeft te gaan.
1) Maak een folder aan genaamd PXE.
2) Plaats in die folder de PXE boot bestanden (zie download onder aan deze pagina)
3) In de software, selecteer het bestand “pxelinux.0” uit die folder.
Menu bestanden – menu opties
1) in de PXE folder maak een subfolder aan genaamd “pxelinux.cfg“.
2) in de maak een nieuw bestand aan in deze folder genaamd “default” (zonder extensie), met de volgende inhoud:
|
1 2 3 4 5 6 7 8 9 10 11 12 13 |
default menu.c32 prompt 0 MENU TITLE PXE Boot HoofdMenu MENU AUTOBOOT Start het lokale systeem in # seconden. MENU TABMSG Druk op [TAB] om instellingen aan te passen. LABEL local MENU LABEL Boot vanaf lokale hardeschijf MENU default LOCALBOOT 0 TIMEOUT 600 TOTALTIMEOUT 9000 |
Hier staan een aantal opties welke je kan configureren:
MENU TITLE ,hierachter kun je de label van het hoofdmenu opgeven.
MENU INCLUDE ,hierachter kun je opgeven welke bestanden er (meer) geladen moeten worden, je hebt zowieso het bestand met de menuconfiguratie nodig “pxelinux.cfg/graphics.conf“.
MENU AUTOBOOT ,hierachter kan je opgeven welke zin onderaan het menu weergegeven moet worden het # (hekje) is het aantal seconden dat aftelt in seconden welke je hebt opgegeven als TIMEOUT. (600 = 60 seconden)
LABEL ,begin van een menu item.
MENU LABEL ,hierachter kan je de menu titel instellen.
Een handleiding is hier te vinden op syslinux.org.
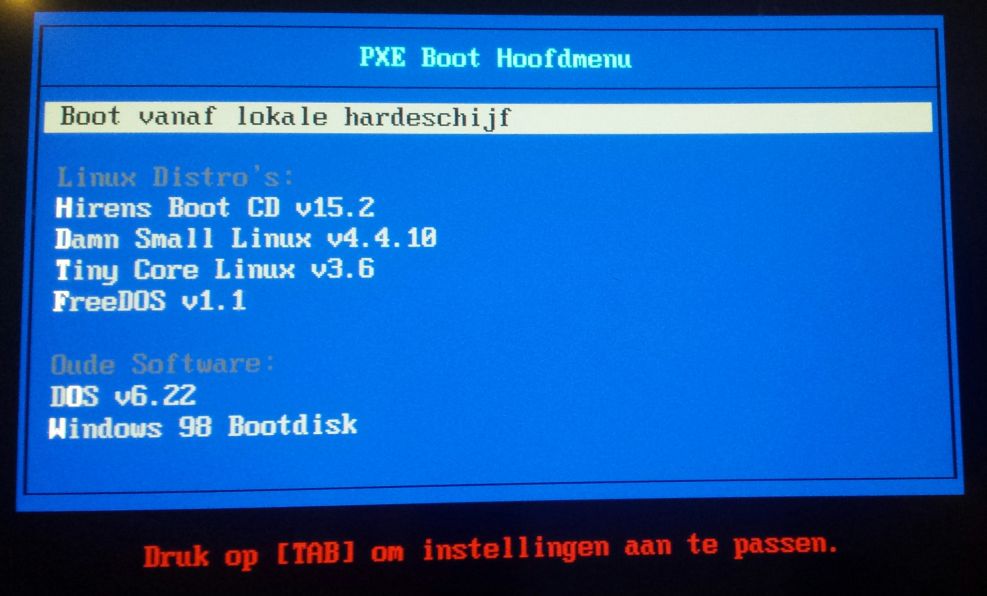
Het menu ziet er dan al zo uit:
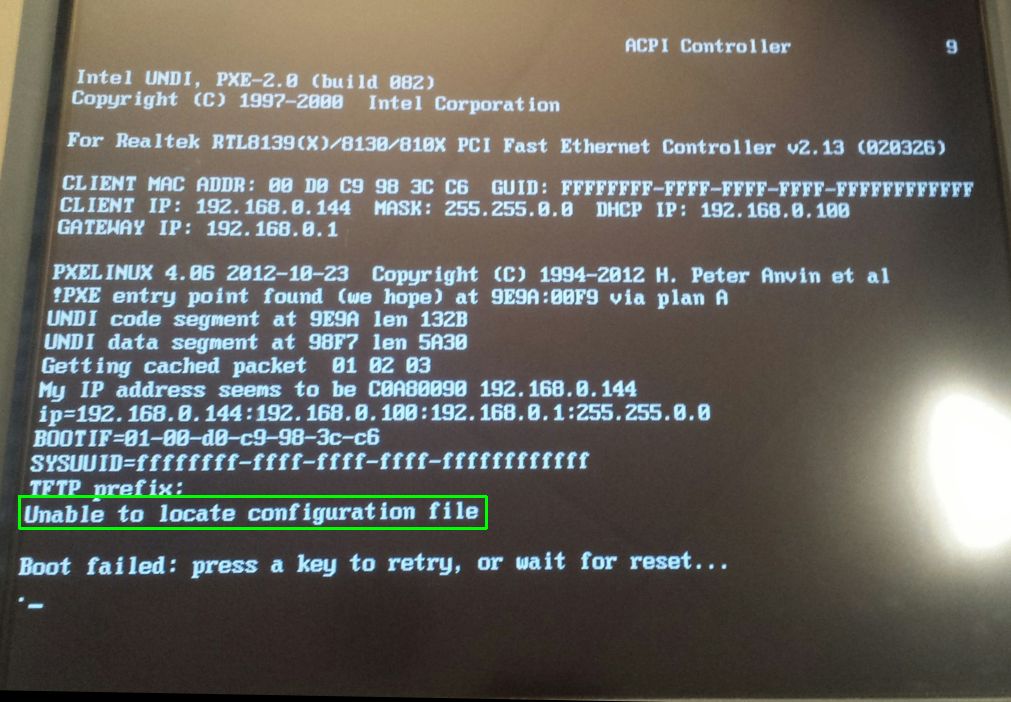
Ps. Als je een configuratie bestand vergeet of het kan niet gevonden worden, dan zie je dat bij het opstarten van de PXE boot:
De structuur ziet er dan zo uit:
|
1 2 3 4 5 6 7 8 9 10 11 12 |
\SERVER | +---PXE | chain.c32 | mboot.c32 | memdisk | menu.c32 | pxelinux.0 | vesamenu.c32 | \---pxelinux.cfg default |
Bootable images toevoegen aan het menu
Laten we een ISO image gaan toevoegen aan het menu om te booten, we nemen bijvoorbeeld Hiren’s BootCD, op het moment van schrijven versie 15.2.
1) Maak een folder aan in de PXE folder genaamd “images“.
2) Plaats de ISO “Hiren’s.BootCD.15.2.iso” in deze map.
3) open het menu “pxelinux.cfg\default” en voeg deze regels daar aan toe
|
1 2 3 4 5 6 7 |
LABEL hirensbootcd MENU LABEL ^Hirens Boot CD v15.2 TEXT HELP Handige Boot CD met veel opties (zelfs windows xp mini). ENDTEXT kernel memdisk append iso raw initrd=images/Hiren's.BootCD.15.2.iso |
TER INFO
– Je ziet dat je een stuk “hulp” tekst kan toevoegen tussen de TEXT HELP en ENDTEXT parameters.
– Het dakje ^ maakt een sneltoets aan voor het karakter waar je hem voor hebt geplaatst.
De structuur ziet er dan zo uit:
|
1 2 3 4 5 6 7 8 9 10 11 12 13 14 15 |
\SERVER | +---PXE | chain.c32 | mboot.c32 | memdisk | menu.c32 | pxelinux.0 | vesamenu.c32 | \---pxelinux.cfg | default | \---images | Hiren's.BootCD.15.2.iso |
Het menu ziet er dan zo uit, en zodra je de Hirens Boot CD optie kiest wordt de ISO geladen:
Je kan bijvoorbeeld nog een DOS of Windows bootdisk toevoegen.
1) Plaats de IMG bestanden in de map “images”.
3) open het menu “pxelinux.cfg\default” en voeg deze regels daar aan toe
|
1 2 3 4 5 6 7 8 9 10 11 12 13 14 15 |
MENU SEPARATOR LABEL - MENU LABEL Oude Software: MENU DISABLE LABEL dosbootdisk MENU LABEL ^DOS v6.22 kernel memdisk append initrd=images/Dos6.22.img LABEL winbootdisk MENU LABEL ^Windows 98 Bootdisk kernel memdisk append initrd=images/Windows98.img |
Voorbeeldmenu
Dit is een PXE menu voorbeeld:
|
1 2 3 4 5 6 7 8 9 10 11 12 13 14 15 16 17 18 19 20 21 22 23 24 25 26 27 28 29 30 31 32 33 34 35 36 37 38 39 40 41 42 43 44 45 46 47 48 49 50 51 52 53 54 55 56 57 58 59 60 61 62 63 64 65 66 67 68 69 70 71 |
default menu.c32 prompt 0 MENU TITLE PXE Boot Hoofdmenu MENU AUTOBOOT Start het lokale systeem in # seconden. MENU TABMSG Druk op [TAB] om instellingen aan te passen. LABEL local MENU LABEL Boot vanaf lokale hardeschijf MENU default LOCALBOOT 0 TIMEOUT 600 TOTALTIMEOUT 9000 MENU SEPARATOR LABEL - MENU LABEL Linux Distro's: MENU DISABLE LABEL hirensbootcd MENU LABEL ^Hirens Boot CD v15.2 TEXT HELP Handige Boot CD met veel opties (zelfs windows xp mini). ENDTEXT kernel memdisk append iso raw initrd=images/Hiren's.BootCD.15.2.iso LABEL dsl MENU LABEL ^Damn Small Linux v4.4.10 TEXT HELP DamnSmallLinux (DSL) is een Linuxdistributie met een zeer beperkte omvang. ENDTEXT kernel images/dsl/linux24 append ramdisk_size=100000 init=/etc/init lang=us apm=power-off vga=795 initrd=images/dsl/minirt24.gz nomce noapic quiet LABEL tinycore MENU LABEL ^Tiny Core Linux v3.6 TEXT HELP The Core Project is a highly modular based system with community build extensions. ENDTEXT kernel images/tinycore/bzImage append initrd=images/tinycore/tinycore.gz LABEL freedos MENU LABEL ^FreeDOS v1.1 TEXT HELP FreeDOS (voorheen Free-DOS en PD-DOS) is een vrij besturingssysteem dat is bedoeld compatibel te zijn met MS-DOS, FreeDOS is opgezet om het oude besturingssysteem DOS levend te houden. ENDTEXT kernel memdisk append initrd=images/FreeDOS-1.1-memstick-3-30M.img MENU SEPARATOR LABEL - MENU LABEL Oude Software: MENU DISABLE LABEL dosbootdisk MENU LABEL D^OS v6.22 kernel memdisk append initrd=images/Dos6.22.img LABEL winbootdisk MENU LABEL ^Windows 98 Bootdisk kernel memdisk append initrd=images/Windows98.img |
Resultaat:
Zelf boot bestanden bij elkaar zetten
Zelf boot bestanden bij elkaar zetten als er een nieuwe release van syslinux uit is gekomen, je kan ze hier vinden:
v4.02
chain.c32 > bios\com32\chain\chain.c32
mboot.c32 > bios\com32\mboot\mboot.c32
menu.c32 > bios\com32\menu\menu.c32
vesamenu.c32 > bios\com32\menu\vesamenu.c32
libcom.c32 > bios\com32\lib\libcom.c32
lpxelinux.0 > bios\core\lpxelinux.0
memdisk > bios\memdisk\memdisk
v6.02 schijnt ook andere bestanden nodig te hebben:
ldlinux.c32 > bios\com32\elflink\ldlinux\ldlinux.c32
libutil.c32 > bios\com32\libutil\libutil.c32
Meer menu’s toevoegen
Je kan eenvoudig meer menu’s toevoegen, begin met een nieuw menu bestand, bijvoorbeeld “pxelinux.cfg\menu2“, zet daar in:
|
1 2 3 4 5 6 |
MENU TITLE PXE 2e Menu LABEL hoofdmenu MENU LABEL ^Terug naar Hoofdmenu KERNEL menu.c32 APPEND pxelinux.cfg/default |
Vanuit het “hoofdmenu” (default) maak je dan de koppeling:
|
1 2 3 4 |
LABEL menu2 MENU LABEL ^2e Menu KERNEL menu.c32 APPEND pxelinux.cfg/menu2 |
Menu bestanden – grafische instellingen voor het simpele menu (optioneel)
Het menu is op veel manieren in te stellen, zoals met het laden van een extra bestand.
1) maak in de folder “pxelinux.cfg” een nieuw bestand aan genaamd “graphics.conf“, met de volgende inhoud:
|
1 2 3 4 5 6 7 8 9 10 11 12 13 14 15 16 17 18 |
menu color tabmsg 37;40 #80ffffff #00000000 menu color hotsel 30;47 #40000000 #20ffffff menu color sel 30;47 #40000000 #20ffffff menu color scrollbar 30;47 #40000000 #20ffffff MENU MASTER PASSWD yourpassword MENU WIDTH 80 MENU MARGIN 22 MENU PASSWORDMARGIN 26 MENU ROWS 6 MENU TABMSGROW 15 MENU CMDLINEROW 15 MENU ENDROW 24 MENU PASSWORDROW 12 MENU TIMEOUTROW 13 MENU VSHIFT 6 MENU PASSPROMPT Enter Password: NOESCAPE 1 ALLOWOPTIONS 0 |
2) Sla het bestand op.
3) Laad de instellingen in het menu door middel van het laden van dit configuratiebestand met:
MENU INCLUDE pxelinux.cfg/graphics.conf
Grafische menu’s gebruiken
Je kan eenvoudig een grafisch menu gebruiken door
default menu.c32
te vervangen naar:
default vesamenu.c32
(doe dit ook in de submenu’s en links)
Je kan zelfs een achtergrond kiezen PNG of JPG met de volgende specificaties: 640×480 pixels 16bpp, inladen kan met:
MENU BACKGROUND achtergrond.png
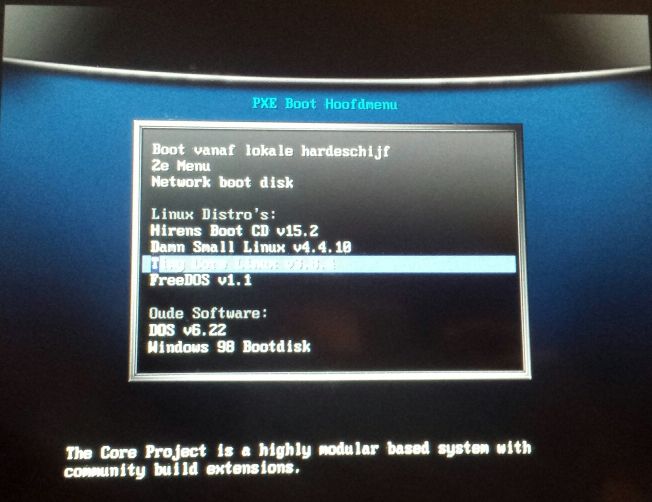
Voorbeeld:
Voor het bovenste menu heb je ook een configuratie nodig, om het allemaal overzichterlijk te houden, kun je een PNG en CFG bestand aanmaken in een folder en die eenmalig aanroepen, voorbeeld:
1) Maak een folder aan genaamd “vesamenu“.
2) Plaats daarin het PNG of JPG bestand genaamd “vesamenu01.png“.
3) Maak een CFG bestand aan genaamd “vesamenu01.cfg” met de volgende inhoud:
|
1 2 3 4 5 6 7 8 9 10 11 12 13 14 15 |
MENU BACKGROUND vesamenu/vesamenu01.png ALLOWOPTIONS 1 MENU WIDTH 77 MENU ROWS 14 MENU TABMSGROW 25 MENU CMDLINEROW 25 MENU HELPMSGROW 23 MENU MARGIN 15 MENU VSHIFT 4 MENU COLOR BORDER 30;44 #00000000 #00000000 none MENU COLOR SEL 7;37;40 #ffffffff #9090a0f0 std MENU COLOR HOTSEL 7;37;40 #ffffffff #204040f0 std MENU COLOR TIMEOUT_MSG 37;40 #aaaaaaaa #00000000 std MENU COLOR TIMEOUT 1;37;40 #ffaaaaff #00000000 std MENU SEPARATOR |
Je kan het CFG bestand aanroepen in het hoofmenu (default) met:
MENU INCLUDE vesamenu/vesamenu01.cfg
Het default menu ziet er dan bijvoorbeeld zo uit:
|
1 2 3 4 5 6 7 8 9 10 11 12 13 14 |
default vesamenu.c32 prompt 0 MENU INCLUDE vesamenu/vesamenu01.cfg MENU TITLE PXE Boot Hoofdmenu MENU AUTOBOOT Start het lokale systeem in # seconden. MENU TABMSG Druk op [TAB] om instellingen aan te passen. LABEL local MENU LABEL Boot vanaf lokale hardeschijf MENU default LOCALBOOT 0 TIMEOUT 600 TOTALTIMEOUT 9000 |
Informatie:
admin-magazine.com
howtogeek.com
defcon.no
[#/software/pxeboot” ]


