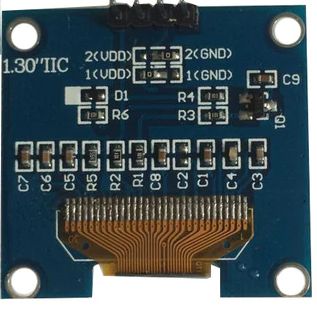
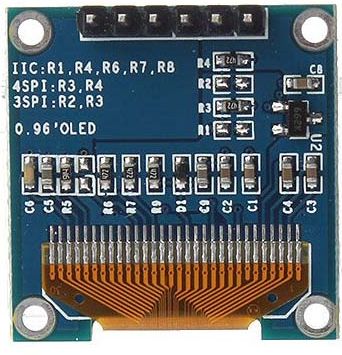
Module – Display – OLED
Hardware
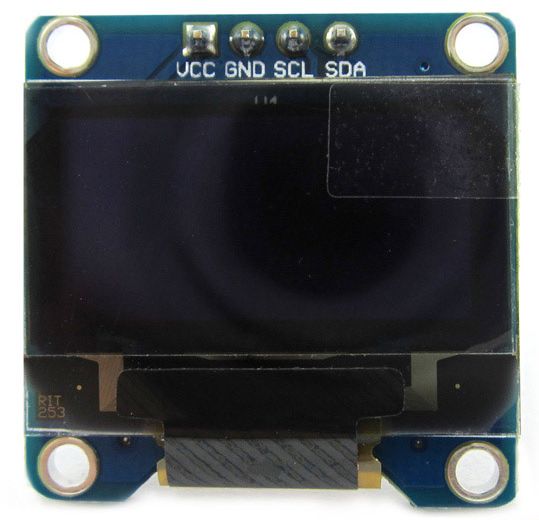
Een organische lichtemitterende diode (Engels: Organic Light Emitting Diode), doorgaans gebruikt in de vorm van het acroniem oled, is een halfgeleiderlichtbron, net als anorganische (leds) en lasers. Terwijl een led een felle puntbron is, is een oled juist een grotevlakkenstraler. De emitterende laag van een oled bestaat uit een speciaal type polymeer of kleine moleculen, op basis van koolwaterstofverbindingen. Deze emitterende laag wordt tussen een anode en kathode geplaatst en afgesloten voor lucht en water. De laag licht op wanneer er een spanning over de kathode en anode wordt gelegd. Met oleds kunnen breedbandige witte lampen gemaakt worden, in tegenstelling tot zijn anorganische tegenhanger.
Bron: WIKI
Technical Specifications (ENG)
- OLED Technology, Self-luminous, need no back-light (consumes less energy)
- High resolution: 128 * 64
- Viewing angle:> 160 degree
- Supports various microcontrollers: Fully compatible with Raspberry Pi, Arduino, 51 Series, MSP430 Series, STM32 / 2, CSR IC, etc.
- Ultra-low power consumption: full screen lit 0.08W
- Operating Voltage: 3.3V Nominal (3.3-6V)
- Compatible I/O level: 3.3V / 5V
- Working Temperature: :-30 ~70 celcius
- Driver IC: SSD1306
Framerate
De SSD1306 chip ondersteunt niet meer dan 100KHz. met de overhead van de ACK (I2C), is er ongeveer 90KHz over voor pure bitrate. Het display heeft 128×64 pixels, dat maakt in totaal 8192 pixels, dat geeft een maximum van ongeveer 11 frames per seconde!
Pinout
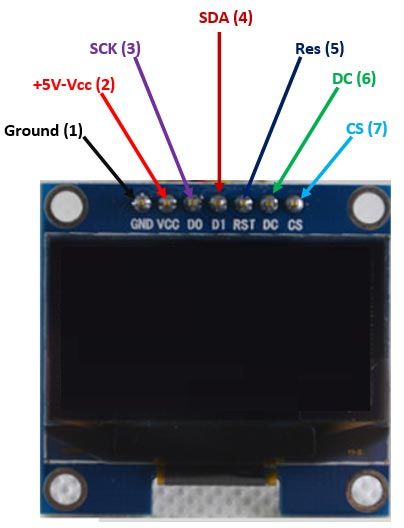
Arduino SSD1306 SPI
Ps. Afhankelijk van welke bibliotheek je gebruikt zul je CS (Chip Select) moeten aan passen in de code of hardwarematig.
Voorbeeld schema’s:
| Pin OLED SPI Display: | Pin Arduino: |
|---|---|
| D0 (SCL,CLK,SCK) (Clock) | Digital 13 |
| D1 (SDA,MOSI) (Data) | Digital 11 |
| RST (Reset) | Digital 8 |
| DC (Data/Command) | Digital 9 |
| CS (Chip Select) | Digital 10 |
| Vin (+3.3 - 5v) | +5v |
| GND | GND |
Ps. bij gebruik van meerdere displays op SPI: D/C, CLK en DAT wordt gedeeld, maar CS moet uniek aangesloten zijn voor elk display!
Wat heb je nodig?
1) Adafruit SSD1306 library
2) Adafruit GFX library
OLED TEKST
In de library’s zijn enkele voorbeeld scripts te vinden, o.a. een Demo wat allemaal mogelijk is, Ik heb uit de Demo wat regels aan script uitgehaald, zodat je eenvoudig kan zien wat nodig is om wat tekst op het display te plaatsen.
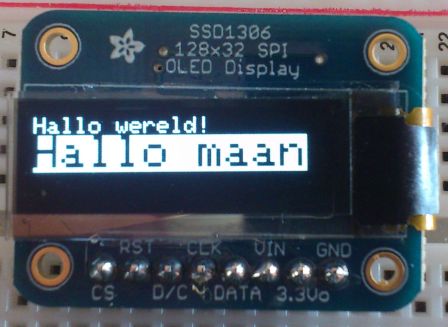
Voorbeeld: Hallo Wereld!
|
1 2 3 4 5 6 7 8 9 10 11 12 13 14 15 16 17 18 19 20 21 22 23 24 25 |
#include <Wire.h> #include <Adafruit_GFX.h> #include <Adafruit_SSD1306.h> #define OLED_DC 11 #define OLED_CS 12 #define OLED_CLK 10 #define OLED_MOSI 9 #define OLED_RESET 13 Adafruit_SSD1306 display(OLED_MOSI, OLED_CLK, OLED_DC, OLED_RESET, OLED_CS); void setup(){ display.begin(SSD1306_SWITCHCAPVCC); display.clearDisplay(); // maak schermbuffer leeg display.setTextSize(1); // tekstgrootte 1 display.setTextColor(WHITE); // tekstkleur display.setCursor(0,0); // zet cursor op x,y display.println("Hallo wereld!"); // print tekst (naar buffer) display.display(); // geef tekst weer (vanuit buffer) }; void loop(){ }; |
Voorbeeld: Hallo Wereld! en Maan! (met geinverteerde kleuren z/w)
|
1 2 3 4 5 6 7 8 9 10 11 12 13 14 15 16 17 18 19 20 21 22 23 24 25 26 27 28 29 |
#include <Wire.h> #include <Adafruit_GFX.h> #include <Adafruit_SSD1306.h> #define OLED_DC 11 #define OLED_CS 12 #define OLED_CLK 10 #define OLED_MOSI 9 #define OLED_RESET 13 Adafruit_SSD1306 display(OLED_MOSI, OLED_CLK, OLED_DC, OLED_RESET, OLED_CS); void setup(){ display.begin(SSD1306_SWITCHCAPVCC); display.clearDisplay(); // maak schermbuffer leeg display.setTextSize(1); // tekstgrootte 1 display.setTextColor(WHITE); // tekstkleur display.setCursor(0,0); // zet cursor op x,y display.println("Hallo wereld!"); // print tekst (naar buffer) display.setTextSize(2); // tekstgrootte 2 display.setTextColor(BLACK, WHITE); // 'geinverteerde' tekst display.println("Hallo maan"); // print tekst (naar buffer) display.display(); // geef tekst weer (vanuit buffer) }; void loop(){ }; |
Arduino Library SSD1306
Installatie van Arduino IDE libraries: Arduino info
Informatie (ENG):
This is a library for our Monochrome OLEDs based on SSD1306 drivers, these displays use SPI to communicate, 4 or 5 pins are required to interface.
1) Rename the uncompressed folder Adafruit_SSD1306.
2) Check that the Adafruit_SSD1306 folder contains Adafruit_SSD1306.cpp and Adafruit_SSD1306.h
3) Place the Adafruit_SSD1306 library folder your <arduinosketchfolder>/libraries/ folder. You may need to create the libraries subfolder if its your first library.
4) Restart the IDE.
Directe download site: Adafruit @ Github
LET OP: Als je een OLED scherm gebruikt die 32 pixels hoog is (ipv 64), dus bijvoorbeeld een 128×32 OLED, dan moet je in dit bestand:
[ArduinoFolder]\libraries\AdafruitSSD1306\Adafruit_SSD1306.h
de // bij deze regel “#define SSD1306_128_32” weghalen om de buffergrootte aan te passen! (en een // zetten bij de 64 pixel instelling)
dus:
|
1 2 |
#define SSD1306_128_64 //#define SSD1306_128_32 |
aanpassen in:
|
1 2 |
//#define SSD1306_128_64 #define SSD1306_128_32 |
- AdafruitSSD1306 (gedownload op 2015-01-29).7z 9,42 kb
- AdafruitSSD1306 (gedownload op 2012-10-04).7z 7,30 kb
- Adafruit_SSD1306-1.1.0.7z 10,14 kb
- Adafruit_SSD1306-1.0.1.7z 10,21 kb
- Adafruit_SSD1306-1.0.0.7z 9,53 kb
Arduino SSH1106 I2C
Aansluiten op de Arduino
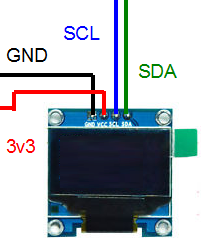
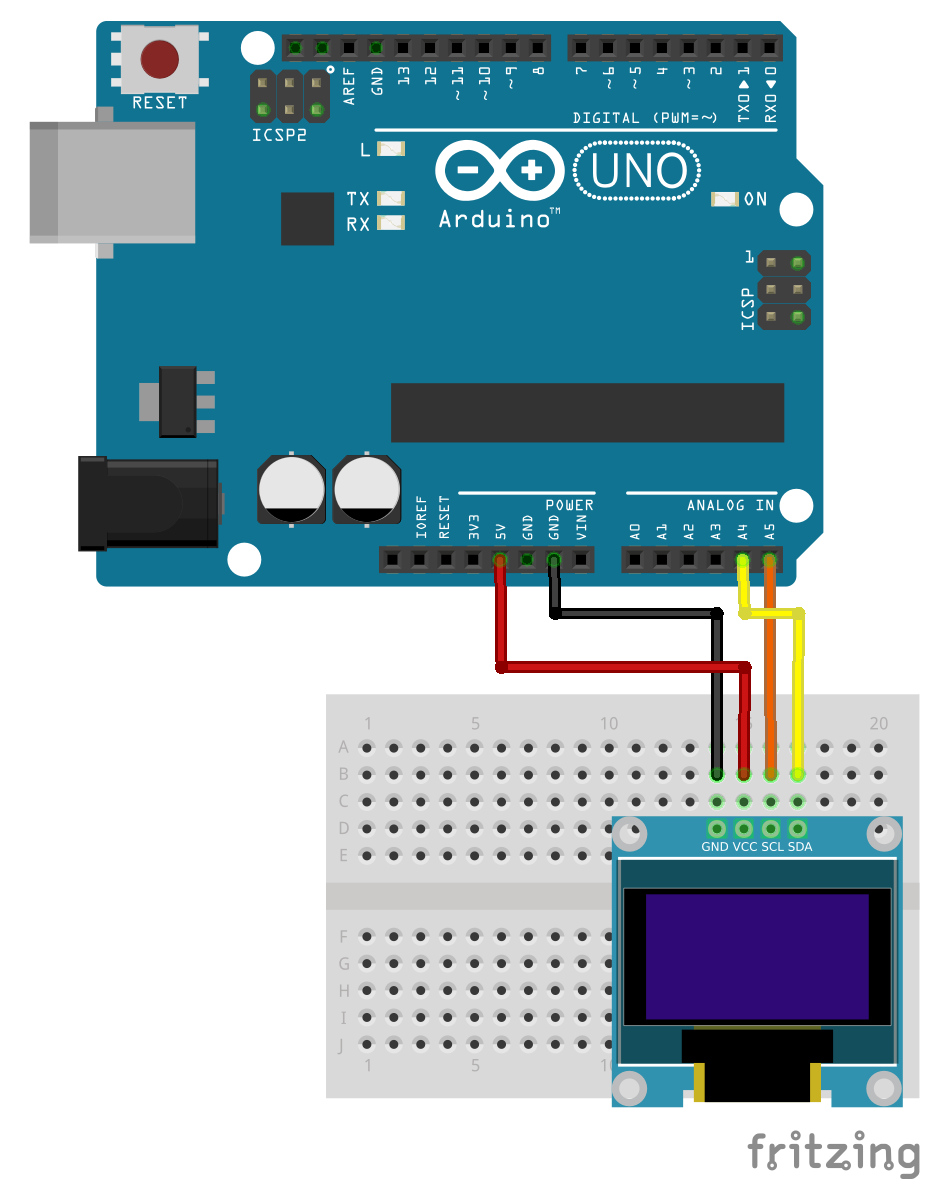
Sluit de OLED display aan volgens onderstaand schema:
| Pin OLED I2C Display: | Pin Arduino: |
|---|---|
| GND | GND |
| VCC | +5v |
| SCL | A5 |
| SCA | A4 |
Script
Wat heb je nodig?
1) Arduino u8glib bibliotheek
Je kan met de u8glib bibliotheek heel veel displays aansturen, dat is afhankelijk van de controller die gebruikt wordt. Je moet daarvoor (in de voorbeeld scripts de commentaar // weghalen) een regel specificeren, het script hieronder is voor een display met een SH1106 controller, daarvoor moet deze regel ingeladen worden:
U8GLIB_SH1106_128X64 u8g(U8G_I2C_OPT_DEV_0|U8G_I2C_OPT_FAST); // Dev 0, Fast I2C / TWI
|
1 2 3 4 5 6 7 8 9 10 11 12 |
// setup u8g object, please remove comment from one of the following constructor calls // IMPORTANT NOTE: The following list is incomplete. The complete list of supported // devices with all constructor calls is here: https://github.com/olikraus/u8glib/wiki/device ... //U8GLIB_SH1106_128X64 u8g(4, 5, 6, 7); // SW SPI Com: SCK = 4, MOSI = 5, CS = 6, A0 = 7 (new blue HalTec OLED) //U8GLIB_SH1106_128X64 u8g(U8G_I2C_OPT_NONE); // I2C / TWI U8GLIB_SH1106_128X64 u8g(U8G_I2C_OPT_DEV_0|U8G_I2C_OPT_FAST); // Dev 0, Fast I2C / TWI //U8GLIB_SH1106_128X64 u8g(U8G_I2C_OPT_NO_ACK); // Display which does not send ACK //U8GLIB_SSD1309_128X64 u8g(13, 11, 10, 9); // SPI Com: SCK = 13, MOSI = 11, CS = 10, A0 = 9 ... |
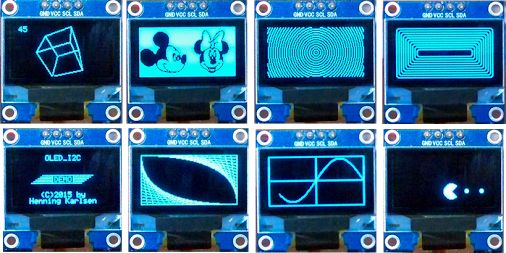
In de u8glib library’s zijn enkele voorbeeld scripts te vinden, o.a. een Demo wat allemaal mogelijk is, Ik heb uit de Demo wat regels aan script uitgehaald, zodat je eenvoudig kan zien wat nodig is om wat tekst op het display te plaatsen.
Voorbeeld: Hallo Wereld!
|
1 2 3 4 5 6 7 8 9 10 11 12 13 14 15 16 17 |
#include "U8glib.h" U8GLIB_SH1106_128X64 u8g(U8G_I2C_OPT_DEV_0|U8G_I2C_OPT_FAST); // Dev 0, Fast I2C / TWI void setup(void) { u8g.setFont(u8g_font_5x8); // font instellen. } void loop(void) { // picture loop u8g.firstPage(); do { u8g.drawStr(0, 10, "Hallo Wereld!"); // print tekst. } while( u8g.nextPage() ); delay(100); // rebuild the picture after some delay } |
Het resultaat (zelfde als onder op de SPI versie):
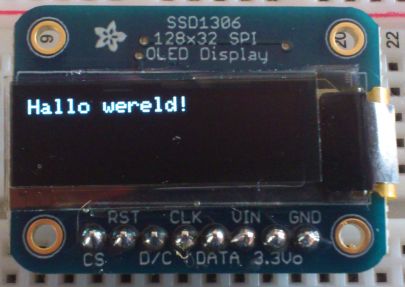
Voorbeeld: Hallo Wereld! en Maan! (met geinverteerde kleuren z/w)
|
1 2 3 4 5 6 7 8 9 10 11 12 13 14 15 16 17 18 19 20 21 22 23 24 25 26 27 28 29 30 |
#include "U8glib.h" U8GLIB_SH1106_128X64 u8g(U8G_I2C_OPT_DEV_0|U8G_I2C_OPT_FAST); // Dev 0, Fast I2C / TWI void draw(void) { // graphic commands to redraw the complete screen should be placed here u8g.setFont(u8g_font_5x8); // font instellen. u8g.drawStr(0, 10, "Hallo Wereld!"); // print tekst. u8g.drawBox(0,14,100,18); // Teken een witte rechthoek. u8g.setColorIndex(0); // zet kleur negatief (pixel uit). u8g.setScale2x2(); // maak het lettertype 2x groter. u8g.drawStr(0, 14, "Hallo maan"); // print tekst. u8g.undoScale(); // zet het lettertype weer terug. u8g.setColorIndex(1); // zet de kleur positief (pixel aan) } void setup(void) { } void loop(void) { // picture loop u8g.firstPage(); do { draw(); } while( u8g.nextPage() ); // rebuild the picture after some delay delay(100); } |
Arduino SSH1106 SPI
Ps. Afhankelijk van welke bibliotheek je gebruikt zul je CS (Chip Select) moeten aan passen in de code of hardwarematig.
Voorbeeld schema’s:
| Pin OLED SPI Display: | Pin Arduino: |
|---|---|
| D0 (SCL,CLK,SCK) (Clock) | Digital 13 |
| D1 (SDA,MOSI) (Data) | Digital 11 |
| RST (Reset) | Digital 8 |
| DC (Data/Command) | Digital 9 |
| CS (Chip Select) | Digital 10 |
| Vin (+3.3 - 5v) | +5v |
| GND | GND |
|
1 2 3 4 5 6 7 8 9 10 11 12 13 14 15 16 17 18 19 20 21 22 23 24 25 26 27 28 29 30 31 32 33 34 35 36 37 38 39 40 41 42 43 44 45 46 47 48 49 50 51 52 53 54 55 56 57 58 59 |
#include "U8glib.h" #include "dht.h" #define dht_apin A0 dht DHT; U8GLIB_SH1106_128X64 u8g(13, 11, 10, 9, 8); // D0=13, D1=11, CS=10, DC=9, Reset=8 const uint8_t brainy_bitmap[] PROGMEM = { 0x00, 0x00, 0x03, 0xB0, 0x00, 0x00, 0x00, 0x00, 0x07, 0xFC, 0x00, 0x00, 0x00, 0x00, 0x0C, 0x46, 0x00, 0x00, 0x00, 0x00, 0xFC, 0x47, 0xC0, 0x00, 0x00, 0x01, 0xCE, 0x4C, 0x60, 0x00, 0x00, 0x03, 0x02, 0x58, 0x30, 0x00, 0x00, 0x03, 0x02, 0x58, 0x10, 0x00, 0x00, 0x02, 0x02, 0x58, 0x18, 0x00, 0x00, 0x03, 0x06, 0x4C, 0x18, 0x00, 0x00, 0x07, 0x04, 0x44, 0x18, 0x00, 0x00, 0x0D, 0x80, 0x40, 0x3C, 0x00, 0x00, 0x09, 0xC0, 0x40, 0xE6, 0x00, 0x00, 0x18, 0x78, 0x47, 0xC2, 0x00, 0x00, 0x18, 0x0C, 0x4E, 0x02, 0x00, 0x00, 0x1F, 0x86, 0x4C, 0x7E, 0x00, 0x00, 0x0E, 0xC6, 0xE8, 0xEE, 0x00, 0x00, 0x18, 0x43, 0xF8, 0x82, 0x00, 0x00, 0x10, 0x06, 0x4C, 0x03, 0x00, 0x00, 0x30, 0x0C, 0x46, 0x01, 0x00, 0x00, 0x30, 0x18, 0x46, 0x01, 0x00, 0x00, 0x10, 0x18, 0x43, 0x03, 0x00, 0x00, 0x18, 0x10, 0x43, 0x03, 0x00, 0x00, 0x1C, 0x70, 0x41, 0x86, 0x00, 0x00, 0x0F, 0xE0, 0x40, 0xFE, 0x00, 0x00, 0x09, 0x1E, 0x4F, 0x06, 0x00, 0x00, 0x08, 0x30, 0x43, 0x86, 0x00, 0x00, 0x0C, 0x20, 0x41, 0x86, 0x00, 0x00, 0x06, 0x60, 0x40, 0x8C, 0x00, 0x00, 0x07, 0x60, 0x40, 0xB8, 0x00, 0x00, 0x01, 0xE0, 0x41, 0xF0, 0x00, 0x00, 0x00, 0x38, 0xE3, 0x00, 0x00, 0x00, 0x00, 0x0F, 0xBE, 0x00, 0x00, 0x00, 0x00, 0x00, 0x00, 0x00, 0x00, 0x1F, 0xCF, 0x82, 0x0C, 0x86, 0x46, 0x1F, 0xEF, 0xC3, 0x0C, 0xC6, 0xEE, 0x1C, 0xEC, 0xC7, 0x0C, 0xE6, 0x7C, 0x1C, 0xED, 0x8D, 0x8C, 0xFE, 0x38, 0x1C, 0xED, 0x8D, 0xCC, 0xDE, 0x38, 0x1D, 0xCD, 0xDF, 0xCC, 0xCE, 0x38, 0x1F, 0x8C, 0xF8, 0xEC, 0xC6, 0x38, 0x1F, 0xEC, 0x08, 0x0C, 0xC2, 0x18, 0x1C, 0xEC, 0x00, 0xC0, 0x00, 0x00, 0x1C, 0xFD, 0xFB, 0xC0, 0x00, 0x00, 0x1C, 0xFC, 0x63, 0x00, 0x00, 0x00, 0x1C, 0xEC, 0x63, 0xC0, 0x00, 0x00, 0x1F, 0xEC, 0x60, 0xC0, 0x00, 0x00, 0x1F, 0xCC, 0x63, 0xC0, 0x00, 0x00, 0x1F, 0x0C, 0x63, 0x00, 0x00, 0x00, 0x00, 0x00, 0x00, 0x00, 0x00, 0x00, 0x00, 0x00, 0x00, 0x00, 0x00, 0x00, 0x28, 0x2B, 0x4F, 0x67, 0x42, 0x38, 0x7B, 0xEA, 0x86, 0xB2, 0x28, 0xC7, }; void draw(void) { u8g.drawBitmapP( 76, 5, 6, 50, brainy_bitmap); // put bitmap u8g.setFont(u8g_font_unifont); // select font u8g.drawStr(0, 30, "Temp: "); // put string of display at position X, Y u8g.drawStr(0, 50, "Hum: "); u8g.setPrintPos(44, 30); // set position u8g.print(DHT.temperature, 0); // display temperature from DHT11 u8g.drawStr(60, 30, "c "); u8g.setPrintPos(44, 50); u8g.print(DHT.humidity, 0); // display humidity from DHT11 u8g.drawStr(60, 50, "% "); } void setup(void) { } void loop(void) { DHT.read11(dht_apin); // Read apin on DHT11 u8g.firstPage(); do { draw(); } while( u8g.nextPage() ); delay(5000); // Delay of 5sec before accessing DHT11 (min - 2sec) } |
Bron: brainy-bits.com
Arduino Library SH1106 (u8glib)
Installatie van Arduino IDE libraries: Arduino info
Informatie (ENG):
A graphics library with support for many different monochrome displays.
- Bintray download links:
- U8glib for Arduino
- U8glib for AVR
- U8glib for ARM
- Converter for BDF fonts: bdf2u8g_101.exe on google drive.
- Supported environments:
- Arduino (ATMEGA and ARM)
- AVR (ATMEGA)
- ARM (with example for LPC1114)
- Library for graphic LCDs and OLEDs
- U8glib documentation and tutorials
- Graphical user interface library (GUI) available: M2tklib
- COM interfaces: Software SPI, Hardware SPI, 8Bit parallel
- Large number of fonts
- Monospaced and proportional fonts
- Mouse-Cursor support
- Landscape and portrait mode
- Many supported devices (SSD1325, ST7565, ST7920, UC1608, UC1610, UC1701, PCD8544, PCF8812, KS0108, LC7981, SBN1661, SSD1306, SH1106, T6963, LD7032)
- Well-defined interface to the device subsystem
Download u8glib @ Github.com
Download u8glib voor Arduino @ Github.com
- u8glib_avr_v1.18.1.7z 583,08 kb
- u8glib_arm_v1.18.1.7z 601,65 kb
- u8glib_Arduino-1.19.1.7z 594,14 kb
- u8glib_Arduino-1.18.1.7z 594,25 kb
- u8glib handleiding wiki.pdf.7z 6,15 MB
- u8glib (gedownload op 2016-01-07 @ github).7z 4,96 MB
OLED Grafisch (Arduino)
Met LCD Assistant is het mogelijk om bitmap bestanden om te zetten naar HEX code’s, zodat het weergegeven kan worden op het display.
Wat heb je nodig?
1) Irfanview
2) LCD Assistant
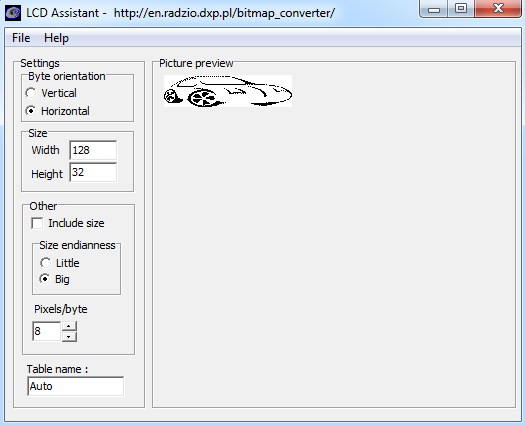
Ps. de instellingen van LCD Assistant die op de site van Adafruit staan werken voor mij niet!, ik heb hieronder de juiste instellingen geplaatst die voor mij werken.
De code om een grafisch plaatje weer te geven op het OLED scherm:
|
1 2 3 4 5 6 7 8 9 10 11 12 13 14 15 16 17 18 19 20 21 22 23 24 25 26 27 28 29 30 31 32 33 |
#include <Wire.h> #include <Adafruit_GFX.h> #include <Adafruit_SSD1306.h> #define OLED_DC 11 #define OLED_CS 12 #define OLED_CLK 10 #define OLED_MOSI 9 #define OLED_RESET 13 Adafruit_SSD1306 display(OLED_MOSI, OLED_CLK, OLED_DC, OLED_RESET, OLED_CS); #define NUMFLAKES 20 #define XPOS 0 #define YPOS 1 #define DELTAY 2 const unsigned char PROGMEM Plaatje[] = { PLAATS HEX CODE VAN HET PLAATJE HIER!! }; void setup(){ // by default, we'll generate the high voltage from the 3.3v line internally! (neat!) display.begin(SSD1306_SWITCHCAPVCC); // init done // bitmap display display.clearDisplay(); display.drawBitmap(0, 0, Plaatje, 128, 32, 1); // zet cursor op x,y -> 0,0 en geef aan dat het plaatje uit 128x32 pixels bestaat en 1-bit is. display.display(); } void loop() { } |
Hoe zet ik een foto/plaatje om om op het display weer te geven?
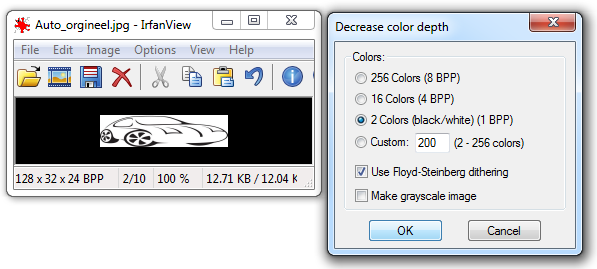
Gebruik Irfanview om de juiste bitmap bestanden te creëren, zie de instructies onder.
2) Ik heb hier een voorbeeld bestand van een auto:
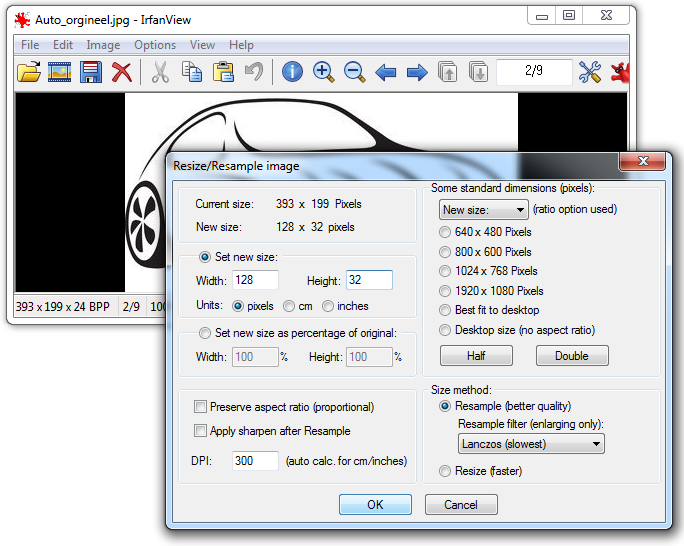
3) Gebruik Irfanview om dit plaatje te verkleinen naar 128×32. (CTRL+R)
4) Ga naar het topmenu -> Image -> Decrease color depth (engels), en zet de instelling op 2 kleuren (zwart/wit) 1-bit
5) Sla het betand op als BMP formaat!, dit is het resultaat:
6) Open LCD Assistant en open het BMP bestand (topmenu -> file -> open bitmap) en gebruik deze instellingen:
7) Sla de conversiegegevens op met: topmenu -> file -> Save output (maakt niet uit welke extensie je gebruikt, maar voor het gemak kun je CPP nemen)
8) Als je nu het “output” bestand opent, dan zie je met het voorbeeld hierboven (auto) deze code:
|
1 2 3 4 5 6 7 8 9 10 11 12 13 14 15 16 17 18 19 20 21 22 23 24 25 26 27 28 29 30 31 32 33 34 |
const unsigned char Plaatje [] = { 0x00, 0x00, 0x00, 0x00, 0x00, 0x00, 0x00, 0x00, 0x00, 0x00, 0x00, 0x00, 0x00, 0x00, 0x00, 0x00, 0x00, 0x00, 0x00, 0x01, 0x6D, 0xAA, 0xAA, 0xB7, 0xC0, 0x00, 0x00, 0x00, 0x00, 0x00, 0x00, 0x00, 0x00, 0x00, 0x00, 0x5C, 0x00, 0x00, 0x00, 0x00, 0x0E, 0x00, 0x00, 0x00, 0x00, 0x00, 0x00, 0x00, 0x00, 0x00, 0x03, 0x2B, 0x00, 0x00, 0x00, 0x00, 0x01, 0xC0, 0x00, 0x00, 0x00, 0x00, 0x00, 0x00, 0x00, 0x00, 0x0D, 0x40, 0x00, 0x00, 0x00, 0x00, 0x00, 0x3C, 0x00, 0x00, 0x00, 0x00, 0x00, 0x00, 0x00, 0x00, 0x54, 0x00, 0x00, 0x00, 0x00, 0x00, 0x00, 0x07, 0x80, 0x00, 0x00, 0x00, 0x00, 0x00, 0x00, 0x01, 0xA0, 0x00, 0x08, 0x00, 0x00, 0x00, 0x00, 0x01, 0xF0, 0x00, 0x00, 0x00, 0x00, 0x00, 0x00, 0x04, 0x80, 0x00, 0x04, 0x00, 0x00, 0x00, 0x00, 0x00, 0x7E, 0x00, 0x00, 0x00, 0x00, 0x00, 0x00, 0x09, 0x00, 0x00, 0x03, 0x80, 0x00, 0x00, 0x00, 0x00, 0x7F, 0xE0, 0x00, 0x00, 0x00, 0x00, 0x00, 0x22, 0x00, 0x00, 0x80, 0x7F, 0xFF, 0xFF, 0xFF, 0xFF, 0xD5, 0xBF, 0xFA, 0x00, 0x00, 0x00, 0x00, 0x86, 0x00, 0x03, 0x00, 0x00, 0x00, 0x00, 0x00, 0x00, 0x00, 0x00, 0x00, 0x7E, 0x00, 0x00, 0x01, 0x07, 0xFF, 0xFC, 0x00, 0x00, 0x00, 0x00, 0x00, 0x00, 0x0A, 0x00, 0x00, 0x01, 0x60, 0x00, 0x00, 0x00, 0x00, 0x00, 0x00, 0x00, 0x00, 0x00, 0x00, 0x00, 0x00, 0xE0, 0x00, 0x00, 0x06, 0x00, 0x00, 0x00, 0x00, 0x02, 0xFA, 0x00, 0x00, 0x08, 0x01, 0x80, 0x00, 0x1C, 0x00, 0x04, 0x01, 0x80, 0x07, 0x80, 0x00, 0x00, 0x07, 0xF0, 0x00, 0x02, 0x00, 0x38, 0x00, 0x03, 0x80, 0x03, 0x00, 0x60, 0x18, 0xE0, 0x00, 0x00, 0x7F, 0xFE, 0x00, 0x01, 0x80, 0x0E, 0x00, 0x00, 0xC0, 0x01, 0x85, 0x38, 0x20, 0x60, 0x00, 0x03, 0xF8, 0x1F, 0x80, 0x00, 0xC0, 0x03, 0x80, 0x00, 0x70, 0x00, 0xF0, 0x5C, 0x59, 0xF0, 0x00, 0x0F, 0x81, 0xE1, 0xC0, 0x00, 0x67, 0xFB, 0xC0, 0x00, 0x38, 0x00, 0x00, 0x06, 0x59, 0xD0, 0x00, 0x1C, 0x03, 0xF8, 0x20, 0x00, 0x7D, 0x45, 0x40, 0x00, 0x1C, 0x00, 0x00, 0x03, 0xCF, 0x18, 0x00, 0x79, 0xE3, 0xF0, 0x10, 0x00, 0x00, 0x00, 0x00, 0x00, 0x0C, 0x00, 0x00, 0x01, 0x98, 0x18, 0x00, 0x73, 0xF3, 0xC0, 0x00, 0x00, 0x00, 0x00, 0x00, 0x00, 0x0E, 0x00, 0x00, 0x01, 0xB7, 0x1C, 0x00, 0xE7, 0xF9, 0x87, 0xC0, 0x00, 0x00, 0x00, 0x00, 0x00, 0x0C, 0x00, 0x00, 0x03, 0xAF, 0xDC, 0x00, 0xE1, 0xFC, 0x3F, 0xC0, 0x00, 0x00, 0x00, 0x00, 0x00, 0x00, 0x00, 0x00, 0x02, 0xDD, 0xDF, 0x00, 0xE0, 0x00, 0x3F, 0xE0, 0x00, 0x00, 0x00, 0x00, 0x00, 0x00, 0x00, 0x00, 0x04, 0x5C, 0x3F, 0xE1, 0xE7, 0xFC, 0x03, 0xC0, 0x00, 0x00, 0x00, 0x00, 0x00, 0x00, 0x00, 0x00, 0x18, 0x24, 0x7F, 0xE0, 0xE7, 0xF1, 0xC0, 0x00, 0x00, 0x00, 0x00, 0x00, 0x00, 0x00, 0x00, 0x00, 0xC0, 0x18, 0xFF, 0xC0, 0x73, 0xE1, 0xE0, 0x0F, 0x00, 0x00, 0x00, 0x00, 0x00, 0x00, 0x00, 0x0F, 0x00, 0x0F, 0xFF, 0x00, 0x38, 0xC1, 0xF8, 0x1F, 0xF4, 0x00, 0x00, 0x00, 0x00, 0x02, 0xFF, 0xE0, 0x00, 0x00, 0x00, 0x00, 0x1E, 0x01, 0xFC, 0x7F, 0xD0, 0x00, 0x00, 0x01, 0xFF, 0xFF, 0xFF, 0x00, 0x00, 0x00, 0x00, 0x00, 0x07, 0x81, 0x81, 0xFE, 0x00, 0x00, 0x00, 0x00, 0x3F, 0xFF, 0xF0, 0x00, 0x00, 0x00, 0x00, 0x00, 0x01, 0xFD, 0x7F, 0xF8, 0x00, 0x00, 0x00, 0x00, 0x01, 0x7E, 0x00, 0x00, 0x00, 0x00, 0x00, 0x00, 0x00, 0x3F, 0xFF, 0x00, 0x00, 0x00, 0x00, 0x00, 0x00, 0x00, 0x00, 0x00, 0x00 }; |
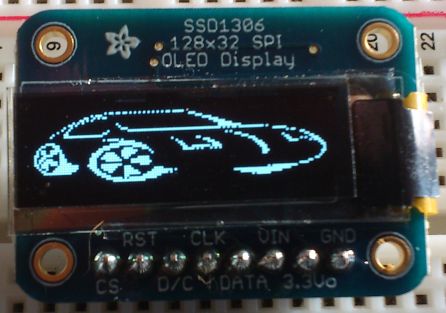
9) Als je de HEX codes in het bovenstaande Aurduino script zet en deze naar de arduino stuurt, dan is dit het resultaat:
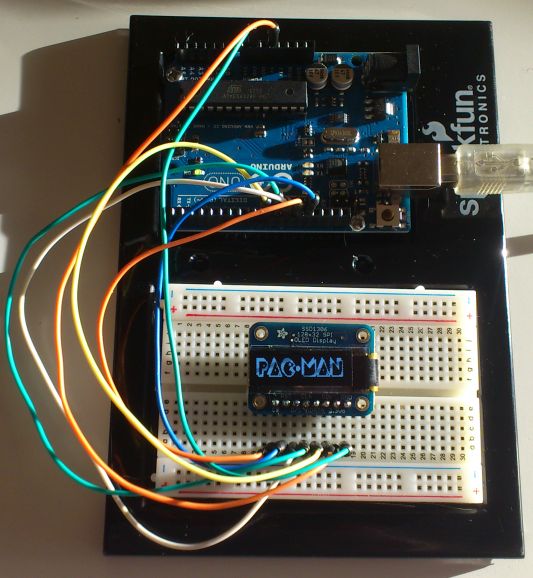
Hetzelfde kan gedaan worden met bijvoorbeeld een pac-man logo, zie hieronder.
Het orginele JPG bestand:
Door irfanview gehaald (1 bit monochrome BMP):
|
1 2 3 4 5 6 7 8 9 10 11 12 13 14 15 16 17 18 19 20 21 22 23 24 25 26 27 28 29 30 31 32 33 34 |
const unsigned char Plaatje [] = { 0x00, 0x00, 0x00, 0x00, 0x00, 0x00, 0x00, 0x00, 0x00, 0x00, 0x00, 0x00, 0x00, 0x00, 0x00, 0x00, 0x00, 0x00, 0x00, 0x00, 0x00, 0x00, 0x00, 0x00, 0x00, 0x00, 0x00, 0x00, 0x00, 0x00, 0x00, 0x00, 0x00, 0x00, 0x00, 0x10, 0x00, 0x00, 0x00, 0x00, 0x10, 0x00, 0x08, 0x00, 0x80, 0x08, 0x00, 0x00, 0x3F, 0xF8, 0x00, 0x30, 0x00, 0x0F, 0x80, 0x00, 0x18, 0x00, 0x18, 0x01, 0x80, 0x0C, 0x03, 0xF0, 0x3F, 0xFC, 0x00, 0x38, 0x00, 0x3F, 0xE0, 0x00, 0x1C, 0x00, 0x38, 0x01, 0xC0, 0x0E, 0x07, 0xF0, 0x3F, 0xFE, 0x00, 0x7C, 0x00, 0x7F, 0xF0, 0x00, 0x1E, 0x00, 0x7B, 0x01, 0xE0, 0x0E, 0x03, 0xF0, 0x3F, 0xFF, 0x00, 0x7C, 0x00, 0xFF, 0xF8, 0x00, 0x1E, 0x00, 0x7F, 0x03, 0xF0, 0x1F, 0x07, 0xFC, 0x3F, 0xFF, 0x00, 0x7E, 0x00, 0xFF, 0xFC, 0x00, 0x1F, 0x00, 0xFF, 0x03, 0xF0, 0x0F, 0x83, 0xFE, 0x3C, 0x01, 0xC0, 0xFE, 0x01, 0xFF, 0x1E, 0x00, 0x1F, 0x81, 0xFF, 0x07, 0xF0, 0x0F, 0xC7, 0xC4, 0x3C, 0x00, 0xC0, 0xFB, 0x03, 0xF8, 0x0E, 0x00, 0x1F, 0xC3, 0xFF, 0x07, 0xD8, 0x0F, 0xC3, 0x84, 0x3C, 0x00, 0x41, 0xFB, 0x03, 0xF0, 0x53, 0x00, 0x1C, 0xC7, 0xFB, 0x07, 0xC8, 0x1E, 0x67, 0x86, 0x3C, 0x00, 0x61, 0xF1, 0x03, 0xE0, 0x71, 0x80, 0x1E, 0x67, 0xF3, 0x0F, 0xCC, 0x0F, 0x33, 0x84, 0x3C, 0x00, 0x23, 0xF1, 0x87, 0xE0, 0x70, 0x80, 0x1E, 0x3F, 0xE3, 0x0F, 0x8C, 0x0E, 0x1F, 0x84, 0x3C, 0x0C, 0x63, 0xF1, 0x83, 0xC0, 0xF1, 0xC0, 0x1C, 0x1F, 0xC3, 0x1F, 0x84, 0x0F, 0x0F, 0x84, 0x3C, 0x0C, 0xA3, 0xE0, 0x87, 0xC0, 0x11, 0xC6, 0x1E, 0x1F, 0x83, 0x1F, 0x06, 0x1E, 0x0F, 0x86, 0x3C, 0x00, 0xE7, 0xE0, 0xC3, 0xC0, 0x07, 0x1F, 0x1C, 0x0F, 0x83, 0x1F, 0x06, 0x0F, 0x07, 0x84, 0x3C, 0x01, 0xE7, 0xC0, 0x47, 0x80, 0x1E, 0x1F, 0x9E, 0x07, 0x03, 0x3F, 0x03, 0x0E, 0x03, 0x84, 0x3C, 0x03, 0xC7, 0xC0, 0x63, 0x80, 0x3C, 0x1F, 0x9C, 0x02, 0x03, 0x3E, 0x03, 0x0F, 0x01, 0x84, 0x3C, 0x3F, 0xCF, 0xC0, 0x63, 0x80, 0x3E, 0x1F, 0x9E, 0x00, 0x03, 0x7E, 0x01, 0x1E, 0x01, 0x86, 0x3C, 0x3F, 0x8F, 0x84, 0x23, 0x80, 0x7E, 0x1F, 0x9C, 0x00, 0x03, 0x7E, 0x21, 0x8F, 0x00, 0x84, 0x3C, 0x3F, 0x1F, 0x8C, 0x33, 0x80, 0x6F, 0x1F, 0x1E, 0x00, 0x03, 0x7C, 0x61, 0x8E, 0x00, 0x04, 0x3C, 0x38, 0x1F, 0x04, 0x11, 0xC0, 0x1F, 0x8E, 0x1C, 0x00, 0x03, 0xFC, 0x20, 0x8F, 0x00, 0x06, 0x3C, 0x30, 0x1F, 0x00, 0x19, 0xC0, 0x07, 0xC0, 0x1E, 0x00, 0x03, 0xF8, 0x00, 0xDE, 0x00, 0x04, 0x3C, 0x38, 0x3F, 0x00, 0x38, 0xE0, 0x02, 0x80, 0x1C, 0x00, 0x03, 0xF8, 0x01, 0xCF, 0x00, 0x0C, 0x3C, 0x30, 0x3E, 0x00, 0x38, 0x60, 0x07, 0x80, 0x1E, 0x00, 0x07, 0xF0, 0x01, 0x6E, 0x00, 0x0E, 0x3C, 0x30, 0x7E, 0x00, 0x2C, 0x30, 0x0B, 0x00, 0x1C, 0x00, 0x07, 0xF0, 0x01, 0x7E, 0x00, 0x0C, 0x3D, 0x78, 0x3C, 0x00, 0x7C, 0x18, 0x06, 0x00, 0x1E, 0x00, 0x07, 0xF0, 0x03, 0xBF, 0x00, 0x0C, 0x0D, 0xF0, 0x0C, 0x00, 0x46, 0x1C, 0x0E, 0x00, 0x04, 0x00, 0x3F, 0x20, 0x02, 0xB2, 0x00, 0x7E, 0x0F, 0xF0, 0x0F, 0xFF, 0xFE, 0x07, 0xF8, 0x00, 0x07, 0xFF, 0xFF, 0x7F, 0xFF, 0xF3, 0xFF, 0xFC, 0x07, 0xF0, 0x0F, 0xFF, 0xFE, 0x03, 0xF0, 0x00, 0x03, 0xFF, 0xFE, 0x7F, 0xFF, 0xF3, 0xFF, 0xFC, 0x00, 0x00, 0x00, 0x00, 0x00, 0x00, 0x00, 0x00, 0x00, 0x00, 0x00, 0x00, 0x00, 0x00, 0x00, 0x00, 0x00, 0x00, 0x00, 0x00, 0x00, 0x00, 0x00, 0x00, 0x00, 0x00, 0x00, 0x00, 0x00, 0x00, 0x00, 0x00 }; |
Het resultaat:
Raspberry Pi SH1106 I2C
Wat heb je nodig?
1) DEV tools met het volgende commando:
sudo apt-get install -y i2c-tools python-smbus python-pip python-dev python-imaging
2) Python OLED library (schrotratte)
Installeren van de bibliotheek kan met de volgende commando’s:
|
1 2 |
git clone git://github.com/Schrottratte/sh1106.git cd sh1106 && sudo python setup.py install |
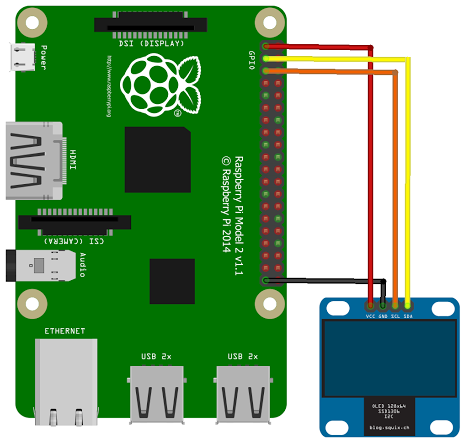
Aansluiten op de Raspberry Pi
Sluit de OLED display aan volgens onderstaand schema:
| Pin OLED I2C Display: | Pin Raspberry: |
|---|---|
| GND | GND |
| VCC | +5v |
| SDA | GPIO 2 (SDA) |
| SCL | GPIO 3 (SCL) |
Controleer aansluiting (I2C)
Om te controleren of het display juist is aangesloten kan je het volgende commandi uitvoeren:
i2cdetect -y 1
|
1 2 3 4 5 6 7 8 9 |
0 1 2 3 4 5 6 7 8 9 a b c d e f 00: -- -- -- -- -- -- -- -- -- -- -- -- -- 10: -- -- -- -- -- -- -- -- -- -- -- -- -- -- -- -- 20: -- -- -- -- -- -- -- -- -- -- -- -- -- -- -- -- 30: -- -- -- -- -- -- -- -- -- -- -- -- 3c -- -- -- 40: -- -- -- -- -- -- -- -- -- -- -- -- -- -- -- -- 50: -- -- -- -- -- -- -- -- -- -- -- -- -- -- -- -- 60: -- -- -- -- -- -- -- -- -- -- -- -- -- -- -- -- 70: -- -- -- -- -- -- -- -- |
Je kan bevestigen dat het display adres 0x3C heeft.
Script
Hieronder een python script dat “Hallo Wereld” zal weergeven, pas het adres aan indien nodig.
|
1 2 3 4 5 6 7 8 9 10 11 12 |
from oled.device import ssd1306, sh1106 from oled.render import canvas from PIL import ImageFont, ImageDraw font = ImageFont.load_default() device = sh1106(port=1, address=0x3C) with canvas(device) as draw: # optioneel font bestand # font = ImageFont.truetype('cc_ra.ttf', 10) draw.text((10, 10), "Hallo", font=font, fill=255) draw.text((20, 20), 'Wereld!', font=font, fill=255) |
Raspberry Library
Python OLED library (schrottratte)
Informatie (ENG):
SH1106 / SSD1306 OLED Driver (only tested with SH1106).
I forked the original and made some minor changes, to make it work with a BPi-M1 on Armbian Jessie Vanilla.
Interfacing OLED matrix displays with the SH1106 (or SSD1306) driver in Python using I2C on the Banana Pi. The particular kit I bought from Amazon: SainSmart 1.3″ I2C IIC Serial 128X64 OLED.
The SH1106 display is 128×64 pixels, and the board is tiny, and will fit neatly inside my BPi Case.
Pre-requisites
This was tested with Armbian-Jessie on a BP1-M1, with Mainline Kernel .
Install some packages(most should be already installed):
|
1 2 |
$ sudo apt-get install i2c-tools python-smbus python-pip python-dev python-imaging |
Next check that the device is communicating properly:
|
1 2 3 4 5 6 7 8 9 10 |
$ i2cdetect -y 1 0 1 2 3 4 5 6 7 8 9 a b c d e f 00: -- -- -- -- -- -- -- -- -- -- -- -- -- 10: -- -- -- -- -- -- -- -- -- -- -- -- -- -- -- -- 20: -- -- -- -- -- -- -- -- -- -- -- -- -- -- -- -- 30: -- -- -- -- -- -- -- -- -- -- -- -- 3c -- -- -- 40: -- -- -- -- -- -- -- -- -- -- -- -- -- -- -- -- 50: -- -- -- -- -- -- -- -- -- -- -- -- -- -- -- -- 60: -- -- -- -- -- -- -- -- -- -- -- -- -- -- -- -- 70: -- -- -- -- -- -- -- -- |
Installing the Python Package
From the bash prompt, enter:
|
1 2 |
$ sudo python setup.py install |
This will install the python files in /usr/local/lib/python2.7 making them ready for use in other programs.
Software Display Driver
The screen can be driven with python using the oled/device.py script. There are two device classes and usage is very simple if you have ever used Pillow or PIL.
First, import and initialise the device:
|
1 2 3 4 5 6 |
<span class="pl-k">from</span> oled.device <span class="pl-k">import</span> ssd1306, sh1106 <span class="pl-k">from</span> oled.render <span class="pl-k">import</span> canvas <span class="pl-k">from</span> <span class="pl-c1">PIL</span> <span class="pl-k">import</span> ImageFont, ImageDraw <span class="pl-c"># substitute sh1106(...) below if using that device</span> device <span class="pl-k">=</span> ssd1306(<span class="pl-v">port</span><span class="pl-k">=</span><span class="pl-c1">1</span>, <span class="pl-v">address</span><span class="pl-k">=</span><span class="pl-c1"><span class="pl-k">0x</span>3C</span>) |
The display device should now be configured for use. The specific ssd1306 or sh1106 classes both expose a display()method which takes a 1-bit depth image. However, for most cases, for drawing text and graphics primitives, the canvas class should be used as follows:
|
1 2 3 4 |
<span class="pl-k">with</span> canvas(device) <span class="pl-k">as</span> draw: font <span class="pl-k">=</span> ImageFont.load_default() draw.rectangle((<span class="pl-c1">0</span>, <span class="pl-c1">0</span>, device.width, device.height), <span class="pl-v">outline</span><span class="pl-k">=</span><span class="pl-c1">0</span>, <span class="pl-v">fill</span><span class="pl-k">=</span><span class="pl-c1">0</span>) draw.text(<span class="pl-c1">30</span>, <span class="pl-c1">40</span>, <span class="pl-s"><span class="pl-pds">"</span>Hello World<span class="pl-pds">"</span></span>, <span class="pl-v">font</span><span class="pl-k">=</span>font, <span class="pl-v">fill</span><span class="pl-k">=</span><span class="pl-c1">255</span>) |
The canvas class automatically creates an ImageDraw object of the correct dimensions and bit depth suitable for the device, so you may then call the usual Pillow methods to draw onto the canvas.
As soon as the with scope is ended, the resultant image is automatically flushed to the device’s display memory and the ImageDraw object is garbage collected.
Run the demos in the example directory:
|
1 2 3 4 5 |
$ python examples/demo.py $ python examples/sys_info.py $ python examples/pi_logo.py $ python examples/maze.py |
Note that python-dev (apt-get) and psutil (pip) are required to run the sys_info.py example. See install instructions for the exact commands to use.
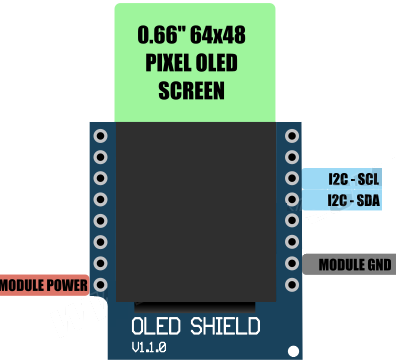
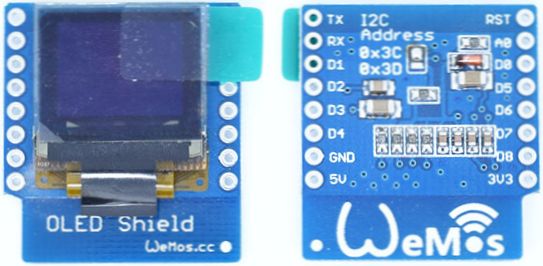
WEMOS OLED Shield SSD1306 I2C
Deze shield gebruikt D1 en D2 voor I2C communicatie.
Script
Wat heb je nodig?
1) Wemos OLED Shield SSD1306 library
|
1 2 3 4 5 6 7 8 9 10 11 12 13 14 15 16 17 18 19 20 21 22 23 24 25 26 27 28 29 30 31 32 33 34 35 36 37 38 39 |
// ----------------------------------------------- // Example code for the SSD1306 library // ----------------------------------------------- #include <SSD1306.h> #include <Wire.h> Ssd1306 ssd1306(0x3C,64,48,0); void setup() { Serial.begin(9600); ssd1306.begin(); // Clear the buffer. ssd1306.oledClearDisplayBuffer(0); ssd1306.oledCopyDisplayBuffer(); ssd1306.oledDrawLine(0,24,63,37,1); ssd1306.oledDrawLine(0,37,63,24,1); ssd1306.oledDrawLine(0,24,64,24,1); ssd1306.oledDrawCircle(32,24,10,1); ssd1306.oledFillRect(0,37,63,47,1); ssd1306.oledPrintLine(0,0,(unsigned char*)"Hallo!",1); ssd1306.oledPrintLine(0,9,(unsigned char*)"12345678901",1); ssd1306.oledCopyDisplayBuffer(); ssd1306.oledPrintLine(0,37,(unsigned char*)"Inverted!",0); ssd1306.oledCopyDisplayBuffer(); delay(2000); ssd1306.oledInvert(); delay(2000); ssd1306.oledNormal(); delay (2000); } void loop() { } |
Arduino Library Wemos OLED Shield SSD1306
Installatie van Arduino IDE libraries: Arduino info
Informatie:
De code van deze libray is compact en bevat alleen een aantal basis functies:
|
1 2 3 4 5 6 7 8 9 10 11 12 13 14 15 |
public: Ssd1306(uint8_t i2caddr,uint8_t width,uint8_t height,uint8_t orientation); void begin(void); void oledSetPixel(int16_t x, int16_t y, uint16_t color); void oledDrawLine(int16_t x0, int16_t y0, int16_t x1, int16_t y1, uint16_t color); void oledDrawRect(int16_t x, int16_t y, int16_t w, int16_t h, uint16_t color); void oledFillRect(int16_t x, int16_t y, int16_t w, int16_t h, uint16_t color); void oledDrawCircle(int16_t x0, int16_t y0, int16_t r,uint16_t color); void oledDrawChar(int16_t x, int16_t y, unsigned char c, uint16_t color); void oledPrintLine(int16_t x, int16_t y, unsigned char *c, uint16_t color); void oledPrintLineP(int16_t x, int16_t y, unsigned char *c, uint16_t color); void oledInvert(void); void oledNormal(void); void oledCopyDisplayBuffer(void); void oledClearDisplayBuffer(uint8_t value); |
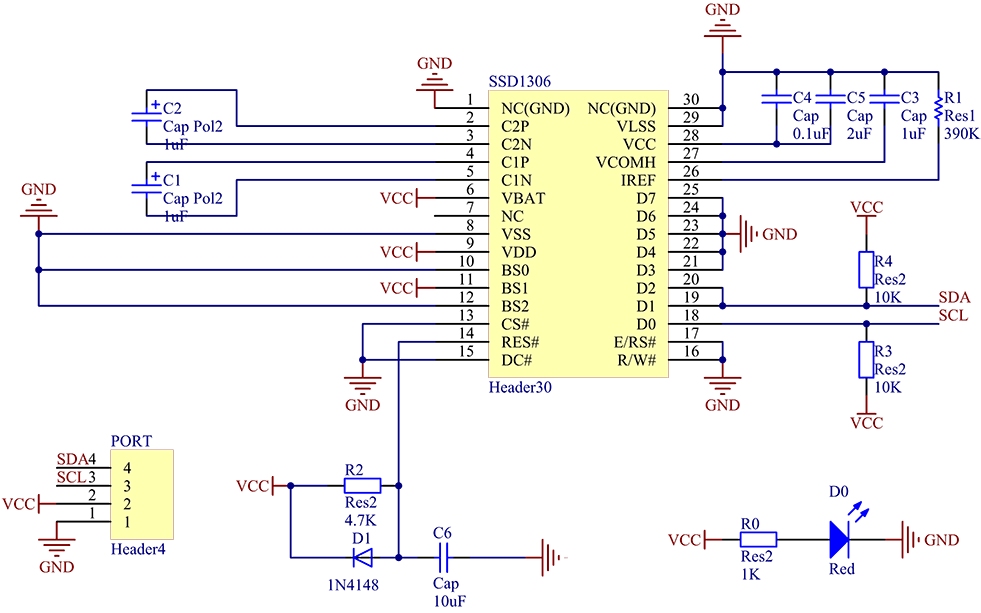
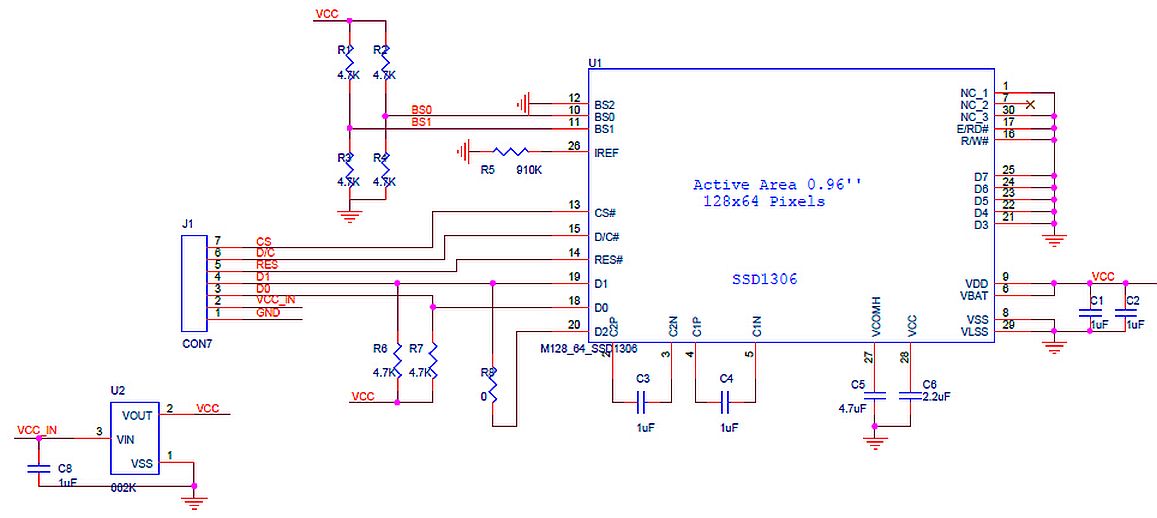
Schema
Afmetingen
Teardown
Datasheet
Fritzing
- OLED_096_128x64_I2C_SSD1306.fzpz 6,54 kb
- OLED Monochrome 128x64 1.3 inch SPI.fzpz 11,70 kb
Downloads
GEEN GEGEVENS


