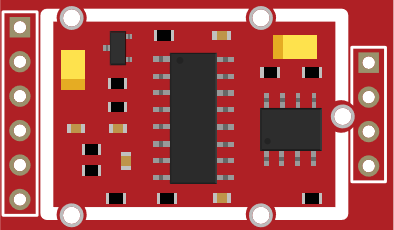
Module – HX711 – Wheatstone brug A/D converter
Hardware
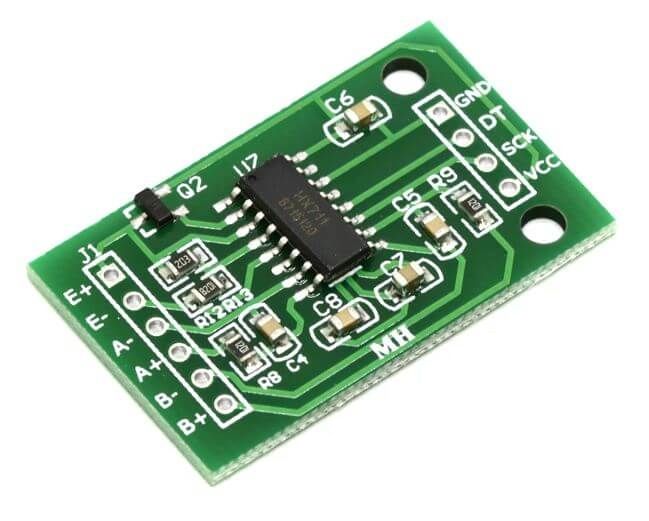
Een kleine module die nodig is om loadcellen correct uit te kunnen lezen.
De HX711 chip versterkt het signaal zodat de variaties van de load cell digitaal verwerkt kunnen worden een microcontroller.
Specificaties:
- Spanningsbereik: 2.7-5V DC
- Nomimaal stroomverbruik: 1.6mA
- Stroomverbruik bij slaapstand: <1uA
- 24-bits nauwkeurigheid
- Mogelijkheid voor twee load cellen
Gewichtcellen
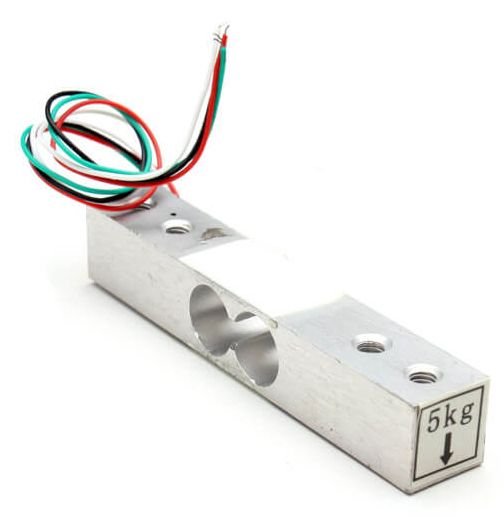
Weegcellen worden in de volksmond ook wel loadcell genoemd. Deze zijn ontworpen om kracht of gewicht te voelen onder een breed scala van ongunstige omstandigheden. Ze zijn niet alleen de meest essentiële deel van een elektronisch weegsysteem, maar ook de meest kwetsbare. Om zo effectief mogelijk de weegcel te krijgen, moet de gebruiker een grondig inzicht in de technologie, constructie en werking van dit unieke apparaat. Bovendien is het noodzakelijk dat de gebruiker de juiste weegcellen voor toepassing selecteert en de nodige zorg voor de loadcell tijdens de levensduur. Weegcellen worden toegepast in bijvoorbeeld weegschalen.
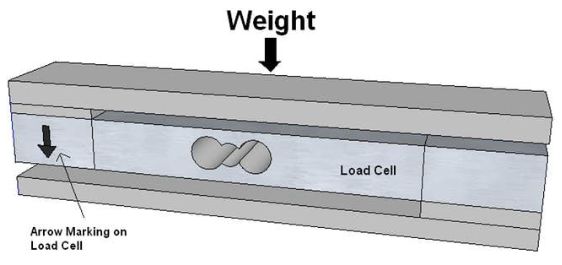
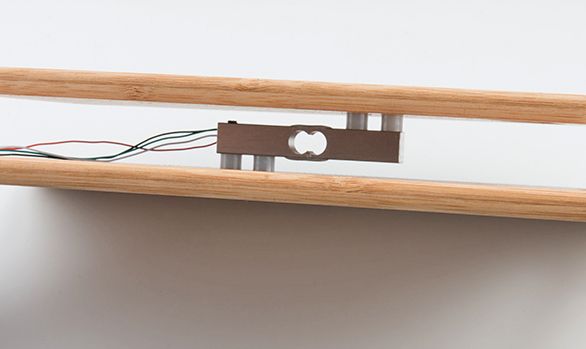
Hoe werken deze weegcellen?
Weegcellen zijn een elektronische sensors (een transducer) die gebruikt wordt om een gewicht om te zetten in een elektrisch signaal. De omzetting is indirect en gebeurt in twee fasen. Door een mechanische constructie wordt een metalen element een klein beetje vervormd (wet van Hooke). Dit element moet iets zwakker zijn dan de constructie waarin het is opgenomen. De vervorming (rek) van het element wordt gemeten met een vervormingssensor, die deze rek in een elektrisch signaal omzet.
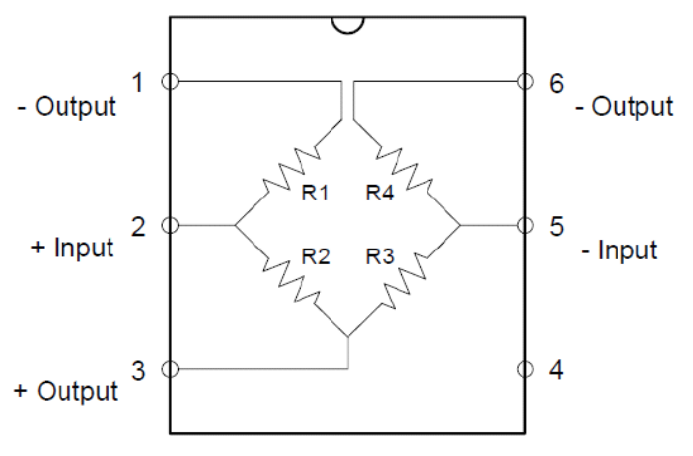
Brug van Wheatstone
De vervormingssensor in een weegcel kan bestaan uit vier rekstrookjes, geplaatst in een brug van Wheatstone. Daarbij zijn twee van de rekstrookjes aan de rekkende zijde geplaatst en de twee andere aan de andere zijde, die gestuikt (samengedukt) wordt. Door aan elke zijde één rekstrookje in de rek- respectievelijk stuikrichting te plaatsen, en het andere loodrecht daarop, kunnen temperatuurinvloeden worden gecompenseerd. Immers de rekstrookjes die loodrecht op de rekrichting staan, worden niet gerekt door de doorbuiging van het element, maar wel door eventuele thermische uitzetting. Deze laatste is isotroop (richtingsonafhankelijk), zodat een hierdoor ontstane rek vanzelf wordt gecompenseerd. Deze opstelling in de brug van Wheatstone levert een optimale gevoeligheid. Daarnaast zijn er ook weegcellen met één of twee rekstrookjes.

Uitgangssignaal
Het uitgangssignaal van de rekstrookjes is in de orde van enkele millivolt en moet versterkt worden door een meetversterker voordat het gebruikt kan worden. Het uitgangssignaal van de meetversterker, doorgaans een gestandariseerd analoog 4-20 mA signaal, of 0-10V dat verder worden verwerkt. Voor een weging kan het, zo nodig via een lineariseringsalgoritme, in een uitleesbare krachtwaarde worden omgezet. In regelsystemen kan het in de regelkring worden toegepast.
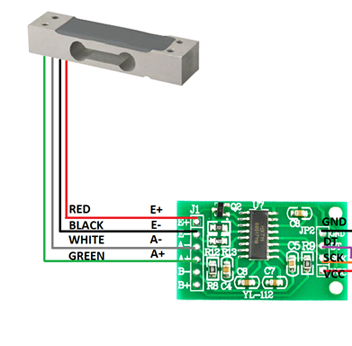
Bedrading
(eng)
These colors correspond to the conventional color coding of load cells, where red, black, green and white wires come from the strain gauge on the load cell and yellow is an optional ground wire that is not hooked up to the strain gauge but is there to ground any small outside EMI (electromagnetic interference). Sometimes instead of a yellow wire there is a larger black wire, foil, or loose wires to shield the signal wires to lessen EMI.

Here we have a large black wire, some loose wires, and foil and loose wires respectively as EMI buffers
| Wheatstone Bridge Node | “Typical” Wire Color |
|---|---|
| Excitation+ (E+) or VCC | RED |
| Excitation- (E-) or GND | BLACK or YELLOW |
| Output+ (O+), Signal+ (S+), or Amplifier+ (A+) | WHITE |
| O-, S-, or A- | GREEN or BLUE |
Some load cells might have slight variations in color coding such as blue instead of green or yellow instead of black or white if there are only four wires (meaning no wire used as an EMI buffer). You might have to infer a little from the colors that you have or check the datasheet on the load cell, but in general you will usually see these colors.
Bron: dexman.nl / learn.sparkfun.com
Druksensor

Deze MPS20N0040D-D druk sensor gebruikt ook een Wheatstone brug om de druk te kunnen bepalen, de pinout:
Pinout

Arduino
Gewichtcellen
Sluit de module aan volgens onderstaand overzicht:

Ander voorbeeld:
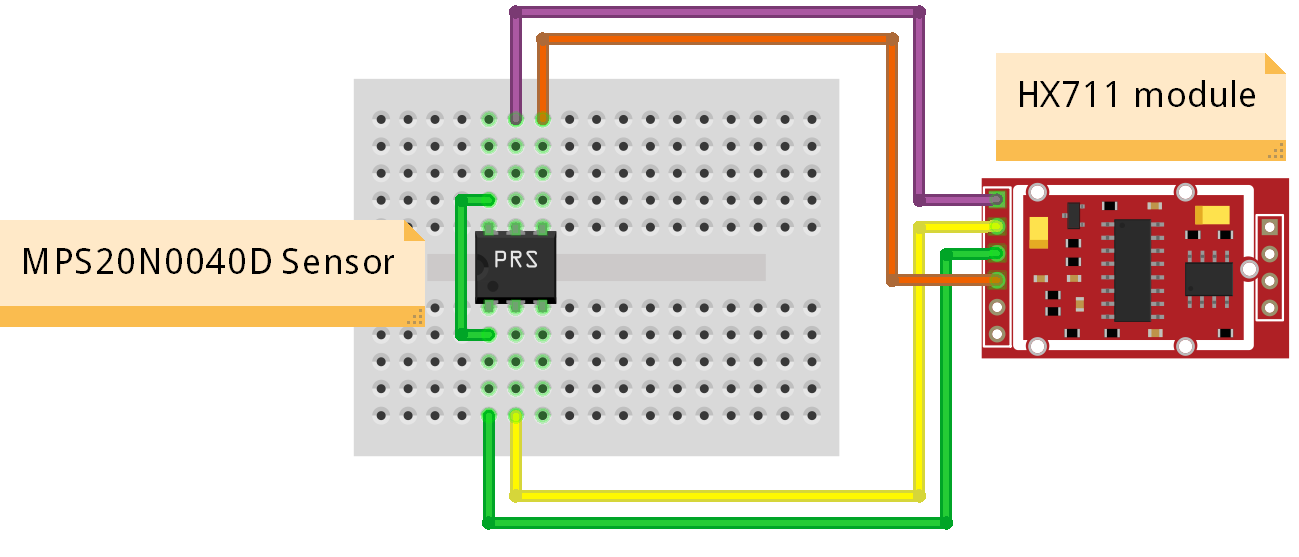
Druksensor
Hier is een voorbeeld van de MPS20N0040D-D sensor aangesloten op een HX711 A/D converter, op internet zijn veel schema’s en pinouts te vinden, maar die blijken na wat testen niet te werken, onze oplossing na wat experimenteren is het schema hieronder.
Opmerkelijk is wel dat PIN 4 wel gebruikt moet worden en PIN 3 niet aangesloten is (vraag is of de pinout dan wel goed is?)

Bron(nen):
forum.hobbycomponents.com #1 / forum.hobbycomponents.com #2
Script #1 – Simpele uitlezing
Script dat alleen het 24-bit getal weergeeft.
|
1 2 3 4 5 6 7 8 9 10 11 12 13 14 15 16 17 18 19 20 21 22 23 24 |
#include "HX711.h" // HX711 circuit wiring const int LOADCELL_DOUT_PIN = 2; const int LOADCELL_SCK_PIN = 3; HX711 scale; void setup() { Serial.begin(57600); scale.begin(LOADCELL_DOUT_PIN, LOADCELL_SCK_PIN); } void loop() { if (scale.is_ready()) { long reading = scale.read(); Serial.print("HX711 reading: "); Serial.println(reading); } else { Serial.println("HX711 not found."); } delay(1000); } |
Het resultaat:
|
1 2 3 4 5 6 7 8 9 10 11 12 13 14 15 16 17 18 |
HX711 reading: -104927 HX711 reading: -94588 HX711 reading: -83424 HX711 reading: -53002 HX711 reading: -45434 HX711 reading: -53900 HX711 reading: 50364 HX711 reading: 89346 HX711 reading: 122230 HX711 reading: 286953 HX711 reading: 368574 HX711 reading: -98061 HX711 reading: -122519 HX711 reading: -122364 HX711 reading: -122178 HX711 reading: -122096 HX711 reading: -121929 HX711 reading: -122100 |
Script #2 – Zonder bibliotheek
|
1 2 3 4 5 6 7 8 9 10 11 12 13 14 15 16 17 18 19 20 21 22 23 24 25 26 27 28 29 30 31 32 33 34 35 36 37 38 39 40 41 42 43 44 45 46 47 48 49 50 51 52 53 54 55 56 57 58 59 60 61 62 63 64 65 66 67 68 69 70 71 72 73 74 75 76 77 78 79 80 81 82 83 84 85 86 87 88 89 90 91 92 93 94 95 96 97 |
/* FILE: HX711_Bridge_Sensor_Digital_Interface_Module DATE: 28/08/14 VERSION: 0.1 AUTHOR: Andrew Davies This is a basic example of how to use the HX711 dual channel bridge sensor interface module (HCMODU0073). By default the sketch will configure the module to take measurements from the channel A input with a gain of 64. These measurements will be repeatedly triggered at its maximum rate and the result output to a serial terminal. PINOUT: Module.....Uno/Nano GND........GND DT.........D9 SCK........D8 VCC........+5V You may copy, alter and reuse this code in any way you like, but please leave reference to HobbyComponents.com in your comments if you redistribute any part of this code. This software may not be used for the purpose of promoting products that directly compete with Hobby Components Ltd's own range of products. THIS SOFTWARE IS PROVIDED "AS IS". HOBBY COMPONENTS MAKES NO WARRANTIES, WHETHER EXPRESS, IMPLIED OR STATUTORY, INCLUDING, BUT NOT LIMITED TO, IMPLIED WARRANTIES OF MERCHANTABILITY AND FITNESS FOR A PARTICULAR PURPOSE, ACCURACY OR LACK OF NEGLIGENCE. HOBBY COMPONENTS SHALL NOT, IN ANY CIRCUMSTANCES, BE LIABLE FOR ANY DAMAGES, INCLUDING, BUT NOT LIMITED TO, SPECIAL, INCIDENTAL OR CONSEQUENTIAL DAMAGES FOR ANY REASON WHATSOEVER. */ /* Define digital pins used for the clock and data signals. */ #define PD_SCK 3 #define DOUT 2 /* Define the various gain and input options */ #define CHAN_A_GAIN_128 1 #define CHAN_B_GAIN_32 2 #define CHAN_A_GAIN_64 3 void setup() { Serial.begin(9600); /* Set the clock pin to and output and the digital pin to an input */ pinMode(PD_SCK, OUTPUT); pinMode(DOUT, INPUT); /* Take the device out of power down mode (clock pin low) */ digitalWrite(PD_SCK, LOW); /* Trigger a conversion so that the module is in the correct mode for the next measurement */ ReadConversion(CHAN_A_GAIN_64); } /* Main program loop */ void loop() { /* Read in the last measurement and output to the serial port */ Serial.println(ReadConversion(CHAN_A_GAIN_64)); } /* Function to read a measurement from the module. The result is returned as a 32 bit signed integer */ long ReadConversion(byte ConversionMode) { byte index; long ConversionData = 0L; /* Read in the 24 bit conversion data */ while(digitalRead(DOUT)); for (index = 0; index < 24; index++) { digitalWrite(PD_SCK, HIGH); ConversionData = (ConversionData << 1) | digitalRead(DOUT); digitalWrite(PD_SCK, LOW); } /* Output some extra clock cycles to set the gain and input options */ for (index = 0; index < ConversionMode; index++) { digitalWrite(PD_SCK, HIGH); digitalWrite(PD_SCK, LOW); } /* Number is returned as a 24bit 2's compliment but we need to convert it to convert to 32 bit singed integer */ if (ConversionData >= 0x800000) ConversionData = ConversionData | 0xFF000000L; return ConversionData ; } |
Script #3 – Volledig voorbeeld inclusief calibratie
|
1 2 3 4 5 6 7 8 9 10 11 12 13 14 15 16 17 18 19 20 21 22 23 24 25 26 27 28 29 30 31 32 33 34 35 36 37 38 39 40 41 42 43 44 45 46 47 48 49 50 51 52 53 54 55 56 57 58 59 60 61 62 63 64 65 66 67 68 69 |
#include "HX711.h" // HX711 circuit wiring const int LOADCELL_DOUT_PIN = 2; const int LOADCELL_SCK_PIN = 3; HX711 scale; void setup() { Serial.begin(9600); Serial.println("HX711 Demo"); Serial.println("Initializing the scale"); // Initialize library with data output pin, clock input pin and gain factor. // Channel selection is made by passing the appropriate gain: // - With a gain factor of 64 or 128, channel A is selected // - With a gain factor of 32, channel B is selected // By omitting the gain factor parameter, the library // default "128" (Channel A) is used here. scale.begin(LOADCELL_DOUT_PIN, LOADCELL_SCK_PIN); Serial.println("Before setting up the scale:"); Serial.print("read: \t\t"); Serial.println(scale.read()); // print a raw reading from the ADC Serial.print("read average: \t\t"); Serial.println(scale.read_average(20)); // print the average of 20 readings from the ADC Serial.print("get value: \t\t"); Serial.println(scale.get_value(5)); // print the average of 5 readings from the ADC minus the tare weight (not set yet) Serial.print("get units: \t\t"); Serial.println(scale.get_units(5), 1); // print the average of 5 readings from the ADC minus tare weight (not set) divided // by the SCALE parameter (not set yet) scale.set_scale(2280.f); // this value is obtained by calibrating the scale with known weights; see the README for details scale.tare(); // reset the scale to 0 Serial.println("After setting up the scale:"); Serial.print("read: \t\t"); Serial.println(scale.read()); // print a raw reading from the ADC Serial.print("read average: \t\t"); Serial.println(scale.read_average(20)); // print the average of 20 readings from the ADC Serial.print("get value: \t\t"); Serial.println(scale.get_value(5)); // print the average of 5 readings from the ADC minus the tare weight, set with tare() Serial.print("get units: \t\t"); Serial.println(scale.get_units(5), 1); // print the average of 5 readings from the ADC minus tare weight, divided // by the SCALE parameter set with set_scale Serial.println("Readings:"); } void loop() { Serial.print("one reading:\t"); Serial.print(scale.get_units(), 1); Serial.print("\t| average:\t"); Serial.println(scale.get_units(10), 1); scale.power_down(); // put the ADC in sleep mode delay(3000); scale.power_up(); } |
Resultaat:
|
1 2 3 4 5 6 7 8 9 10 11 12 13 14 15 16 17 18 19 20 |
HX711 Demo Initializing the scale Before setting up the scale: read: -127134 read average: -128541 get value: -128602.00 get units: -128610.0 After setting up the scale: read: -128561 read average: -128556 get value: 55.00 get units: 0.0 Readings: one reading: 0.0 | average: 0.0 one reading: 98.8 | average: 98.9 one reading: 102.5 | average: 106.4 one reading: 177.7 | average: 175.9 one reading: 185.7 | average: 184.1 one reading: -1.2 | average: -0.9 one reading: -0.7 | average: -0.6 |
Arduino Library
Installatie van Arduino IDE libraries: Arduino info
Informatie (ENG):
An Arduino library to interface the Avia Semiconductor HX711 24-Bit Analog-to-Digital Converter (ADC) for reading load cells / weight scales.
It supports the architectures atmelavr, espressif8266, espressif32, atmelsam, teensy and ststm32 by corresponding PlatformIO targets.
HAL support
- Arduino AVR core
- Arduino core for ESP8266
- Arduino core for ESP32
- Arduino core for SAMD21 (untested)
- Arduino core for SAMD51 (untested)
- Arduino core for STM32
Hardware support
The library has been tested successfully on the following hardware.
- ATmega328: Arduino Uno
- ESP8266: WeMos D1 mini, Adafruit HUZZAH
- ESP32: ESP32 DEVKIT V1, Heltec WiFi Kit 32, Adafruit Feather HUZZAH32
- STM32 F1 (Cortex-M3): STM32F103C8T6 STM32 Blue Pill Board
Thanks, @bogde and @ClemensGruber!
Features
- It provides a
tare()function, which “resets” the scale to 0. Many other implementations calculate the tare weight when the ADC is initialized only. I needed a way to be able to set the tare weight at any time. Use case: Place an empty container on the scale, calltare()to reset the readings to 0, fill the container and get the weight of the content. - It provides a
power_down()function, to put the ADC into a low power mode. According to the datasheet,
When PD_SCK pin changes from low to high and stays at high for longer than 60μs, HX711 enters power down mode.
Use case: Battery-powered scales. Accordingly, there is a
power_up()function to get the chip out of the low power mode. - It has a
set_gain(byte gain)function that allows you to set the gain factor and select the channel. According to the datasheet,
Channel A can be programmed with a gain of 128 or 64, corresponding to a full-scale differential input voltage of ±20mV or ±40mV respectively, when a 5V supply is connected to AVDD analog power supply pin. Channel B has a fixed gain of 32.
The same function is used to select the channel A or channel B, by passing 128 or 64 for channel A, or 32 for channel B as the parameter. The default value is 128, which means “channel A with a gain factor of 128”, so one can simply call
set_gain().This function is also called from the initializer method
begin(). - The
get_value()andget_units()functions can receive an extra parameter “times”, and they will return the average of multiple readings instead of a single reading.
How to calibrate your load cell
- Call
set_scale()with no parameter. - Call
tare()with no parameter. - Place a known weight on the scale and call
get_units(10). - Divide the result in step 3 to your known weight. You should get about the parameter you need to pass to
set_scale(). - Adjust the parameter in step 4 until you get an accurate reading.
- HX711-0.7.1.7z 10,59 kb
Afmetingen
GEEN GEGEVENS
Schema


Teardown
GEEN GEGEVENS
Datasheet
Fritzing
Downloads
GEEN GEGEVENS