Raspberry Pi – RPi en Arduino seriele communicatie
Informatie (ENG):
Today’s the last day of my summer holiday, and I had some free time on my hands. So I decided to see if I could get my Arduino Uno and Raspberry Pi to talk to each other. It turned out the task was even easier than my previous Pi to RS-232 project– all that was needed between the two devices was some jumper wire and two 1 kOhm resistors to form a voltage divider between Arduino TX pin and Pi RX pin – Arduino understands Pi’s 3.3V signal levels just fine so Pi TX to Arduino RX needed no voltage shifting at all.
IMPORTANT UPDATE! It turns out that the RX pin on the Arduino is held at 5V even when that pin is not initialized. I suspect it is due to the fact that the Arduino is programmed via these same pins every time you flash it from Arduino IDE, and there are external (weak) pullups to keep the lines to 5V at other times. So the method described below may be risky – I suggest either add a resistor in series to the RX pin, or use a proper level converter (see this post for details how to accomplish that). And if you do try the method below, never connect the Pi to Arduino RX pin before you have already flashed the program to Arduino, otherwise you may end up with a damaged Pi!!!
Setting Raspberry Pi up for serial communications
In order to use the Pi’s serial port for anything else than as a console, you first need to disable getty (the program that displays login seen) by commenting the serial line out of Pi’s /etc/inittab:
|
1 2 3 4 5 6 7 |
1:2345:respawn:/sbin/getty 115200 tty1 # Line below commented out # 2:23:respawn:/sbin/getty -L ttyAMA0 115200 vt100 3:23:respawn:/sbin/getty 115200 tty3 4:23:respawn:/sbin/getty 115200 tty4 5:23:respawn:/sbin/getty 115200 tty5 6:23:respawn:/sbin/getty 115200 tty6 |
If you don’t want the Pi sending stuff over the serial line when it boots, you can also remove the statementsconsole=ttyAMA0,115200 and kgdboc=ttyAMA0,115200 from/boot/cmdline.txt. You’ll need to reboot the Pi in order for the changes to take effect.
If you have a 3.3V compatible serial adapter in your computer (or a MAX3232 and normal RS-232 adapter, in which case see mytutorial on building one), it’s a good time to try out if everything is working on the Pi side. Install minicom (sudo apt-get install minicom) and attach is to serial terminal:
minicom -b 9600 -o -D /dev/ttyAMA0
Then open Putty or similar serial terminal on PC side. Everything you type into minicom should appear in the serial terminal on PC side, and characters typed to serial terminal should appear on minicom.
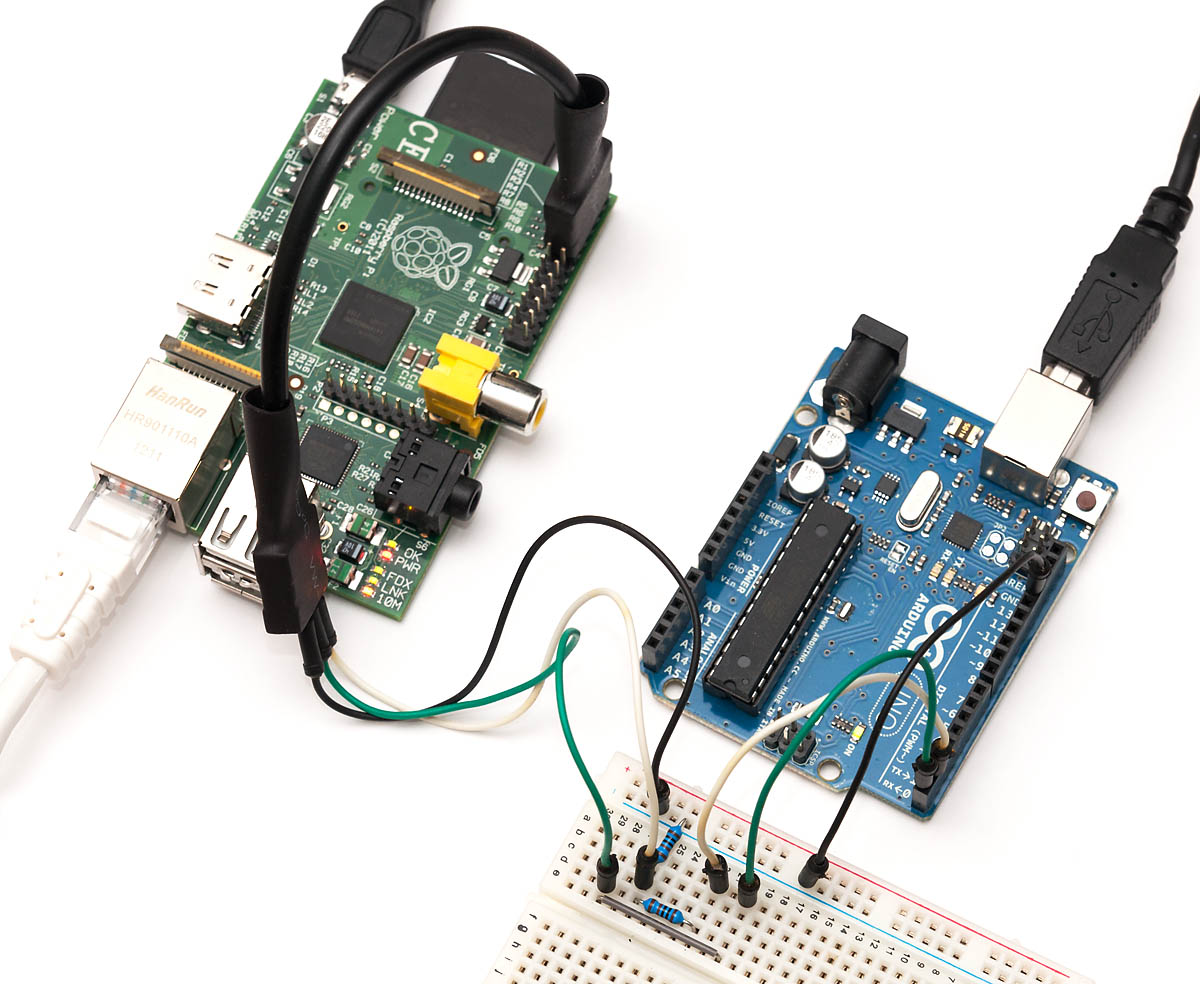
Connecting Arduino Uno to Raspberry Pi
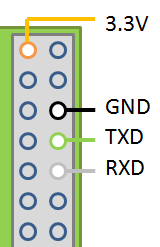
There’s basically two ways to link the Arduino to the Pi. Easier route would be to just plug Arduino into the Pi via USB. The USB to serial bridge should be automatically recognized and be available at /dev/ttyACM0. But if you want to do it the hard way like I did, you can also connect the Pi GPIO pins (seen on the right, 3.3V not needed this time) to Arduino:
- Connect grounds of both devices (triple check first that they are the grounds!)
- Connect Pi TX to Arduino RX (series resistor recommended, only connect after flashing, never flash with Pi connected!)
- Connect Arduino TX to Pi RX via a voltage devider
As a voltage divider, I used a 1 kOhm resistor between the Arduino TX and Pi RX, and another 1 kOhm between Pi RX and ground. That way, the 5V Arduino signal voltage is effectively halved. Connect the resistor ladder first, and then the Pi RX between the two resistors, so there’s at no point a voltage over 3.3 volts that could damage the Pi! You can see the connection in action here.
Communication between Pi and Uno
For RaspPi side, I’d recommend minicom (see the command-line above) for testing, and pySerial (sudo apt-get install python-serial) for interaction. Using Python, you can easily make the Pi do lots of interesting things when commands are received from Arduino side. Here’s a simple ROT-13 application that works with the GPIO serial interface:
|
1 2 3 4 5 6 7 8 9 10 11 12 13 14 15 16 17 18 19 20 21 |
#!/usr/bin/env python import serial import string rot13 = string.maketrans( "ABCDEFGHIJKLMabcdefghijklmNOPQRSTUVWXYZnopqrstuvwxyz", "NOPQRSTUVWXYZnopqrstuvwxyzABCDEFGHIJKLMabcdefghijklm") test=serial.Serial("/dev/ttyAMA0",9600) test.open() try: while True: line = test.readline(eol='\r') test.write(string.translate(line, rot13)) except KeyboardInterrupt: pass # do cleanup here test.close() |
For the Arduino, you can you the serial capabilities of Arduino environment. Here’s a simple program that echoes back everything that is sent from Pi to Arduino:
|
1 2 3 4 5 6 7 8 9 10 11 12 13 14 15 |
void setup() { Serial.begin(9600); } void loop() { int incomingByte; if(Serial.available() > 0) { // read the incoming byte: incomingByte = Serial.read(); // echo Serial.write(incomingByte); } } |
Note that you shouldn’t use these programs together, or nothing happens (and you won’t see anything either) – Pi side programs can be tested with a PC serial adapter and Putty, and Arduino side programs with minicom running in the Pi.
That’s it for this time. Now that I have the two things communicating, I think I’ll do something useful with the link next. Maybe a simple Arduino “HDMI shield” using RaspPi!