T-962 reflow oven 01 – Information
![]()
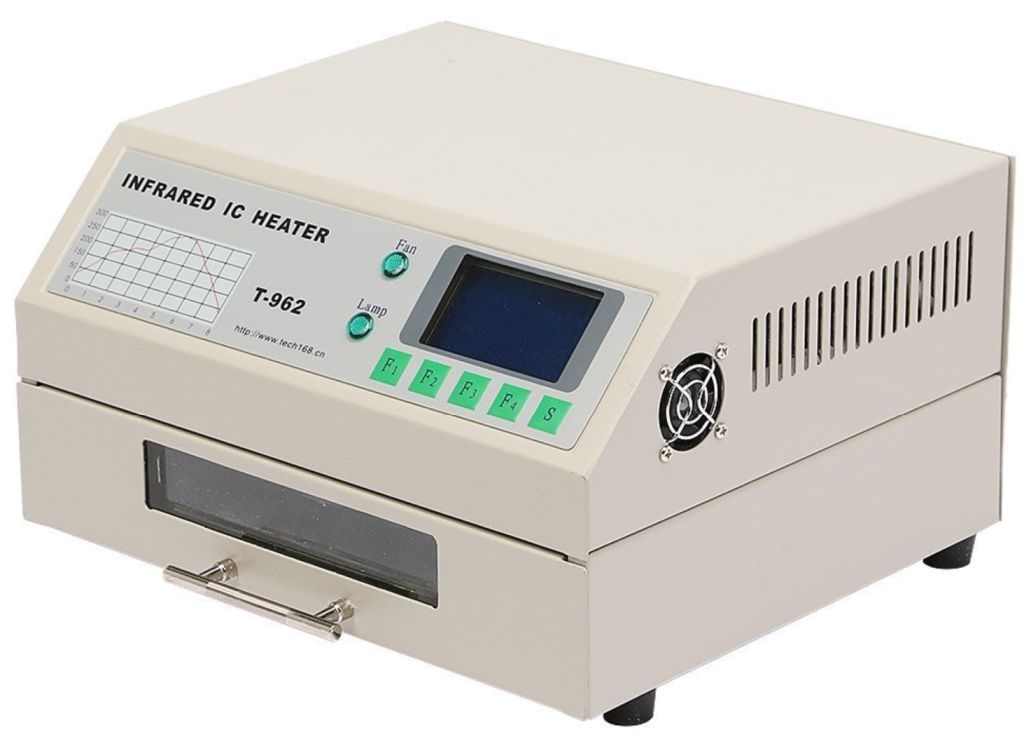
1) The T962 is a self-contained Micro-Processor controlled IC Heater and solder rework station .
2) Uses up to 800 watts of energy efficient infrared heating and air circulation to reflow solder in a large 180mm*235mm area.
3) Parameters of Eight(8) Soldering cycles are Pre-defined.
4) A single windowed drawer holds assemblies within the heating chamber.
5) Soldering cycles are keypad selected and progress displayed on the T962. LCD
6) The T962 design is ergononic ,prctical and easily operated .
7) The entire soldering process is completes automatically from preheat ,soak and reflow through cool-down.
8) The T962 is an ecnomical rework solution from single runs to on-demand small batch production.
9) Light weight and a small fooprint allows the T962 to be easily bench positioned transported or stored !
Technical parameters:
– Soldering max area: 180×235 mm
– Size: 31×29×17cm
– Packing size:36×23×36 cm
– Rated power :800W
– Process Period:1~8 min
– Supply: AC220V/52HZ
– Net weight: 6.2kg
– Gross weight:7.5kg
Installation of the machine
Place this machine on an even surface with good ventilation and no combustible items nearby. Make sure to leave adequate space in front of the machine for opening for opening the drawer. Leave at least 20 mm on either side because the machine will emit heat when in use. Check that the power supply is 220V or 110V; connect the machine with power supply and press the POWEW ON button and the LCD will light up.
- Press “s” button to go to the main menu page.
- Press “F4” to Select English Menu
- In the main menu, press the “F3” button to select different temperature waves. This example shows wave one:
- Press “F3” button again to see the parameters for the chosen wave, for example soldering paste sort, soldering temperature, time etc.
- Press the “F4” button to return previous page. Press the temperature wave that the”F1” key carries out to make selection automatically, the process will shut down automatically upon completion and a warning buzzer will sound.
- In the main menu page, press “F2” button for manual operation
Press “F1” button to start cooling, Press F1/S key again to stop. Press “F2” button to start heat up, Press F2/S key again to stop.
Wave Cycle Select
- Press the “S” button selection operation interface after switching on, press the “F4” button to select the desired language
- Following we provide eight different waves, please choose one according to your request. Press the F1/F2 to choose different wave, press F3 to look into different wave parameter, press 4 to confirm the wave you chose.
Wave one, use the same with 85Sn/15Pb 70 Sn/30Pb
Wave two, use the same with 63Sn/37Pb 60 Sn/40Pb
Wave three, use the same with Sn/Ag3.5; Sn/Cu 75 Sn/Ag4.0/Cu.5
Wave four, use the same with Sn/Ag2.5/Cu.8/Sb.5; Sn/Bi3.0/Ag3.0
Wave five, use the same with The red gum standard is solid to turn temperature wave,Heraeus PD955M.
Wave six & seven & egiht, use the same with The PCB circuit board returns to fix etc.
Wave seven & egiht, use the same with the wave cycle set-up by yourself.
Press “s” button to the temperature page,
Press “F1/F2” button, forward and backward to select different time. Press F3/F4 button up and down to select different temperature, Press “s” button to save.
Once saved, press the “F4” button to select the temperature wave. Press “S” button for repetition.
Operating instructions
- Place the product to be worked on in the drawer, close the drawer and press F1 to switch on. The automatic performance makes a selection of heat wave, shows the current performance time, the enactment temperature and measure temperature on the LCD screen, and the automatic formation order form wave.
- The whole process is in your supervision and control, you can see the product through the drawer window and you can see the data on the LCD screen. If the wave doesn’t achieve your desired result, please modify the data by yourself at any time.
- The pre-set up wave cycle is according to the temperature that the different solder paste needs. You can pre-set up other wave cycle according to your needs.
- In the process, you can press “S” to force to stop; when finished, the exhaust fan will work automatically to cool;
you also can force to turn on the exhaust fan. - Should there be any faults or blemishes after completion of the soldering, you can sold it automatically again, or you can sold it manually.
Operation suggestions
- To satisfy the need of soldering both sides of the PCB, there is a particular designed fan duct in the machine. When the both sides of the PCB are of large difference in temperature, it can sold the patch in one side, and in the same time, it can keep another side of the PCB as well. To satisfy the soldering of a small board, please pre-put a PCB board in the size of 10cm x10cm, when soldering a small board and the solder-ball. It will make the soldering effect very well.
- When using the machine, please pre-heat it if the environment is of low temperature or high humidity. The method:
after choosing the wave cycle, run the machine with nothing in the drawer at the first time. - Attention: This machine can’t be used to solder components (like chips with metal encapsulation of strong reflective material) and the “plastic plug in board” which can’t be heated up to temperatures of 250 degrees centigrade.
- To measure the temperatures of the machine just use a standard thermometer. Fix the probe on the face of the PCB board (make sure it is the facing the right way), then put the PCB board into the drawer, close the drawer. This way you will get the actual temperature.
source: teeltech.com
Unpack
The oven comes well packed and there are certificates and documents inside the box.

Manual
There is a English manual available: T-962 User Manual