T-962 reflow oven 30 – Firmware flash
Firmware replacement
The standard T-962 firmware is very simple and there are a few flaws in it (temperature overshoot, no coldjuntion compensation, no pwm controlled fan, etc). There is a opensource firmware build on github:
https://github.com/UnifiedEngineering/T-962-improvements
Github page
T-962 reflow oven improvements
Custom firmware for the cheap T-962 reflow oven utilizing the existing controller hardware.
- Wiki for more info
- Hackaday post
- We have Travis-CI in place to build pull requests
Introduction
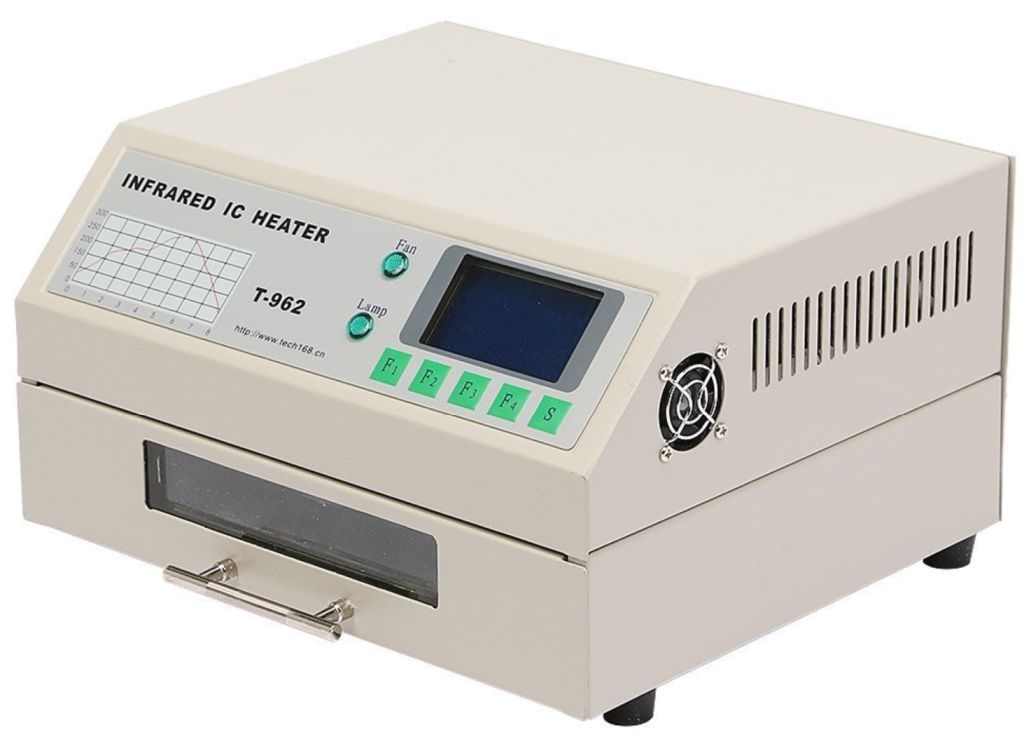
As we had use for a small reflow oven for a small prototype run we settled for the T-962 even after having seen the negative reviews of it as there were plenty of suggestions all across the Internet on how it could be improved including replacing the existing controller and display(!). After having had a closer look at the hardware (replacing the masking tape inside with Kapton tape first) it was obvious that there was a simple way to improve the software disaster that is the T-962.
Hardware improvements
Here are a few improvements made to the cheap T-962 reflow oven utilizing the existing controller hardware with only a small, cheap, but very necessary modification. As you have to open the top part of the oven anyway to reflash the software this is a no-brainer fix:
Cold junction compensation
The existing controller makes the assumption that the cold-junction is at 20 degrees Celsius at all times which made keeping a constant temperature “a bit” challenging as the terminal block sits on_top_of_an_oven with two TRIACs nearby. We can fix this by adding a temperature sensor to the connector block where the thermocouples are connected to the controller board. It turns out that both an analog input and at least one generic GPIO pin is available on unpopulated pads on the board. GPIO0.7 in particular was very convenient for 1-wire operation as there was an adjacent pad with 3.3V so a 4k7 pull-up resistor could be placed there, then a jumper wire is run from GPIO0.7 pad to the Dq pin of a cheap DS18B20 1-wire temperature sensor that gets epoxied to the terminal block, soldering both Vcc and ground pins to the ground plane conveniently located right next to it. Some hot-glue may have to be removed to actually get to the side of the connector and the ground plane, someone seems to have been really trigger-happy with the glue gun!
Wiki: cold junction compensation mod
System fan PWM control
The system fan is very noisy an can be turned of most of the time. The custom firmware uses spare ADO test point to control it.
New firmware
The firmware was originally built with LPCXpresso 7.5.0 as I’ve never dealt with the LPC2000-series NXP microcontrollers before so I just wanted something that wouldn’t require TOO much of work to actually produce a flashable image. Philips LPC2000 Flash Utility v2.2.3 was used to flash the controller through the ISP header present on the board.
LPCXpresso requires activation but is free for everything but large code sizes (the limit is larger than the 128kB flash size on this controller anyway so it’s not really an issue). The flash utility unfortunately only runs on Windows but Flash Magic is an alternative (see Wiki for more flashing instructions).
With help from the community the project now also builds standalone using the standard gcc-arm-none-eabi toolchain, see COMPILING.md for more information.
The MCU in this particular oven is an LPC2134/01 with 128kB flash/16kB RAM, stated to be capable of running at up to 60MHz. Unfortunately the PLL in this chip is not that clever so with the supplied XTAL at 11.0592MHz we can only reach 55.296MHz (5x multiplier). Other variants exist, the Wiki has more information about this.
wiki: Flashing firmware
|
1 2 3 4 5 6 7 8 9 10 11 12 13 14 15 16 17 18 19 20 21 22 23 24 25 26 27 28 29 30 31 32 33 34 35 36 37 38 39 40 41 42 43 44 45 46 47 48 |
v0.5.2 PRs included in this release: #61 (float support for serial) #63 (float support for serial) #65 (TC2/3 used if TC0/1 absent) #67 (build fix for asm) #94 (DS18S20 support) (with an additional fix for a stray parenthesis) #112 (TC_EXTRA1 typo bugfix) Travis-CI builds have been unbroken and #70 (schematics) has also been pulled in Note that the resulting binary is again slightly exceeding 64kB so it's not possible to load this into an LPC21x2 chip (64kB flash). The factory firmware image is slightly larger than 32kB and would fit in a 64kB part, but so far all ovens seems to utilize a LPC21x4 chip (128kB flash) v0.5.1 Fix setup menu calibration that broke in v0.5.0 v0.5.0 Initial serial command support release This release adds support for controlling the oven from a computer attached to the serial port (same one that's used for flashing). Also the computer software can directly generate graphs of the completed profile. See the Python code (https://github.com/UnifiedEngineering/T-962-improvements/blob/master/serial-control.py) for for details. Note that this is still work in progress and not finalized. v0.4.1 This release includes support to allow a DS1822 temperature sensor to be used as cold junction compensation sensor if a DS18B20 cannot be sourced. v0.4.0 Baudrate now defaults to 115200 To make such a slow baudrate possible without affecting timing the UART is now interrupt driven. Lots of other cleanup, including cleaner log output making it suitable for direct import into a spreadsheet for higher resolution plotting of the reflow profile performance: v0.3.1 Add simple temperature-controlled system fan support This needs a hardware modification to actually control the fan speed (see systemfan.c for details for now) v0.3.0 Add support for max31855 thru sc18is602b bridge Also add the ability to enter ISP/Bootloader mode by holding F1 on power-up v0.2.1 Better PID tuning v0.2.0 Basic settings UI is now added where the following can be configured: - Minimum fan speed - Reflow cycle completion beep length - Left and right thermocouple gain and offset adjust v0.1.1 Clean up EEPROM data dump a bit |
Flashing the firmware
Hardware needed
- FTDI Serial to USB adapter
- Jumper wires female/female
Ps. FTDI is preferred, because you need acces to DTR and RTS
Software needed
Connecting the USB stick
ISP location:
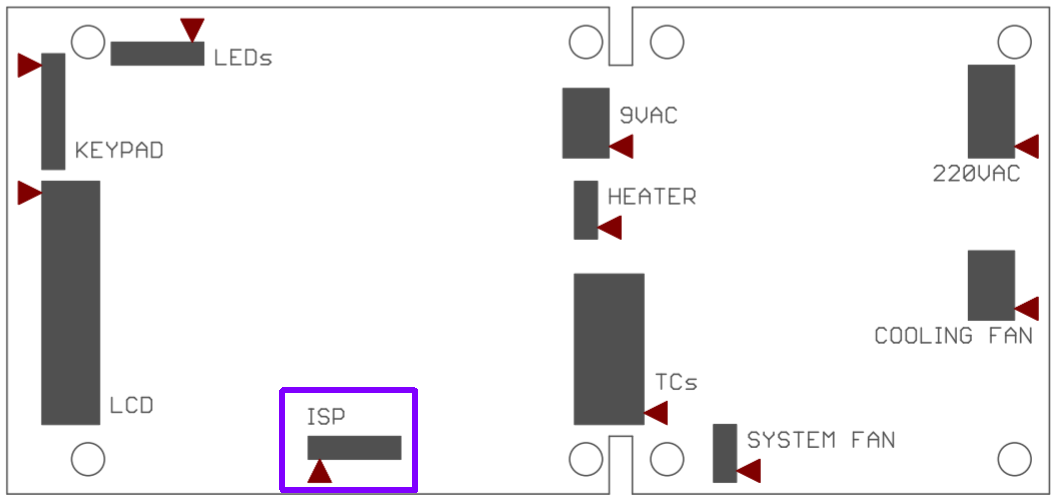
ISP pinout:
|
1 2 3 4 5 6 7 |
| | | | | 12345 | +-------------------+ 1 | 2 | 3 | 4 | 5 P0.14 | RST | TXD | RXD | GND |
Note: please make sure you have the 3.3V selected on the USB stick (via a jumper), 5V may harm the device!
To read/write to the unit, please power the unit ON
Firmware backup
First of all, make a backup of your existing firmware, so you can always revert to it if something went wrong.
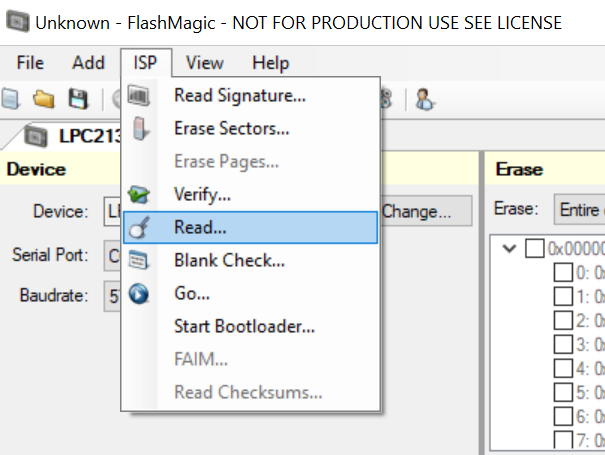
Backup NXP firmware with flashmagic in top menu select ISP > Read…
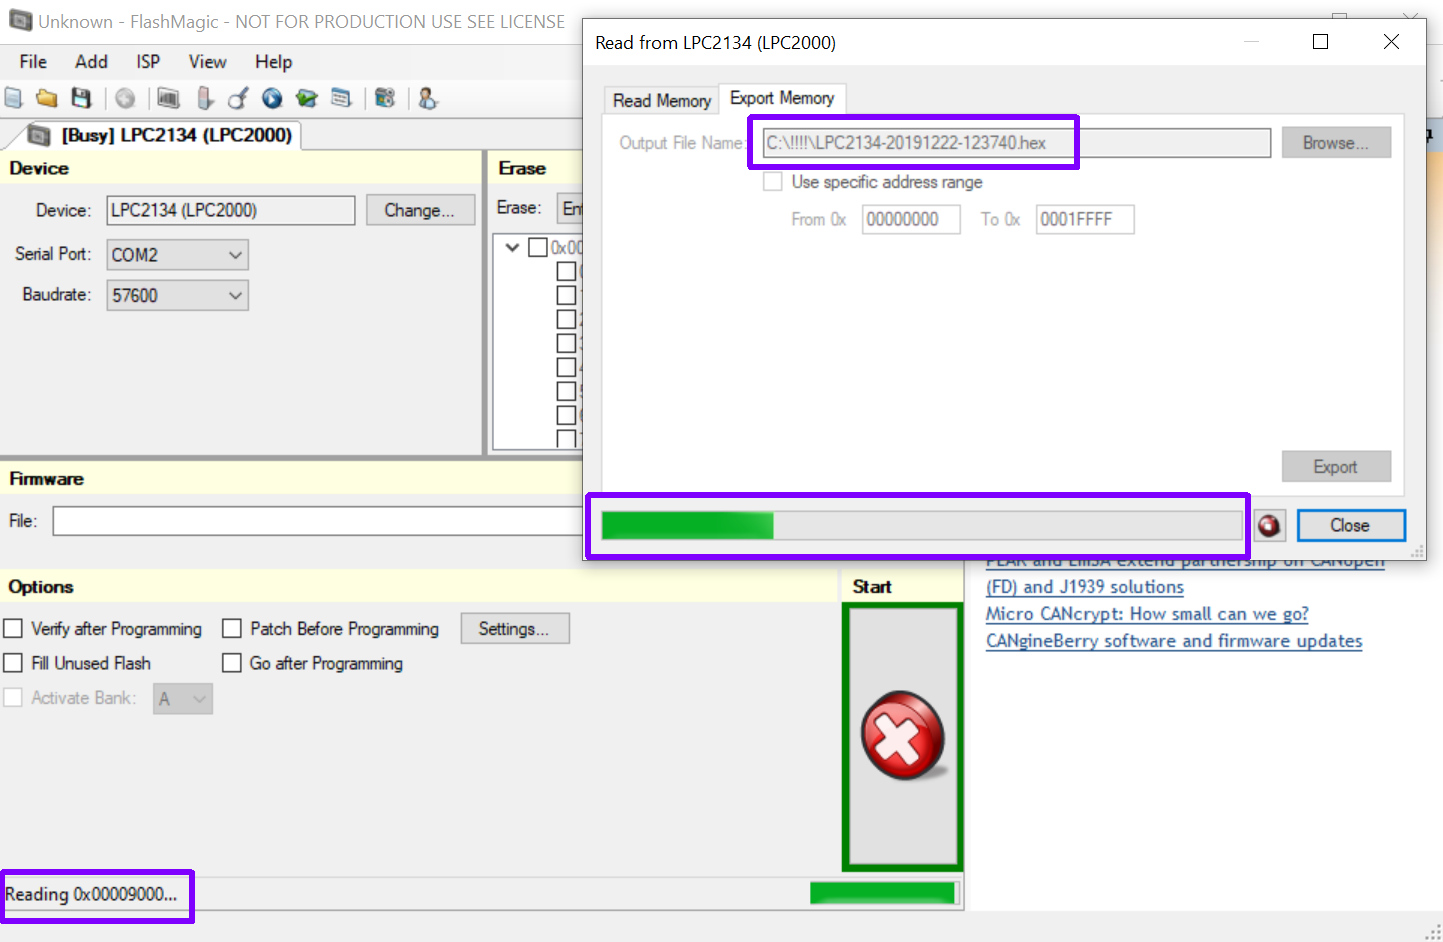
In the next screen go to TAB “Export Memory” and fill in the filename:
Upload firmware
You can use flashmagic to upload the firmware:

or the Philips LPC2000 flash utlity:

Downloads:
- T-962-improvements-0.5.2.hex.7z 49,96 kb
- T-962-improvements-0.5.2.7z 196,31 kb
- T-962-improvements-0.5.1.hex.7z 39,67 kb
- T-962-improvements-0.5.1.7z 60,43 kb
- T-962-improvements-0.5.0.hex.7z 39,64 kb
- T-962-improvements-0.5.0.7z 60,41 kb
- T-962-improvements-0.4.1.hex.7z 34,93 kb
- T-962-improvements-0.4.1.7z 57,06 kb
- T-962-improvements-0.4.0.hex.7z 34,95 kb
- T-962-improvements-0.4.0.7z 56,74 kb
- T-962-improvements-0.3.1.hex.7z 34,02 kb
- T-962-improvements-0.3.1.7z 53,34 kb
- T-962-improvements-0.3.0.hex.7z 33,63 kb
- T-962-improvements-0.3.0.7z 52,58 kb
- T-962-improvements-0.2.1.hex.7z 32,82 kb
- T-962-improvements-0.2.1.7z 51,03 kb
- T-962-improvements-0.2.0.hex.7z 32,90 kb
- T-962-improvements-0.2.0.7z 50,82 kb
- T-962-improvements-0.1.1.hex.7z 31,76 kb
- T-962-improvements-0.1.1.7z 49,87 kb
- T-962-improvements-0.1.0.7z 49,75 kb
- Puhui T-962A - Firmware original ID0x0002FF12_BLv2_13.hex.7z 16,90 kb
- Puhui T-962 - Firmware original NXP LPC2134.hex.7z 24,26 kb