Sensor – BMP180 – Temperatuur en Barometrische druk sensor
Hardware
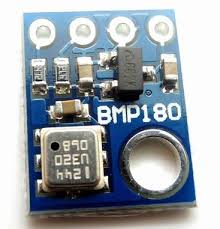
BMP180 Barometrische druksensor GY-68. Het meten van de absolute druk van de omgeving met een digitale barometer als deze heeft een aantal interessante toepassingen. Door het omzetten van de gemeten druk in de hoogte, heb je een betrouwbare sensor voor het bepalen van de hoogte van uw robot, vliegtuig of projectiel!
De BMP180 komt volledig gekalibreerd en klaar voor gebruik. Het werkt via I2C er zijn optionele I2C pull ups die kunnen worden geactiveerd met behulp van de jumper op het bord. Met I2C worden druk en temperatuur in 16bit waarden gebruikt.
Pinout
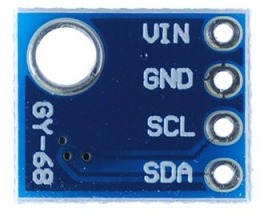
| Pin: | Functie: |
|---|---|
| 01 | +5V |
| 02 | GND |
| 03 | SCL Serial Clock (line) |
| 04 | SCA Serial Clock (data) |
Arduino
Wat heb je nodig?
1) Adafruit Sensor Driver bibliotheek
2) Adafruit BMP085/180 bibliotheek
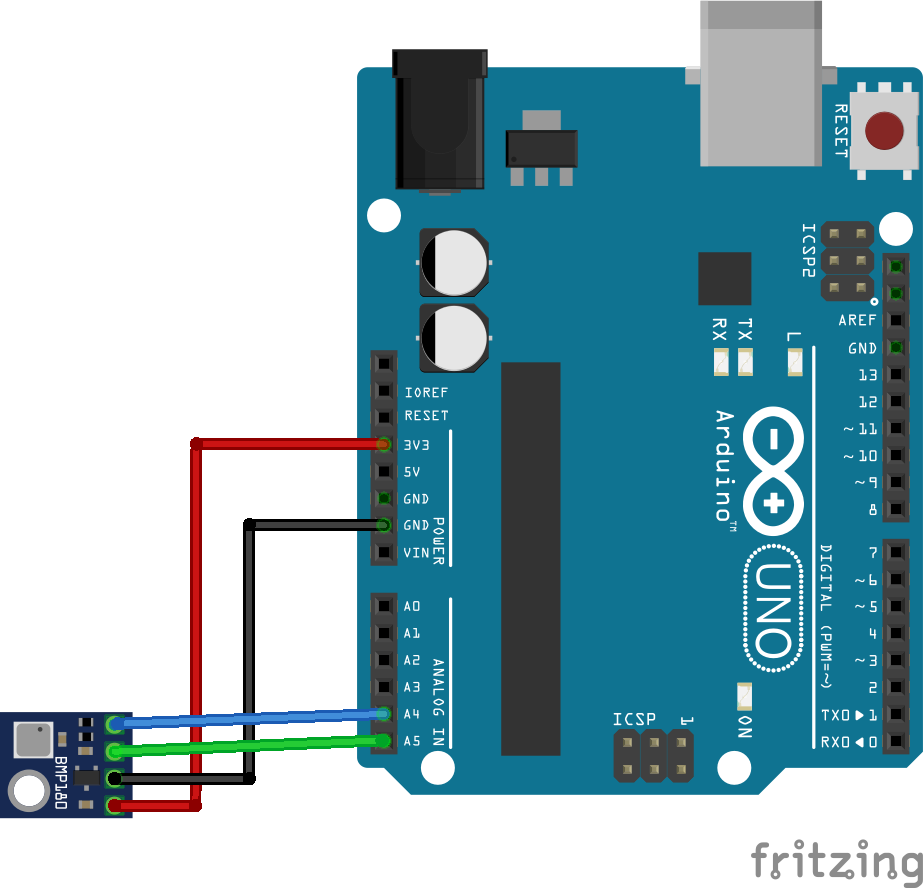
Sluit de module aan volgens onderstaand overzicht:
| Arduino Pin: | BMP180 Pin: |
|---|---|
| +5v | 01 (+5V) |
| GND | 02 (GND) |
| A5 | 03 (SCL / Serial Clock line) |
| A4 | 04 (SCA /Serial Clock data) |
Script met adafruit BMP180 bibliotheek
|
1 2 3 4 5 6 7 8 9 10 11 12 13 14 15 16 17 18 19 20 21 22 23 24 25 26 27 28 29 30 31 32 33 34 35 36 37 38 39 40 41 42 43 44 45 46 47 48 49 50 51 52 53 54 55 56 57 58 59 60 61 62 63 64 65 66 67 68 69 70 71 72 73 74 75 76 77 78 79 80 81 82 83 84 85 86 87 88 89 90 91 92 93 94 95 96 97 98 99 100 101 102 103 104 105 106 107 108 109 110 111 112 113 114 115 116 117 118 119 120 121 122 123 124 125 126 127 128 129 130 131 132 |
#include <Wire.h> #include <Adafruit_Sensor.h> #include <Adafruit_BMP085_U.h> /* This driver uses the Adafruit unified sensor library (Adafruit_Sensor), which provides a common 'type' for sensor data and some helper functions. To use this driver you will also need to download the Adafruit_Sensor library and include it in your libraries folder. You should also assign a unique ID to this sensor for use with the Adafruit Sensor API so that you can identify this particular sensor in any data logs, etc. To assign a unique ID, simply provide an appropriate value in the constructor below (12345 is used by default in this example). Connections =========== Connect SCL to analog 5 Connect SDA to analog 4 Connect VDD to 3.3V DC Connect GROUND to common ground History ======= 2013/JUN/17 - Updated altitude calculations (KTOWN) 2013/FEB/13 - First version (KTOWN) */ Adafruit_BMP085_Unified bmp = Adafruit_BMP085_Unified(10085); /**************************************************************************/ /* Displays some basic information on this sensor from the unified sensor API sensor_t type (see Adafruit_Sensor for more information) */ /**************************************************************************/ void displaySensorDetails(void) { sensor_t sensor; bmp.getSensor(&sensor); Serial.println("------------------------------------"); Serial.print ("Sensor: "); Serial.println(sensor.name); Serial.print ("Driver Ver: "); Serial.println(sensor.version); Serial.print ("Unique ID: "); Serial.println(sensor.sensor_id); Serial.print ("Max Value: "); Serial.print(sensor.max_value); Serial.println(" hPa"); Serial.print ("Min Value: "); Serial.print(sensor.min_value); Serial.println(" hPa"); Serial.print ("Resolution: "); Serial.print(sensor.resolution); Serial.println(" hPa"); Serial.println("------------------------------------"); Serial.println(""); delay(500); } /**************************************************************************/ /* Arduino setup function (automatically called at startup) */ /**************************************************************************/ void setup(void) { Serial.begin(9600); Serial.println("Pressure Sensor Test"); Serial.println(""); /* Initialise the sensor */ if(!bmp.begin()) { /* There was a problem detecting the BMP085 ... check your connections */ Serial.print("Ooops, no BMP085 detected ... Check your wiring or I2C ADDR!"); while(1); } /* Display some basic information on this sensor */ displaySensorDetails(); } /**************************************************************************/ /* Arduino loop function, called once 'setup' is complete (your own code should go here) */ /**************************************************************************/ void loop(void) { /* Get a new sensor event */ sensors_event_t event; bmp.getEvent(&event); /* Display the results (barometric pressure is measure in hPa) */ if (event.pressure) { /* Display atmospheric pressue in hPa */ Serial.print("Pressure: "); Serial.print(event.pressure); Serial.println(" hPa"); /* Calculating altitude with reasonable accuracy requires pressure * * sea level pressure for your position at the moment the data is * * converted, as well as the ambient temperature in degress * * celcius. If you don't have these values, a 'generic' value of * * 1013.25 hPa can be used (defined as SENSORS_PRESSURE_SEALEVELHPA * * in sensors.h), but this isn't ideal and will give variable * * results from one day to the next. * * * * You can usually find the current SLP value by looking at weather * * websites or from environmental information centers near any major * * airport. * * * * For example, for Paris, France you can check the current mean * * pressure and sea level at: http://bit.ly/16Au8ol */ /* First we get the current temperature from the BMP085 */ float temperature; bmp.getTemperature(&temperature); Serial.print("Temperature: "); Serial.print(temperature); Serial.println(" C"); /* Then convert the atmospheric pressure, and SLP to altitude */ /* Update this next line with the current SLP for better results */ float seaLevelPressure = SENSORS_PRESSURE_SEALEVELHPA; Serial.print("Altitude: "); Serial.print(bmp.pressureToAltitude(seaLevelPressure, event.pressure)); Serial.println(" m"); Serial.println(""); } else { Serial.println("Sensor error"); } delay(1000); } |
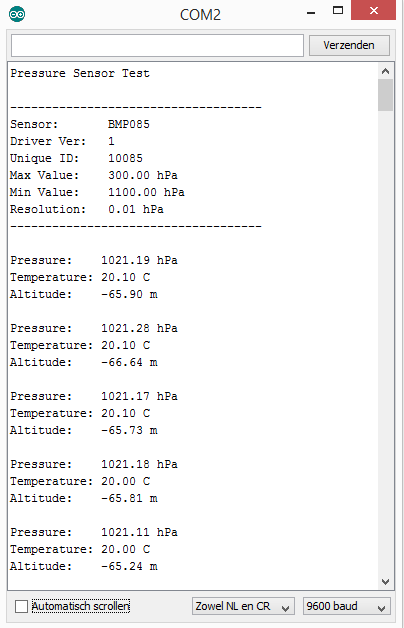
Het resultaat
Arduino Library
Installatie van Arduino IDE libraries: Arduino info
Wat heb je nodig?
1) Adafruit Sensor library
Sparkfun BMP180 Breakout Arduino Library
This archive contains an Arduino library and example sketch showing how to use this sensor. The library must be installed onto your computer in order for the example code to work correctly.
|
1 2 3 4 |
V_1.1.2 - Small patch on integers, cleaning up library files. V_1.1.1 - Updated library.properties file V_1.1.0 - Updated to new library structure V_1.0.0 - Untracked version |
ESP8266
![]()
![]()
Wat heb je nodig?
1) Firmware flashen met ArduinoIDE
2) BMP085/810 arduino bibliotheek (gebruik de Sparkfun bibliotheek)
Standaard worden de SDA en SCL connecties gebruikt op de arduino bij deze module bibliotheek:
|
1 2 3 4 5 6 |
Board I2C / TWI pins Uno, Ethernet A4 (SDA), A5 (SCL) Mega2560 20 (SDA), 21 (SCL) Leonardo 2 (SDA), 3 (SCL) Due 20 (SDA), 21 (SCL), SDA1, SCL1 |
Deze regels staan hard ingesteld in het bestand [ArduinoIDE]\[portable]\packages\esp8266\hardware\esp8266\2.0.0\libraries\Wire\Wire.cpp
|
1 2 |
static int default_sda_pin = SDA; static int default_scl_pin = SCL; |
Maar de op de ESP-01 is het GPIO 0 en GPIO 2, na deze regel “include <wire>“, kun je deze waarden opnieuw een waarde geven, voor de ESP-01 is dat:
|
1 2 |
static int default_sda_pin = 0; static int default_scl_pin = 2; |
Een voorbeeld code voor een BMP180 module via I2C:
|
1 2 3 4 5 6 7 8 9 10 11 12 13 14 15 16 17 18 19 20 21 22 23 24 25 26 27 28 29 30 31 32 33 34 35 36 37 38 39 40 41 42 43 44 45 46 47 48 49 50 51 52 53 54 55 56 57 58 59 60 61 62 63 64 65 66 67 68 69 70 71 72 73 74 75 76 77 78 79 80 81 82 83 84 85 86 87 88 89 90 91 92 93 94 95 96 97 98 99 100 101 102 103 104 105 106 107 108 109 110 111 112 113 114 115 116 117 118 119 120 121 122 123 124 125 126 127 128 129 130 131 132 133 134 135 136 137 138 139 140 141 142 143 144 145 |
// SFE_BMP180 library example sketch // Your sketch must #include this library, and the Wire library. // (Wire is a standard library included with Arduino.): #include <SFE_BMP180.h> #include <Wire.h> static int default_sda_pin = 0; static int default_scl_pin = 2; // You will need to create an SFE_BMP180 object, here called "pressure": SFE_BMP180 pressure; #define ALTITUDE 1655.0 // Altitude of SparkFun's HQ in Boulder, CO. in meters void setup() { Serial.begin(9600); Serial.println("REBOOT"); // Initialize the sensor (it is important to get calibration values stored on the device). if (pressure.begin()) Serial.println("BMP180 init success"); else { // Oops, something went wrong, this is usually a connection problem, // see the comments at the top of this sketch for the proper connections. Serial.println("BMP180 init fail\n\n"); while(1); // Pause forever. } } void loop() { char status; double T,P,p0,a; // Loop here getting pressure readings every 10 seconds. // If you want sea-level-compensated pressure, as used in weather reports, // you will need to know the altitude at which your measurements are taken. // We're using a constant called ALTITUDE in this sketch: Serial.println(); Serial.print("provided altitude: "); Serial.print(ALTITUDE,0); Serial.print(" meters, "); Serial.print(ALTITUDE*3.28084,0); Serial.println(" feet"); // If you want to measure altitude, and not pressure, you will instead need // to provide a known baseline pressure. This is shown at the end of the sketch. // You must first get a temperature measurement to perform a pressure reading. // Start a temperature measurement: // If request is successful, the number of ms to wait is returned. // If request is unsuccessful, 0 is returned. status = pressure.startTemperature(); if (status != 0) { // Wait for the measurement to complete: delay(status); // Retrieve the completed temperature measurement: // Note that the measurement is stored in the variable T. // Function returns 1 if successful, 0 if failure. status = pressure.getTemperature(T); if (status != 0) { // Print out the measurement: Serial.print("temperature: "); Serial.print(T,2); Serial.print(" deg C, "); Serial.print((9.0/5.0)*T+32.0,2); Serial.println(" deg F"); // Start a pressure measurement: // The parameter is the oversampling setting, from 0 to 3 (highest res, longest wait). // If request is successful, the number of ms to wait is returned. // If request is unsuccessful, 0 is returned. status = pressure.startPressure(3); if (status != 0) { // Wait for the measurement to complete: delay(status); // Retrieve the completed pressure measurement: // Note that the measurement is stored in the variable P. // Note also that the function requires the previous temperature measurement (T). // (If temperature is stable, you can do one temperature measurement for a number of pressure measurements.) // Function returns 1 if successful, 0 if failure. status = pressure.getPressure(P,T); if (status != 0) { // Print out the measurement: Serial.print("absolute pressure: "); Serial.print(P,2); Serial.print(" mb, "); Serial.print(P*0.0295333727,2); Serial.println(" inHg"); // The pressure sensor returns abolute pressure, which varies with altitude. // To remove the effects of altitude, use the sealevel function and your current altitude. // This number is commonly used in weather reports. // Parameters: P = absolute pressure in mb, ALTITUDE = current altitude in m. // Result: p0 = sea-level compensated pressure in mb p0 = pressure.sealevel(P,ALTITUDE); // we're at 1655 meters (Boulder, CO) Serial.print("relative (sea-level) pressure: "); Serial.print(p0,2); Serial.print(" mb, "); Serial.print(p0*0.0295333727,2); Serial.println(" inHg"); // On the other hand, if you want to determine your altitude from the pressure reading, // use the altitude function along with a baseline pressure (sea-level or other). // Parameters: P = absolute pressure in mb, p0 = baseline pressure in mb. // Result: a = altitude in m. a = pressure.altitude(P,p0); Serial.print("computed altitude: "); Serial.print(a,0); Serial.print(" meters, "); Serial.print(a*3.28084,0); Serial.println(" feet"); } else Serial.println("error retrieving pressure measurement\n"); } else Serial.println("error starting pressure measurement\n"); } else Serial.println("error retrieving temperature measurement\n"); } else Serial.println("error starting temperature measurement\n"); delay(5000); // Pause for 5 seconds. } |
Code flashen:
Voordat je de module kan aansluiten, verbind GPIO 0 op GND en flash de code in de ESP8266 module.
Module aansluiten:
Eenmaal de code geflashed, Sluit de module aan volgens onderstaand schema:

Het resultaat via de seriële monitor:
|
1 2 3 4 5 6 7 8 9 10 11 12 13 14 15 16 17 |
provided altitude: 1655 meters, 5430 feet temperature: 19.74 deg C, 67.52 deg F absolute pressure: 1006.12 mb, 29.71 inHg relative (sea-level) pressure: 1228.81 mb, 36.29 inHg computed altitude: 1655 meters, 5430 feet provided altitude: 1655 meters, 5430 feet temperature: 27.28 deg C, 81.11 deg F absolute pressure: 1025.25 mb, 30.28 inHg relative (sea-level) pressure: 1252.17 mb, 36.98 inHg computed altitude: 1655 meters, 5430 feet provided altitude: 1655 meters, 5430 feet temperature: 29.04 deg C, 84.28 deg F absolute pressure: 1029.60 mb, 30.41 inHg relative (sea-level) pressure: 1257.49 mb, 37.14 inHg computed altitude: 1655 meters, 5430 feet |
![]()
![]()
Wat heb je nodig?
1) ESPlorer IDE
Sluit de BMP module aan op volgens onderstaand schema:
BMP script
Upload deze “library” code als bmp085.lua
Tip: Download de code sla het op als bestand, en gebruik de “Upload…” knop in ESPlorer.
|
1 2 3 4 5 6 7 8 9 10 11 12 13 14 15 16 17 18 19 20 21 22 23 24 25 26 27 28 29 30 31 32 33 34 35 36 37 38 39 40 41 42 43 44 45 46 47 48 49 50 51 52 53 54 55 56 57 58 59 60 61 62 63 64 65 66 67 68 69 70 71 72 73 74 75 76 77 78 79 80 81 82 83 84 85 86 87 88 89 90 91 92 93 94 95 96 97 98 99 100 101 102 103 104 |
------------------------------------------------------------------------------ -- BMP085 query module -- -- LICENCE: http://opensource.org/licenses/MIT -- Vladimir Dronnikov <dronnikov@gmail.com> -- Heavily based on work of Christee <Christee@nodemcu.com> -- -- Example: -- print(dofile("bmp085.lua").read(sda, scl)) ------------------------------------------------------------------------------ local M do -- cache local i2c, tmr = i2c, tmr -- helpers local r8 = function(reg) i2c.start(0) i2c.address(0, 0x77, i2c.TRANSMITTER) i2c.write(0, reg) i2c.stop(0) i2c.start(0) i2c.address(0, 0x77, i2c.RECEIVER) local r = i2c.read(0, 1) i2c.stop(0) return r:byte(1) end local w8 = function(reg, val) i2c.start(0) i2c.address(0, 0x77, i2c.TRANSMITTER) i2c.write(0, reg) i2c.write(0, val) i2c.stop(0) end local r16u = function(reg) return r8(reg) * 256 + r8(reg + 1) end local r16 = function(reg) local r = r16u(reg) if r > 32767 then r = r - 65536 end return r end -- calibration data local AC1, AC2, AC3, AC4, AC5, AC6, B1, B2, MC, MD -- read local read = function(sda, scl, oss) i2c.setup(0, sda, scl, i2c.SLOW) -- cache calibration data if not AC1 then AC1 = r16(0xAA) AC2 = r16(0xAC) AC3 = r16(0xAE) AC4 = r16u(0xB0) AC5 = r16u(0xB2) AC6 = r16u(0xB4) B1 = r16(0xB6) B2 = r16(0xB8) MC = r16(0xBC) MD = r16(0xBE) end if not oss then oss = 0 end if oss <= 0 then oss = 0 end if oss > 3 then oss = 3 end -- get T w8(0xF4, 0x2E) tmr.delay(5000) local t = r16(0xF6) local X1 = (t - AC6) * AC5 / 32768 local X2 = MC * 2048 / (X1 + MD) t = (X2 + X1 + 8) / 16 -- get raw P w8(0xF4, 0x34 + 64 * oss) tmr.delay((4 + 3 ^ oss) * 1000) local p = (r8(0xF6) * 65536 + r8(0xF7) * 256 + r8(0xF8)) / 2 ^ (8 - oss) -- normalize P local B6 = t * 16 - 8 - 4000 local X1 = B2 * (B6 * B6 / 4096) / 2048 local X2 = AC2 * B6 / 2048 local X3 = X1 + X2 local B3 = ((AC1 * 4 + X3) * 2 ^ oss + 2) / 4 X1 = AC3 * B6 / 8192 X2 = (B1 * (B6 * B6 / 4096)) / 65536 X3 = (X1 + X2 + 2) / 4 local B4 = AC4 * (X3 + 32768) / 32768 local B7 = (p - B3) * (50000 / 2 ^ oss) p = B7 / B4 * 2 X1 = (p / 256) ^ 2 X1 = (X1 * 3038) / 65536 X2 = (-7357 * p) / 65536 p = p + (X1 + X2 + 3791) / 16 -- Celsius * 10, Hg mm * 10 p = p * 3 / 40 -- has floats? divide by 10 if 1/2 ~= 0 then t, p = t / 10, p / 10 end -- return t, p end -- expose M = { read = read, } end return M |
Gebruik de volgende regel om de temperatuur en luchtdruk weer te geven:
print(dofile("bmp180.lua").read(3, 4))
waarbij 3, 4 de SDA/SCL verbindig is, geen gegeven of hele afwijkende waarden?, draad de SCL/SDA verbindingen om.
resultaat:
|
1 2 3 4 5 6 |
> print(dofile("bmp180.lua").read(4, 3)) 19.464115828258 753.49008363561 > print(dofile("bmp180.lua").read(4, 3)) 25.942454628487 753.44345613436 > print(dofile("bmp180.lua").read(4, 3)) 28.020052654712 753.45755279213 |
Getest met NodeMCU 0.9.6 build 20150704 floating point en bmp180
bron:
dvv @ github.com
BMP script met webserver
Let op: firmare NodeMCU 0.9.6 build 20150704 floating point nodig!, download hier
Upload deze “library” code als bmp180.lua
Tip: Download de code sla het op als bestand, en gebruik de “Upload…” knop in ESPlorer.
|
1 2 3 4 5 6 7 8 9 10 11 12 13 14 15 16 17 18 19 20 21 22 23 24 25 26 27 28 29 30 31 32 33 34 35 36 37 38 39 40 41 42 43 44 45 46 47 48 49 50 51 52 53 54 55 56 57 58 59 60 61 62 63 64 65 66 67 68 69 70 71 72 73 74 75 76 77 78 79 80 81 82 83 84 85 86 87 88 89 90 91 92 93 94 95 96 97 98 99 100 101 102 103 104 105 106 107 108 109 110 111 112 113 114 115 116 117 118 119 120 121 122 123 124 125 126 127 128 129 130 131 132 133 134 135 136 137 138 139 140 141 142 143 144 145 146 147 148 149 150 151 152 |
-- *************************************************************************** -- BMP180 module for ESP8266 with nodeMCU -- BMP085 compatible but not tested -- -- Written by Javier Yanez -- -- MIT license, http://opensource.org/licenses/MIT -- *************************************************************************** local moduleName = ... local M = {} _G[moduleName] = M local ADDR = 0x77 --BMP180 address local REG_CALIBRATION = 0xAA local REG_CONTROL = 0xF4 local REG_RESULT = 0xF6 local COMMAND_TEMPERATURE = 0x2E local COMMAND_PRESSURE = {0x34, 0x74, 0xB4, 0xF4} -- calibration coefficients local AC1, AC2, AC3, AC4, AC5, AC6, B1, B2, MB, MC, MD -- temperature and pressure local t,p local init = false -- i2c interface ID local id = 0 -- 16-bit two's complement -- value: 16-bit integer local function twoCompl(value) if value > 32767 then value = -(65535 - value + 1) end return value end -- read data register -- reg_addr: address of the register in BMP180 -- lenght: bytes to read local function read_reg(reg_addr, length) i2c.start(id) i2c.address(id, ADDR, i2c.TRANSMITTER) i2c.write(id, reg_addr) i2c.stop(id) i2c.start(id) i2c.address(id, ADDR,i2c.RECEIVER) c = i2c.read(id, length) i2c.stop(id) return c end -- write data register -- reg_addr: address of the register in BMP180 -- reg_val: value to write to the register local function write_reg(reg_addr, reg_val) i2c.start(id) i2c.address(id, ADDR, i2c.TRANSMITTER) i2c.write(id, reg_addr) i2c.write(id, reg_val) i2c.stop(id) end -- initialize module -- sda: SDA pin -- scl SCL pin function M.init(sda, scl) i2c.setup(id, sda, scl, i2c.SLOW) local calibration = read_reg(REG_CALIBRATION, 22) AC1 = twoCompl(string.byte(calibration, 1) * 256 + string.byte(calibration, 2)) AC2 = twoCompl(string.byte(calibration, 3) * 256 + string.byte(calibration, 4)) AC3 = twoCompl(string.byte(calibration, 5) * 256 + string.byte(calibration, 6)) AC4 = string.byte(calibration, 7) * 256 + string.byte(calibration, 8) AC5 = string.byte(calibration, 9) * 256 + string.byte(calibration, 10) AC6 = string.byte(calibration, 11) * 256 + string.byte(calibration, 12) B1 = twoCompl(string.byte(calibration, 13) * 256 + string.byte(calibration, 14)) B2 = twoCompl(string.byte(calibration, 15) * 256 + string.byte(calibration, 16)) MB = twoCompl(string.byte(calibration, 17) * 256 + string.byte(calibration, 18)) MC = twoCompl(string.byte(calibration, 19) * 256 + string.byte(calibration, 20)) MD = twoCompl(string.byte(calibration, 21) * 256 + string.byte(calibration, 22)) init = true end -- read temperature from BMP180 local function read_temp() write_reg(REG_CONTROL, COMMAND_TEMPERATURE) tmr.delay(5000) local dataT = read_reg(REG_RESULT, 2) UT = string.byte(dataT, 1) * 256 + string.byte(dataT, 2) local X1 = (UT - AC6) * AC5 / 32768 local X2 = MC * 2048 / (X1 + MD) B5 = X1 + X2 t = (B5 + 8) / 16 return(t) end -- read pressure from BMP180 -- must be read after read temperature local function read_pressure(oss) write_reg(REG_CONTROL, COMMAND_PRESSURE[oss + 1]); tmr.delay(30000); local dataP = read_reg(0xF6, 3) local UP = string.byte(dataP, 1) * 65536 + string.byte(dataP, 2) * 256 + string.byte(dataP, 1) UP = UP / 2 ^ (8 - oss) local B6 = B5 - 4000 local X1 = B2 * (B6 * B6 / 4096) / 2048 local X2 = AC2 * B6 / 2048 local X3 = X1 + X2 local B3 = ((AC1 * 4 + X3) * 2 ^ oss + 2) / 4 X1 = AC3 * B6 / 8192 X2 = (B1 * (B6 * B6 / 4096)) / 65536 X3 = (X1 + X2 + 2) / 4 local B4 = AC4 * (X3 + 32768) / 32768 local B7 = (UP - B3) * (50000/2 ^ oss) p = (B7 / B4) * 2 X1 = (p / 256) * (p / 256) X1 = (X1 * 3038) / 65536 X2 = (-7357 * p) / 65536 p = p +(X1 + X2 + 3791) / 16 return (p) end -- read temperature and pressure from BMP180 -- oss: oversampling setting. 0-3 function M.read(oss) if (oss == nil) then oss = 0 end if (not init) then print("init() must be called before read.") else read_temp() read_pressure(oss) end end; -- get temperature function M.getTemperature() return t end -- get pressure function M.getPressure() return p end return M |
Upload deze server code als srvbmp180.lua
Tip: Download de code sla het op als bestand, en gebruik de “Upload…” knop in ESPlorer.
|
1 2 3 4 5 6 7 8 9 10 11 12 13 14 15 16 17 18 19 20 21 22 23 24 25 26 27 28 29 30 31 32 33 34 35 36 37 38 39 40 41 42 43 44 45 46 47 48 49 50 51 52 53 54 55 56 57 58 59 60 61 62 63 64 65 66 67 68 69 70 71 72 |
-- Demo http server for sensors BMP180/BMP085 -- Tested with Lua NodeMCU 0.9.6 build 20150704 floating point only! -- 1. Flash Lua NodeMCU 0.9.6 build 20150704 floating point to esp8266 module. -- 2. Login esp8266 module to your AP - wifi.setmode(wifi.STATION),wifi.sta.config("yourSSID","yourPASSWORD") -- 3. You can rename the program "srvbmp180.lua" to "init.lua" and correct altitude -- 4. Load program "bmp180.lua" and "srvbmp180.lua" to ESP8266 with a LuaLoader -- 5. HW reset module -- 6. Read ip address of module esp8266 from console "= wifi.sta.getip()" -- 7. Run program "srvbmp180.lua" - dofile("srvbmp180.lua") -- 8. Test it with your browser and true IP address of module. -- 9. The sensor is repeatedly reading every 10s --11. Data on http page are auto refreshed every 10s too. --12. The pictures on page are external. --************************************************************** alti=170 -- set correction for your altitude location in meters --************************************************************** wifi.setmode(wifi.STATION) --wifi.sta.config("yourSSID","yourPASSWORD") wifi.sta.connect() sda=4 -- GPIO2 connect to SDA BMP180 scl=3 -- GPIO0 connect to SCL BMP180 pres=0 -- pressure temp=0 -- temperature fare=0 -- temperature oss=0 -- over sampling setting --load BMP module for reading sensor function ReadBMP() bmp180 = require("bmp180") bmp180.init(sda, scl) bmp180.read(oss) pres = bmp180.getPressure()/100+alti/8.43 temp = bmp180.getTemperature()/10 fare=(temp*9/5+32) print("Pressure: "..string.format("%.1f",pres).." hPa") print("Temperature: "..string.format("%.1f",temp).." deg C") print("Temperature: "..string.format("%.1f",fare).." deg F") print(" ") -- release module bmp180 = nil package.loaded["bmp180"]=nil end -- First reading data ReadBMP() -- Periodic reading of the sensor tmr.alarm(1,10000,1, function()ReadBMP()end) srv=net.createServer(net.TCP) srv:listen(80,function(conn) conn:on("receive",function(conn,payload) --print(payload) -- for debugging only strstr={string.find(payload,"GET / HTTP/1.1")} if(strstr[1]~=nil)then --generates HTML web site conn:send('HTTP/1.1 200 OK\r\nConnection: keep-alive\r\nCache-Control: private, no-store\r\n\r\n\ <!DOCTYPE HTML>\ <html><head><meta content="text/html;charset=utf-8"><title>ESP8266</title>\ <meta http-equiv="refresh" content="10;url=/"></head>\ <body bgcolor="#ffe4c4"><h2>Barometer with I2C sensor<br>BMP180 or BMP85</h2>\ <h3><font color="green">\ <IMG SRC="http://esp8266.fancon.cz/bmp180/bar.gif"WIDTH="64"HEIGHT="64"><br>\ <input style="text-align: center"type="text"size=6 name="j"value="'..string.format("%.1f",pres)..'"> Atmos. pressure hPa<br><br>\ <IMG SRC="http://esp8266.fancon.cz/bmp180/tmp.gif"WIDTH="64"HEIGHT="64"><br>\ <input style="text-align: center"type="text"size=4 name="p"value="'..string.format("%.1f",temp)..'"> Temperature grade C<br>\ <input style="text-align: center"type="text"size=4 name="s"value="'..string.format("%.1f",fare)..'"> Temperature grade F</font></h3>\ <h6>Tested with Lua NodeMCU<br> 0.9.6 build 20150704 float!</h6>') end conn:on("sent",function(conn) conn:close() end) end) end) |
Instructies (ENG)
— Tested with Lua NodeMCU 0.9.6 build 20150704 floating point only!
— 1. Flash Lua NodeMCU 0.9.6 build 20150704 floating point to esp8266 module.
— 2. Login esp8266 module to your AP – wifi.setmode(wifi.STATION),wifi.sta.config(“yourSSID”,”yourPASSWORD”)
— 3. You can rename the program “srvbmp180.lua” to “init.lua” and correct altitude
— 4. Load program “bmp180.lua” and “srvbmp180.lua” to ESP8266 with a LuaLoader
— 5. HW reset module
— 6. Read ip address of module esp8266 from console “= wifi.sta.getip()”
— 7. Run program “srvbmp180.lua” – dofile(“srvbmp180.lua”)
— 8. Test it with your browser and true IP address of module.
— 9. The sensor is repeatedly reading every 10s
–11. Data on http page are auto refreshed every 10s too.
–12. The pictures on page are external.
Ps. Geen gegevens?, draai de SCL en SDA kabeltjes om, of verander pin 3,4 in pin 4,3 in de code.
Na het draaien van de server code krijg je deze data via de seriele interface:
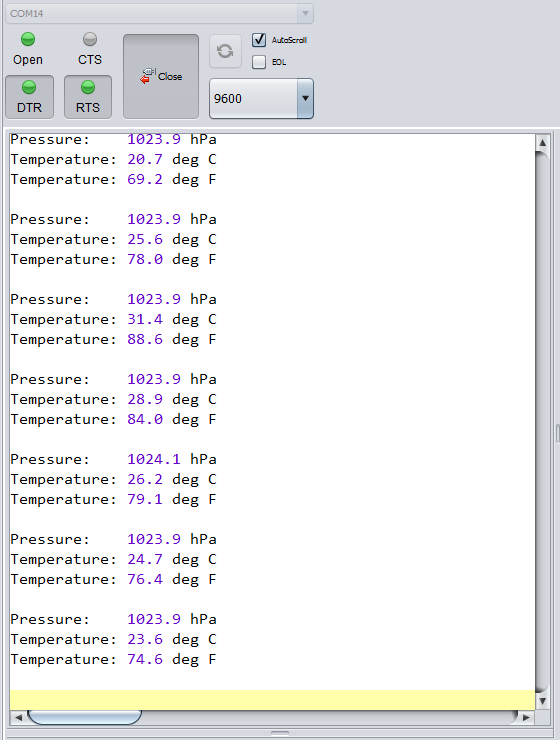
Dit is de webinterface (ververst zichzelf):

Bron:
esp8266.com
Raspberry Pi
Sluit de module aan zoals aangegeven op onderstaand schema:
| Raspberry Pi pin: | I2C module pin: |
|---|---|
| +5v | +5v |
| GND | GND |
| 3 (GPIO2) SDA | SDA |
| 5 (GPIO3) SCL | SCL |

Wat moet je doen?
1) I2C aanzetten op de Pi.
2) SMBUS module installeren voor Python:
Om de I2C bus in Python te gebruiken moet je een module installeren, genaamd SMBUS, commando:
sudo apt-get install python-smbus
|
1 2 3 4 5 6 7 8 9 10 11 12 13 14 |
Reading package lists... Done Building dependency tree Reading state information... Done The following NEW packages will be installed: python-smbus 0 upgraded, 1 newly installed, 0 to remove and 79 not upgraded. Need to get 11.9 kB of archives. After this operation, 95.2 kB of additional disk space will be used. Get:1 http://archive.raspberrypi.org/debian/ wheezy/main python-smbus armhf 3.1.1+svn-1 [11.9 kB] Fetched 11.9 kB in 0s (131 kB/s) Selecting previously unselected package python-smbus. (Reading database ... 78301 files and directories currently installed.) Unpacking python-smbus (from .../python-smbus_3.1.1+svn-1_armhf.deb) ... Setting up python-smbus (3.1.1+svn-1) ... |
Je kan dan de module importeren in python door middel van: import smbus
Controleren van de aansluiting
Om de aansluiting van de module te controleren voor je het volgende commando uit: sudo i2cdetect -y 1, je ziet dan adres 0x77 staan in de lijst:
|
1 2 3 4 5 6 7 8 9 10 |
pi@raspberrypi:~ $ sudo i2cdetect -y 1 0 1 2 3 4 5 6 7 8 9 a b c d e f 00: -- -- -- -- -- -- -- -- -- -- -- -- -- 10: -- -- -- -- -- -- -- -- -- -- -- -- -- -- -- -- 20: -- -- -- -- -- -- -- -- -- -- -- -- -- -- -- -- 30: -- -- -- -- -- -- -- -- -- -- -- -- -- -- -- -- 40: -- -- -- -- -- -- -- -- -- -- -- -- -- -- -- -- 50: -- -- -- -- -- -- -- -- -- -- -- -- -- -- -- -- 60: -- -- -- -- -- -- -- -- -- -- -- -- -- -- -- -- 70: -- -- -- -- -- -- -- 77 |
Script
Het script bmp.py om de module uit te lezen:
|
1 2 3 4 5 6 7 8 9 10 11 12 13 14 15 16 17 18 19 20 21 22 23 24 25 26 27 28 29 30 31 32 33 34 35 36 37 38 39 40 41 42 43 44 45 46 47 48 49 50 51 52 53 54 55 56 57 58 59 60 61 62 63 64 65 66 67 68 69 70 71 72 73 74 75 76 77 78 79 80 81 82 83 84 85 86 87 88 89 90 91 92 93 94 |
#!/usr/bin/python # BMP180 luchtdruk + temperatuur sensor # Gebaseerd op een script gemaakt door Matt Hawkins import smbus import time from ctypes import c_short DEVICE = 0x77 bus = smbus.SMBus(1) def convertToString(data): return str((data[1] + (256 * data[0])) / 1.2) def getShort(data, index): return c_short((data[index] << 8) + data[index + 1]).value def getUshort(data, index): return (data[index] << 8) + data[index + 1] def readBmp180(addr=DEVICE): REG_CALIB = 0xAA REG_MEAS = 0xF4 REG_MSB = 0xF6 REG_LSB = 0xF7 CRV_TEMP = 0x2E CRV_PRES = 0x34 OVERSAMPLE = 3 cal = bus.read_i2c_block_data(addr, REG_CALIB, 22) AC1 = getShort(cal, 0) AC2 = getShort(cal, 2) AC3 = getShort(cal, 4) AC4 = getUshort(cal, 6) AC5 = getUshort(cal, 8) AC6 = getUshort(cal, 10) B1 = getShort(cal, 12) B2 = getShort(cal, 14) MB = getShort(cal, 16) MC = getShort(cal, 18) MD = getShort(cal, 20) # Lees Temperatuur bus.write_byte_data(addr, REG_MEAS, CRV_TEMP) time.sleep(0.005) (msb, lsb) = bus.read_i2c_block_data(addr, REG_MSB, 2) UT = (msb << 8) + lsb # Lees Luchtdruk bus.write_byte_data(addr, REG_MEAS, CRV_PRES + (OVERSAMPLE << 6)) time.sleep(0.04) (msb, lsb, xsb) = bus.read_i2c_block_data(addr, REG_MSB, 3) UP = ((msb << 16) + (lsb << 8) + xsb) >> (8 - OVERSAMPLE) # Opmaak temperatuur X1 = ((UT - AC6) * AC5) >> 15 X2 = (MC << 11) / (X1 + MD) B5 = X1 + X2 temperature = (B5 + 8) >> 4 # Opmaak luchtdruk B6 = B5 - 4000 B62 = B6 * B6 >> 12 X1 = (B2 * B62) >> 11 X2 = AC2 * B6 >> 11 X3 = X1 + X2 B3 = (((AC1 * 4 + X3) << OVERSAMPLE) + 2) >> 2 X1 = AC3 * B6 >> 13 X2 = (B1 * B62) >> 16 X3 = ((X1 + X2) + 2) >> 2 B4 = (AC4 * (X3 + 32768)) >> 15 B7 = (UP - B3) * (50000 >> OVERSAMPLE) P = (B7 * 2) / B4 X1 = (P >> 8) * (P >> 8) X1 = (X1 * 3038) >> 16 X2 = (-7357 * P) >> 16 pressure = P + ((X1 + X2 + 3791) >> 4) return (temperature/10.0,pressure/ 100.0) def main(): deg = u'\xb0' (temperature,pressure)=readBmp180() print "Temperatuur : ", temperature,deg.encode('utf8'), "C" print "Luchtdruk : ", pressure, "mbar" if __name__=="__main__": main() |
Start het script met: sudo python bmp.py, resultaat:
|
1 2 |
Temperatuur : 26.2 ° C Luchtdruk : 1024.69 mbar |
Bron(nen):
raspberrytips.nl
learn.adafruit.com
Script met Adafruit BMP085 180 Library
|
1 2 3 4 5 6 7 8 9 10 11 12 13 14 15 16 17 18 19 20 21 22 23 24 25 26 27 28 29 |
# Can enable debug output by uncommenting: #import logging #logging.basicConfig(level=logging.DEBUG) import Adafruit_BMP.BMP085 as BMP085 # Default constructor will pick a default I2C bus. # # For the Raspberry Pi this means you should hook up to the only exposed I2C bus # from the main GPIO header and the library will figure out the bus number based # on the Pi's revision. # # For the Beaglebone Black the library will assume bus 1 by default, which is # exposed with SCL = P9_19 and SDA = P9_20. sensor = BMP085.BMP085() # Optionally you can override the bus number: #sensor = BMP085.BMP085(busnum=2) # You can also optionally change the BMP085 mode to one of BMP085_ULTRALOWPOWER, # BMP085_STANDARD, BMP085_HIGHRES, or BMP085_ULTRAHIGHRES. See the BMP085 # datasheet for more details on the meanings of each mode (accuracy and power # consumption are primarily the differences). The default mode is STANDARD. #sensor = BMP085.BMP085(mode=BMP085.BMP085_ULTRAHIGHRES) print('Temp = {0:0.2f} *C'.format(sensor.read_temperature())) print('Pressure = {0:0.2f} Pa'.format(sensor.read_pressure())) print('Altitude = {0:0.2f} m'.format(sensor.read_altitude())) print('Sealevel Pressure = {0:0.2f} Pa'.format(sensor.read_sealevel_pressure())) |
Raspberry Pi Library
This library has been deprecated!
the bmp085 and bmp180 are no longer made, and are replaced by the bmp280 + friends
we are now only using our circuitpython sensor libraries in python
we are leaving the code up for historical/research purposes but archiving the repository.
check out this guide for using the bmp280 with python! https://learn.adafruit.com/adafruit-bmp280-barometric-pressure-plus-temperature-sensor-breakout
Adafruit Python BMP
Python library for accessing the BMP series pressure and temperature sensors like the BMP085/BMP180 on a Raspberry Pi or Beaglebone Black.
Designed specifically to work with the Adafruit BMP085/BMP180 pressure sensors —-> https://www.adafruit.com/products/1603
To install, download the library by clicking the download zip link to the right and unzip the archive somewhere on your Raspberry Pi or Beaglebone Black. Then execute the following command in the directory of the library:~~
|
1 2 |
sudo python setup.py install |
Make sure you have internet access on the device so it can download the required dependencies.
See examples of usage in the examples folder.
Adafruit invests time and resources providing this open source code, please support Adafruit and open-source hardware by purchasing products from Adafruit!
Written by Tony DiCola for Adafruit Industries. MIT license, all text above must be included in any redistribution
See examples of usage in the examples folder.
Also execute:
|
1 2 |
apt-get update sudo apt-get install python-dev <span class="pln">python</span><span class="pun">-</span><span class="pln">smbus</span> |
|
1 2 3 4 5 6 7 8 9 10 11 12 13 14 15 |
Reading package lists... Done Building dependency tree Reading state information... Done python-dev is already the newest version. The following NEW packages will be installed: python-smbus 0 upgraded, 1 newly installed, 0 to remove and 73 not upgraded. Need to get 0 B/9,462 B of archives. After this operation, 58.4 kB of additional disk space will be used. Do you want to continue? [Y/n] Y Selecting previously unselected package python-smbus. (Reading database ... 126340 files and directories currently installed.) Preparing to unpack .../python-smbus_3.1.1+svn-2_armhf.deb ... Unpacking python-smbus (3.1.1+svn-2) ... Setting up python-smbus (3.1.1+svn-2) ... |
Installatie via GIT (github)
|
1 |
sudo git clone https://github.com/adafruit/Adafruit_Python_BMP.git |
|
1 2 3 4 5 |
Cloning into 'Adafruit_Python_BMP'... remote: Counting objects: 69, done. remote: Total 69 (delta 0), reused 0 (delta 0), pack-reused 69 Unpacking objects: 100% (69/69), done. Checking connectivity... done. |
|
1 2 |
cd Adafruit_Python_BMP sudo python setup.py install |
|
1 2 3 4 5 6 7 8 9 10 11 12 13 14 15 16 17 18 19 20 21 22 23 24 25 26 27 28 29 30 31 32 33 34 35 36 37 38 39 40 41 42 43 44 45 46 47 48 49 50 51 52 53 54 55 56 57 58 59 60 61 62 63 64 65 66 67 68 69 |
running install running bdist_egg running egg_info creating Adafruit_BMP.egg-info writing requirements to Adafruit_BMP.egg-info/requires.txt writing Adafruit_BMP.egg-info/PKG-INFO writing top-level names to Adafruit_BMP.egg-info/top_level.txt writing dependency_links to Adafruit_BMP.egg-info/dependency_links.txt writing manifest file 'Adafruit_BMP.egg-info/SOURCES.txt' reading manifest file 'Adafruit_BMP.egg-info/SOURCES.txt' writing manifest file 'Adafruit_BMP.egg-info/SOURCES.txt' installing library code to build/bdist.linux-armv7l/egg running install_lib running build_py creating build creating build/lib.linux-armv7l-2.7 creating build/lib.linux-armv7l-2.7/Adafruit_BMP copying Adafruit_BMP/__init__.py -> build/lib.linux-armv7l-2.7/Adafruit_BMP copying Adafruit_BMP/BMP085.py -> build/lib.linux-armv7l-2.7/Adafruit_BMP creating build/bdist.linux-armv7l creating build/bdist.linux-armv7l/egg creating build/bdist.linux-armv7l/egg/Adafruit_BMP copying build/lib.linux-armv7l-2.7/Adafruit_BMP/__init__.py -> build/bdist.linux-armv7l/egg/Adafruit_BMP copying build/lib.linux-armv7l-2.7/Adafruit_BMP/BMP085.py -> build/bdist.linux-armv7l/egg/Adafruit_BMP byte-compiling build/bdist.linux-armv7l/egg/Adafruit_BMP/__init__.py to __init__.pyc byte-compiling build/bdist.linux-armv7l/egg/Adafruit_BMP/BMP085.py to BMP085.pyc creating build/bdist.linux-armv7l/egg/EGG-INFO copying Adafruit_BMP.egg-info/PKG-INFO -> build/bdist.linux-armv7l/egg/EGG-INFO copying Adafruit_BMP.egg-info/SOURCES.txt -> build/bdist.linux-armv7l/egg/EGG-INFO copying Adafruit_BMP.egg-info/dependency_links.txt -> build/bdist.linux-armv7l/egg/EGG-INFO copying Adafruit_BMP.egg-info/requires.txt -> build/bdist.linux-armv7l/egg/EGG-INFO copying Adafruit_BMP.egg-info/top_level.txt -> build/bdist.linux-armv7l/egg/EGG-INFO zip_safe flag not set; analyzing archive contents... creating dist creating 'dist/Adafruit_BMP-1.5.2-py2.7.egg' and adding 'build/bdist.linux-armv7l/egg' to it removing 'build/bdist.linux-armv7l/egg' (and everything under it) Processing Adafruit_BMP-1.5.2-py2.7.egg Copying Adafruit_BMP-1.5.2-py2.7.egg to /usr/local/lib/python2.7/dist-packages Adding Adafruit-BMP 1.5.2 to easy-install.pth file Installed /usr/local/lib/python2.7/dist-packages/Adafruit_BMP-1.5.2-py2.7.egg Processing dependencies for Adafruit-BMP==1.5.2 Searching for Adafruit-GPIO>=0.6.5 Best match: Adafruit-GPIO 0.6.5 Downloading https://github.com/adafruit/Adafruit_Python_GPIO/tarball/master#egg=Adafruit-GPIO-0.6.5 Processing master Writing /tmp/easy_install-8yI1Vs/adafruit-Adafruit_Python_GPIO-5abc5d2/setup.cfg Running adafruit-Adafruit_Python_GPIO-5abc5d2/setup.py -q bdist_egg --dist-dir /tmp/easy_install-8yI1Vs/adafruit-Adafruit_Python_GPIO-5abc5d2/egg-dist-tmp-d7cGQF zip_safe flag not set; analyzing archive contents... Adding Adafruit-GPIO 1.0.1 to easy-install.pth file Installed /usr/local/lib/python2.7/dist-packages/Adafruit_GPIO-1.0.1-py2.7.egg Searching for adafruit-pureio Reading https://pypi.python.org/simple/adafruit-pureio/ Best match: Adafruit-PureIO 0.2.1 Downloading https://pypi.python.org/packages/55/fa/99b1006fb4bb356762357b297d8db6ec9ffa13af480692ab72aa4a0dd0c4/Adafruit_PureIO-0.2.1.tar.gz#md5=5b3276059eb55d6c37429a8413a92029 Processing Adafruit_PureIO-0.2.1.tar.gz Writing /tmp/easy_install-nlQUih/Adafruit_PureIO-0.2.1/setup.cfg Running Adafruit_PureIO-0.2.1/setup.py -q bdist_egg --dist-dir /tmp/easy_install-nlQUih/Adafruit_PureIO-0.2.1/egg-dist-tmp-fvkcOq zip_safe flag not set; analyzing archive contents... Adding Adafruit-PureIO 0.2.1 to easy-install.pth file Installed /usr/local/lib/python2.7/dist-packages/Adafruit_PureIO-0.2.1-py2.7.egg Searching for spidev==3.0 Best match: spidev 3.0 Adding spidev 3.0 to easy-install.pth file Using /usr/lib/python2.7/dist-packages Finished processing dependencies for Adafruit-BMP==1.5.2 |
Schema

Teardown
Binnenkant:

Datasheet
Fritzing
Downloads
GEEN GEGEVENS